With Shimano adding 12 speed GRX to the line up Fustle have refined their line up for 2024, simplifying the choices on this excellent frame set. Designed in Northern Ireland these bikes just excel off road and on (yes, I’ve got one myself!) here’s the press release from Alistair Becket, designer and owner at Fustle.
FUSTLE MY2024
As we approach the end of the summer of 2023 (if we can call the torrential rain and colder than average temperates ‘summer’) it marks a milestone in the life span of FUSTLE. We launched in 2019 as a small family run brand, with big ideas, but an even bigger challenge ahead of us, although we didn’t know it at the time.
We have learned a lot, we have had some great luck along the way, and some poor luck at the same time, but our customers have remained as fantastic as we could ever hoped for.
What we have learned in the last 3 or so years is that we thrive when we make products that people don’t know they need, and for MY2024 we have taken this approach exactly.
Gone are the huge variety of custom build options.
Gone are the similar looking specifications that only service to cause confusion amongst our potential new customers.
Here to stay is our proven and award winning Causeway GR1.1 frame and fork kit. We are yet to find a way to make significant improvements to this chassis (and we have tried, with multiple prototypes that are unlikely to make the light of day) so we decided to continue with this chassis and focus our efforts at refining the component choices to really maximise the experience of riding one of our bikes.
What we have done is split our bike range into 2 very clear categories, and then offered 2 spec levels and 2 price points within those.
We have chosen specifications that we feel make the bikes unique and considered for their specific purpose, and feel the latest developments in technology have only served to enable us to refine these products exactly the way we have wanted to for some time.
BACKROAD: Available in both ‘Core’ and ‘Control’ spec tiers.
All of our backroad bikes make use of the very latest Shimano GRX 2×12 groupsets, and are designed for those riders who thrive on endless fire-road adventures, bike packing expeditions and even serves well as your brand new winter road bike given hal the chance.
A refined build kit with lower rolling restistance tyre choices, and proven wide flared cockpit, make these models the ultimate go to gravel bike for anyone with a background or an appetite for riding.
TRAIL: Available in both ‘Core’ and ‘Control’ spec tiers.
Where it all started for FUSTLE with our award winning gravity inspired gravel bikes, the Trail builds utilise the very latest Shimano 1×12 groupset, offering a wide enough range to get up into the mountains, and all the MTB tech to keep your chain in place no matter how excited you get on the way back down.
Retail Pricing: Inc free shipping within UK and EU
Backroad Core: RRP £2249.99
Backroad Control; RRP £2499.99
Trail Core: RRP £2249.99
Trail Control: RRP £2649.99
All of our bikes are available for pre order today, with the ‘Control’ models available for dispatch in October 2023, and ‘Core’ models available for dispatch in November 2023.
USE (Ultimate Sports Engineering) are probably better known for their excellent range of bike lights but they also have a range of bike components for which they use the brand name “Ultimate”. One such component is the Vybe Duro suspension seatpost.
This particular post is made from aluminium and gives up to 50mm of travel that is controlled by an elastomer/spring stack contained inside the seat post shaft. There are no pivots or springs visible, just a neat shaft entering the post via a wiper seal. It is very reminiscent of a dropper post in looks but it does not function like a dropper.
When ordering the post it’s important to check the rider weight guide and choose the density of spring and elastomer that you’ll need. I’m not the most svelte of riders so I went with the hard spring option, but you can buy the others, soft, med etc if you want to change the rate of compression or you lose or gain weight.
the post is available in all the popular seat tube diameters (this one is 27.2mm) and the clamp is a very simple to use clam shell design with one single bolt to adjust fore-aft and pivot up and down. if you have a carbon rail saddle or one with unusual shape rails you’ll need to specify this when ordering. My saddle is bog standard and it took literally seconds to fit and adjust, a refreshing change from some complicated designs on other posts.
Adjustment to the post is via a threaded disc at the end of the shaft, a simple turn with an Allen key to compress or uncompress the spring is all there is to it. It’s very maintenance shy people friendly! I popped the post into the bike, set the height while it was at full extension and went off in search of something bumpy to ride.
Over the course of the next couple of months I was able to try the post out in both sopping wet and muddy and bone hard dry conditions. the first ride i noticed the post had a quite harsh and loud top out clunk (when the post extended back after being compressed down) For the next ride I wound in the disc inside the post a few turns and this stopped the clunk completely.
It’s very hard to photograph a suspension seatpost working while you are sat on it and harder to video without a film crew following you filming your backside, i wouldn’t inflict that on anyone so what i did do is ask anyone riding with me to have a look as we were riding along to check to see if the post was moving. The thing is when you get the post dialled in the movement is quite subtle and you hardly notice it. I can say definitely that it works though from the feedback from riders staring at my ass! When the going got really bumpy, the time any normal person would stand on the pedals and absorb the bumps with their legs I chose to stay seated, just for testing purposes and I could feel the post working then.
At 434g (on my bog standard non verified set of scales) the Vybe post is never going to be as light as a standard seat post but a standard seatpost will not give you that little bit of give that could mean the difference of a longer day in the saddle and quicker recovery from the chatter of rough trails to ride again the next day and that is worth a few extra grams in my mind. I didn’t notice it moving too much when riding on tarmac either.
The fact that the post is pretty much maintenance free, just wipe it down post ride is a bonus too. I have to say compared to parallelogram designs the Vybe is a lot prettier to look at and it looks like a quality item. I chose the layback version as the post it was replacing on that particular bike had layback too but a non layback version is available also.
The Ultimate USE Vybe Duro shockpost is a well made, dare i say attractive suspension seatpost that really works, if you suffer lower back problems from the jarring some gravel routes give then it could be a solution for longer more comfortable rides and recovery. Its very user friendly too so popping it on for those rough rides and using a standard post for less violent stuff could be an option too.
find out more about the seatpost here Ultimate USE
If you are looking for inspiration for your next ride, be it long or short then look no further than either of these two books, bike packing Wales by Emma Kingston and bike packing Scotland by Markus Stitz
I feel its ok to review these two books side by side because rather than competing with each other they in fact compliment each other. look no further than these two books if you want to dip your toe in the bike packing water or are a seasoned leathery skinned wanderer as there are easier routes for the inexperienced (me!) to full on out there riding on lumpy terrain for those with more experience.
The full colour pictures just make you want to drop whatever you are doing, check the air in your tyres and head out the door on an adventure. A tremendous amount of work has gone into these books from both authors, there’s so much detail. not just about the route and the conditions you can expect at various times of year but also what to look out for on your ride. places of interest you might have just ridden past are listed as well as the essentials like food stops, pubs and bike shops.
The maps are comprehensive and detailed but as you probably won’t want to carry the book with you on the rides there are downloadable GPX file links for every route making it simple to transfer the route to you mapping computer of choice.
You can of course adapt the routes to suit yourself, I adapted a route from the Forest of Dean into Wales as i was tight on time and this is one of the things I like about these books, they are very versatile, you can dip in and out of them, use the published route or join them up for a longer ride. all the rides are graded and the grading system is explained so you get an idea if the route is suitable for you before you start.
The thing I like most about them though is Emma and Markus’s enthusiasm for just riding a bike as it seems to shine through on every page.
If you’ve ever thought about bike packing or just want to go ride your bike in some wonderful places bike packing Wales and bike packing Scotland are must have books, and even if you haven’t thought about it they are worth buying just to look at, i can’t guarantee you won’t be tempted to swing a leg over a bike and ride off into the countryside though!
you can buy these books direct from the publisher, always a good idea for the author
These are non affiliate links, ukgravelco makes not money if you click on these. If you’d like to support ukgravelco.com to ensure more reviews and articles like this then visit the shop here and buy a T shirt or some stickers or please follow the instagram, facebook group or youtube channel
as you can see, my sense of style hasn’t changed much!
The picture above is the first one I can find of me with a gravel bike back in 2018, I’d been dabbling by adding gravel-esque tyres to my rigid forked 29er MTB in the months before but although a flat bar gravel bike is now a thing I don’t think it counted way back then.
I was lucky enough to be working in a bike shop at the time and the manager let me use the demo gravel bike that we got in for the showroom. I was to showcase this new fangled bike genre and we thought having a bike that looked like it had been used as intended, i. e.- off road, would attract more customers to the idea than a nice shiny showroom pony. I wasn’t going to argue so for around 6 months I got to ride a Trek Checkpoint AL5 iirc. This was in the days before GRX and so the bike came with a Shimano 105 groupset. To preserve the drivetrain as the bike would be sold after the demo period I swapped the double chainset (even back then I felt the 50-34 road ratio was not ideal for an off road bike) for a cobbled together 38t single ring and added a wider range rear cassette which I think was an 11-44, revolutionary at the time! and added a frame bag to carry my lunch and cake money, again, nothing has changed there and went out exploring.
I’d ridden a road bike now and then but was always more of a MTB rider and while the MTB is great for exploring rugged off road routes, where I live the off road is pretty tame and can only be accessed by using roads or tarmac and even then the off road sections are short and sweet. The gravel bike then was the right tool for the job. I could ride 50 miles and the route could consist of 35 miles of tarmac and only 15 of off road but the tarmac bits wouldn’t be as tedious as they would be on a MTB and on the gravel bike if i spotted a new to me bridleway or track I could ride it to explore where it went, something I’d have been hesitant to do on a pure road bike for fear of punctures, mud and tyre clearance etc.
For me this was why gravel bikes were so exciting, it opened up areas I’d dismiss as too far away by MTB or even worse, that I’d have to drive to first before riding. The gravel bike for me was very much like getting your first proper bike when you were a kid, the difference from only being able to play outside your house and not being allowed to go further than the end of your road to being able to ride to the local park or woods (and further, sorry Mom and Dad!)
In its infancy gravel seemed the refuge away from the ultra serious road riders and believe me some of the customers who came in the shop were way too serious about road bikes and wanting to look like pro road riders to the point of duplicating the bike set ups of their hero’s even though it was clearly too extreme a position for them and was causing issues, with their full trade team kit, even though they weren’t sponsored #FKW For Gravel riding there were no rules, you could wear what you liked, ride what you liked, If you met up with other gravel riders it was more about the chat, the sharing of trails and routes and there was no mention of “you must be able to maintain this *insert inflated kph figure* to be able to ride with us and there definitely wasn’t a “if you get dropped, you’re on your own” rule that seems to be applied to every road club I’ve been involved with. I’ve taken riders out for their first gravel ride and their only experience was having ridden with road clubs and they are astonished that someone in the group would volunteer to go ahead and open a gate and wait until everyone else was through before shutting it and then catching up. “I can’t believe how everyone mucks in and supports each other, I love it” is something or a variant of it I’ve heard many times in the last five years.
Group riding is awesome, so many shared experiences and laughs with no pressure to be a riding expert or Iron man distance fit and this area of gravel was growing and growing and I’ve met so many cool people by sharing my or their routes but then a little pandemic hit the world in 2020 and suddenly all group rides were restricted and solo riding was the thing to do.
This also was a boom time for the bike industry, gravel bikes were suddenly the thing to have, which is absolutely awesome but in promoting the gravel bike, companies began to sponsor riders or sponsor events, this is sort of great and yet also I think began the divergence of gravel. When things opened up again we’d gone from home grown events where everyone shared the route and did it at their own pace to “stage races” with timed stages where there was only one “winner” rather than everyone winning through the joy of shared adventure and experiences. The grass roots events in the USA such as Unbound Gravel went from something that riders were proud to just have finished to arguments about the use of aero bars, female riders being drafted by their male team mates to achieve a win and that old favourite trade team kits instead of wear whatever you feel comfortable in. There were now “race gravel bikes” light weight, minimal luggage mounts and steep head angles as well as “adventure gravel bikes” for mounting bike packing stuff and forgiving geometry for riding for days at a time if you wanted to. Ok, I can forgive this as a perk of the commercialisation of gravel as more choice is always a good thing. But someone was waiting in the wings to take this all to a new level.
Hello UCi, the governing body of cycle racing, never quick on the uptake it’s taken them a few years to stumble onto the band wagon bringing the UCi World gravel championships and qualifying events, pro licences for racing, rainbow jerseys and worst of all a rule book as thick as a Ebike down tube.
Don’t get me wrong, I like to watch cycle racing. I sit glued to the Spring classic road races and the Tour de France but now the “i can’t ride because I’m not that good” mentality has started to be heard in gravel racing. I conducted a poll via the 19k+ followers on my instagram account and asked what was stopping them either starting to ride gravel or going to gravel events or organising group rides themselves and by far the most popular response was “i don’t want to ruin other people’s ride because I’m not quick enough” or “my bike isn’t good enough” and this is my whole reason for writing this long ramble.
We need to get the message out that you should just get out and ride your bike, there are no rules, ride what you like, wear what you like. If you just want to ride to the top of a nearby hill and sit on your favourite bench and look at the view, then just do that. Ignore average speeds and distances covered, they are just numbers, your ride doesn’t need to be “epic” just because you see people doing extraordinary distances and trips on social media. Any and every ride is worth it compared to not riding. Ignore the commercialisation, if you want the latest bike and tech then get it, if you want to use your 1992 mtb, then do that too. Want to ride alone? that’s fine, want to share the fun? then why not plan a ride and meet up with other riders. Encourage others and lets stop gravel riding from becoming elitist and get back to how it started. Innovation and progress is good but lets also keep things simple and accessible for anyone to be able to join in.
STOP! before you say “flex stem” I do know about those innovative stems that were about in the late 80s-early 90s and if I had a £ for every time someone mentions them when reading a review or looking at a picture of a modern suspension stem I would have enough cash to buy an original one!
The first thing to say about the Cane creek EEsilk stem is that it is not a substitute for a suspension fork. Stems like this are designed to dampen the vibrations coming off the front wheel of your rigid forked bike. There are a few of these stems on the market today and they are perfect for a gravel bike and allow more comfortable riding over rough ground. They reduce fatigue on your arms, shoulders and neck which means you can ride for longer and recover more quickly to ride the next day.
So how does the EESilk stem handle being on the front of a gravel bike ridden by someone not known for their finesse when riding?
Cane creek EESilk Stem with compliance lever
The EEsilk stem is made of aluminium and offers up to 20mm of compliance, I received the 90mm version to test and this comes with a soft, medium and hard elastomer which controls the travel. An Extra firm elastomer is also available. The stem I tested weighs 231g. This stem includes what Cane Creek call the “compliance switch” This lever on the top of the stem allows on the fly change of compliance from soft to firm. Cane Creek offer a cheaper version without this switch.
Changing the elastomer is very easy, just a 4mm Allen key will remove the hard plastic wedge allowing the elastomer to be removed from the bottom of the stem and swapped for one with a different density. Reverse the process to secure the wedge into the stem. The bolt needs to be torqued up to no more than 2Nm though so investing in a quality torque wrench (very useful for all the bolts on your bike anyway) would be a good idea. if you don’t have one maybe visit your local bike shop and ask the mechanic to check it for you.
The EEsilk stem fits just like and ordinary stem so it was easy to fit to my bike, I first used the medium elastomer that came factory fitted and went in search of rough trails. I deliberately didn’t load the bike up with anything that I wouldn’t normally carry to give it a fair comparison against my normal stem. Immediately on fitting though i realised that the top cap computer mount I usually run would stop me being able to move the compliance lever, Cane Creek do sell an out front mount that fits to the face plate of the stem though. An ordinary -fits to bar- out front mount will fit perfectly, so something to consider when buying.
After an hour or so of riding on gravel fireroads and in the woods I really appreciated the amount of damping that the medium elastomer was giving me, it is very wrist and shoulder friendly, however even with the lever set to firm I found it too soft on smooth tarmac. When climbing out of the saddle the stem bobbed a little too much for my liking. I pedaled home and swapped to the hardest elastomer, luckily this is a 5 minute job. No need to remove the stem or bars from the bike, everything can be swapped in situ.
Cane creek EESilk StemCane creek EESilk Stem
With the firm elastomer in place and the compliance lever set to firm it all but eliminated the bob on smooth surfaces, certainly to the point I stopped noticing it. In the soft lever position the stem obviously didn’t offer up as much compliance as the softer elastomer option but it gave enough to be noticeably more comfortable than a rigid stem. Throughout the test, which was ridden in a period of weather that ranged from 29+ degrees C with 80% humidity to very wet, gritty and muddy single figure temperatures the stem showed no side to side movement or flex and stayed completely silent, no squeaks or creaks. After longer length rides, say over 50 miles I noticed a significant difference in my arms and shoulders compared to my other bike with a standard stem. I even pedalled the same routes one with the EEsilk and one with standard stem with a day in between for recovery to try and give a fair comparison. Using the EESilk stem I didn’t suffer any hand or finger numbness which I had two days before on a standard stem.
If you are in the market for one of these stems, the Cane Creek EESilk stem is a great option to look at, it’s easy elastomer swap out without having to remove handle bars is a great feature while you dial in your preferred setting. This also means it’s easy to increase or decrease the compliance if loading the bike up with luggage for bike packing trips. I had a few messages asking how easy spares and different rated elastomers are to get. The UK Distributor, Extra UK assure me they have good stock of all parts so if you need to change the elastomer to the extra firm one etc it should be easy.
The Cane Creek EESilk stem works silently and efficiently and the ease of fit and adjustability makes it stand out. The compliance lever adds to the versatility allowing you to almost lock the stem out for smooth sections. On rough ground though is where it really shines, saving wrists, shoulders and neck from a battering. The only downside is you soon learn all about Flex-stems from everyone who was around BITD 🙂
Cane creek EESilk Stem in its natural habitat
more details can be found on the Cane Creek website here
This is NOT an affiliate link, if you buy a Cane Creek EESilk stem UKGRAVELCO gets nothing! The test stem will be going back to Extra UK, so if you want to support these independent reviews please consider buying something from the UK Gravel Collective Shop or subscribe to the Youtube channel or follow me on my instagram account
I must have passed this bridleway literally 100s of times but a couple of days ago I noticed a new sign so myself and Lisa from @my.bike.adventure decided to explore. It turned out to be an interesting ride.
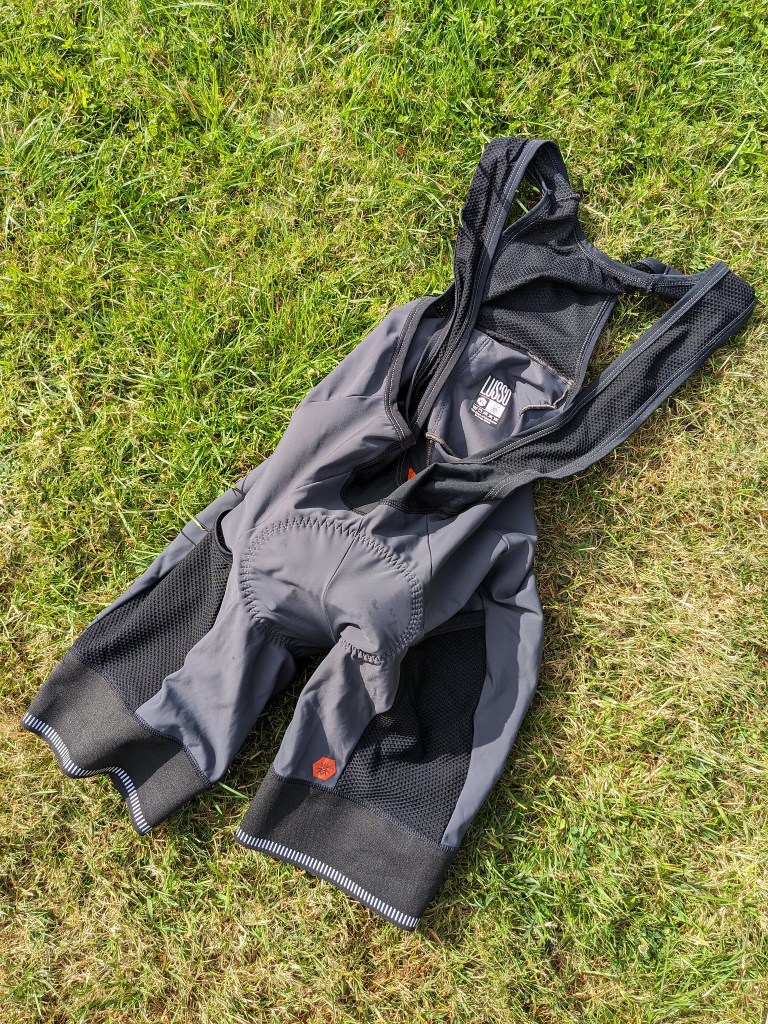
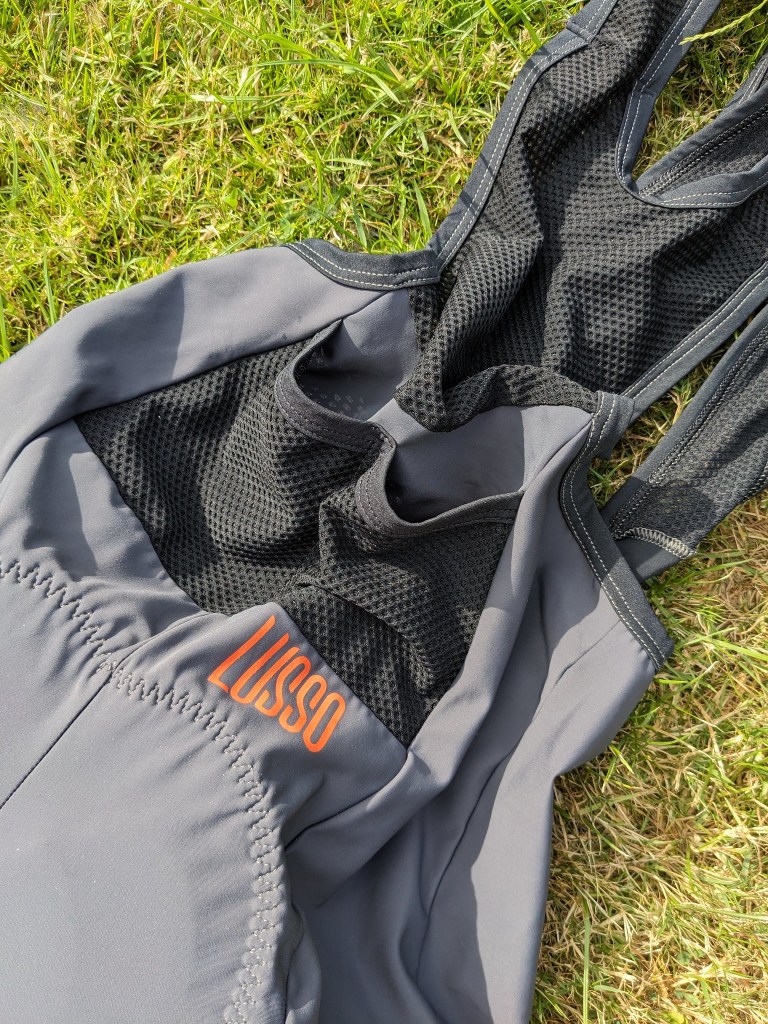
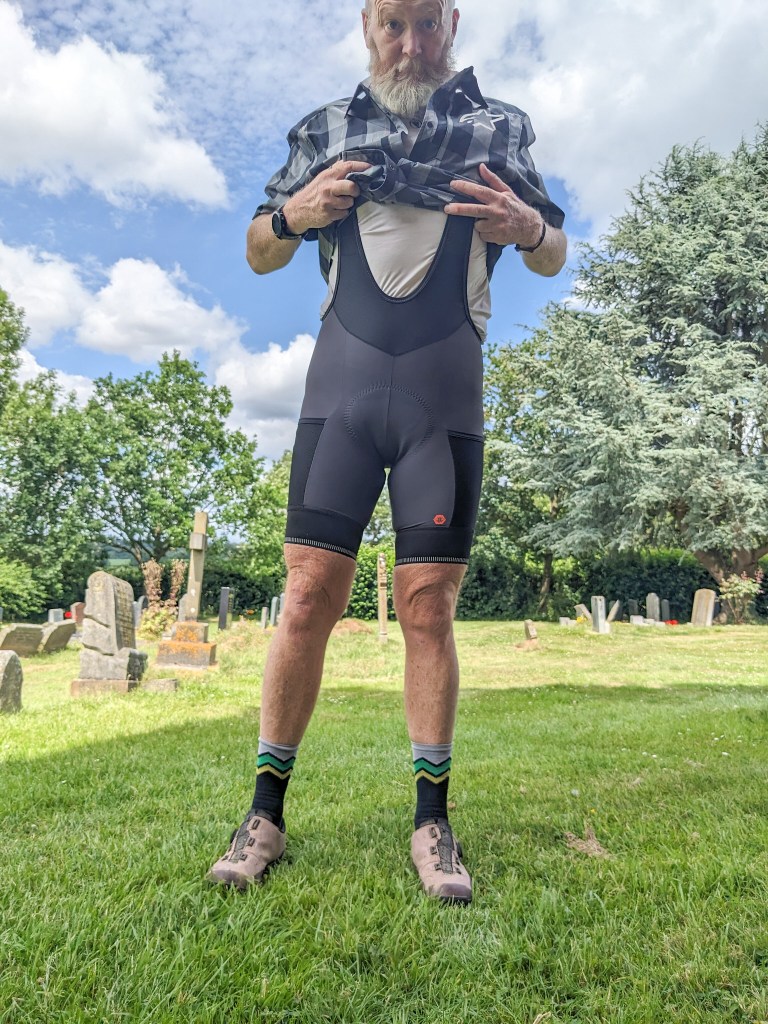
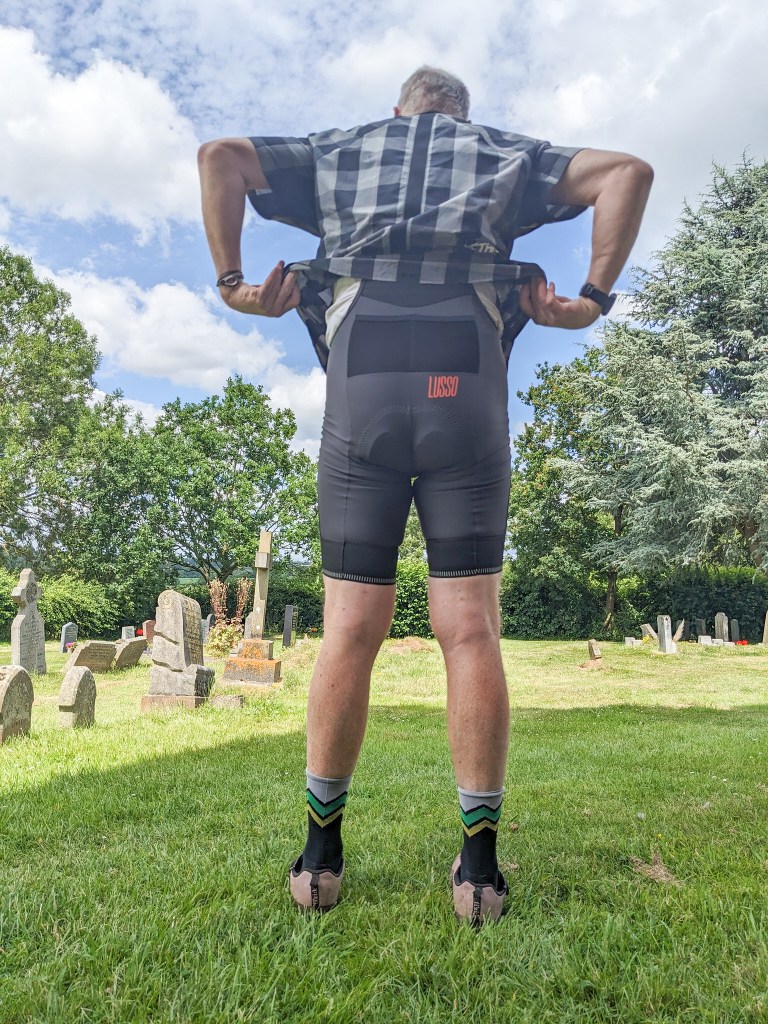
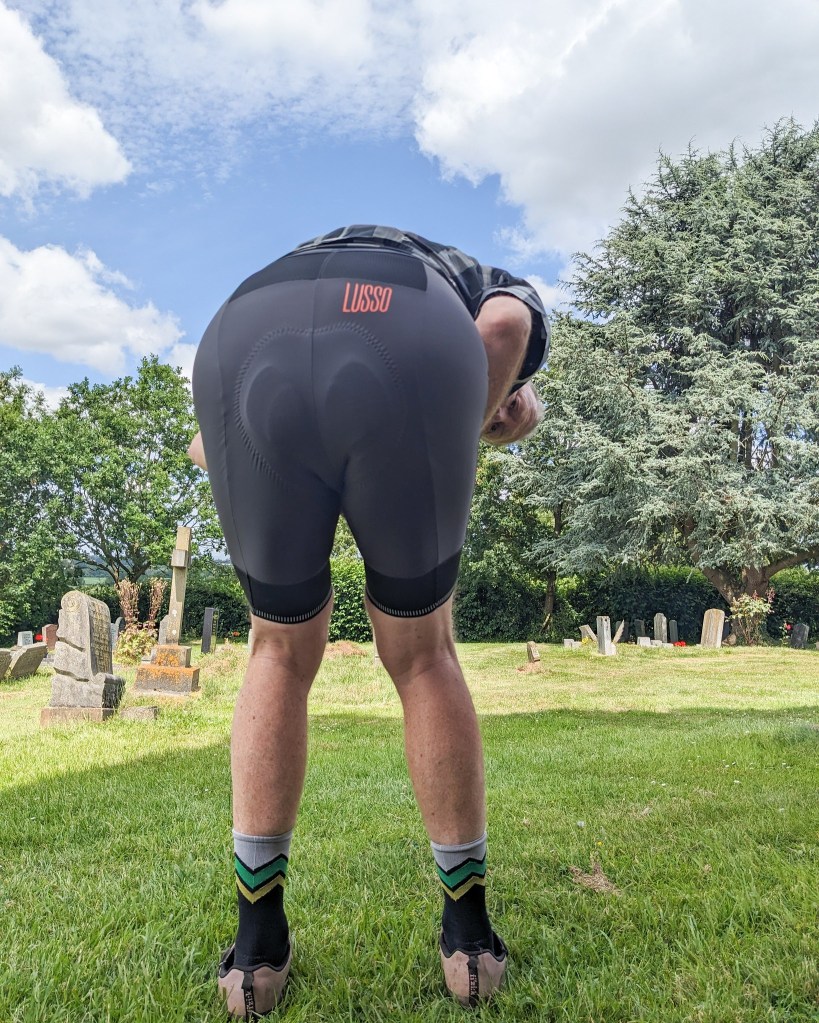
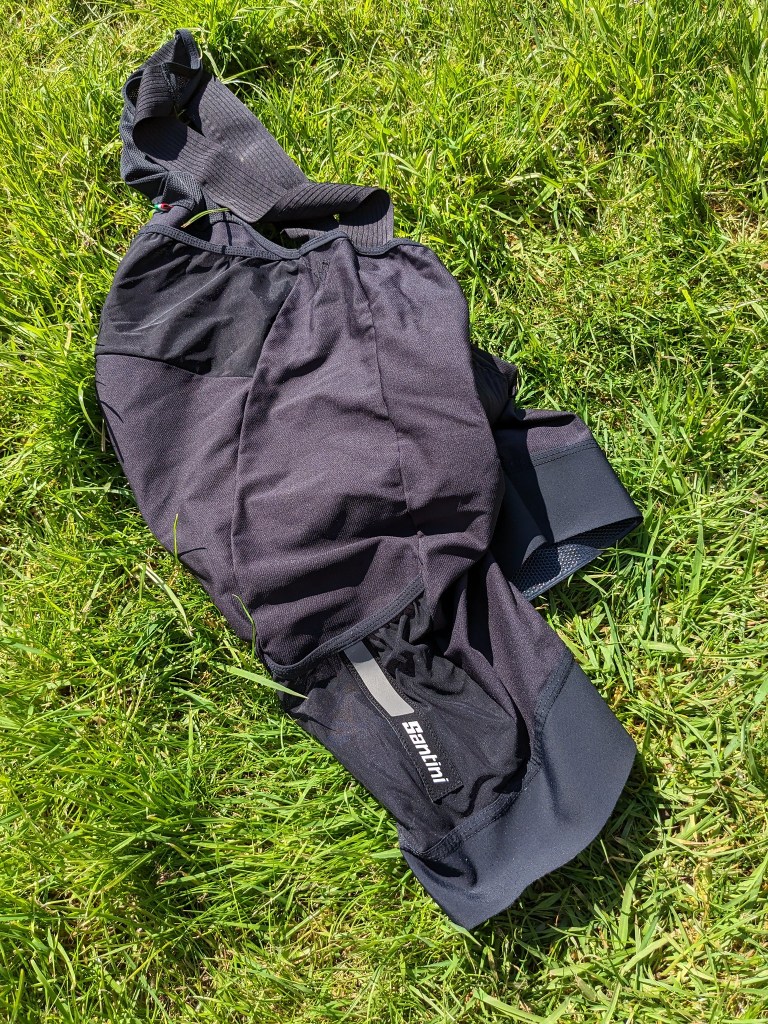
Cargo bib shorts are the in thing right now and most shorts making companies have at least one model on their range so what makes the Lusso Terra shorts different?
MADE IN MANCHESTER are the three words that made these shorts stand out to me before I’d even pulled them on. In a world where strawberries can be grown in Argentina, packed in Indonesia and sold in a shop in Birmingham it’s a great thing to see that a company is manufacturing on the UK.
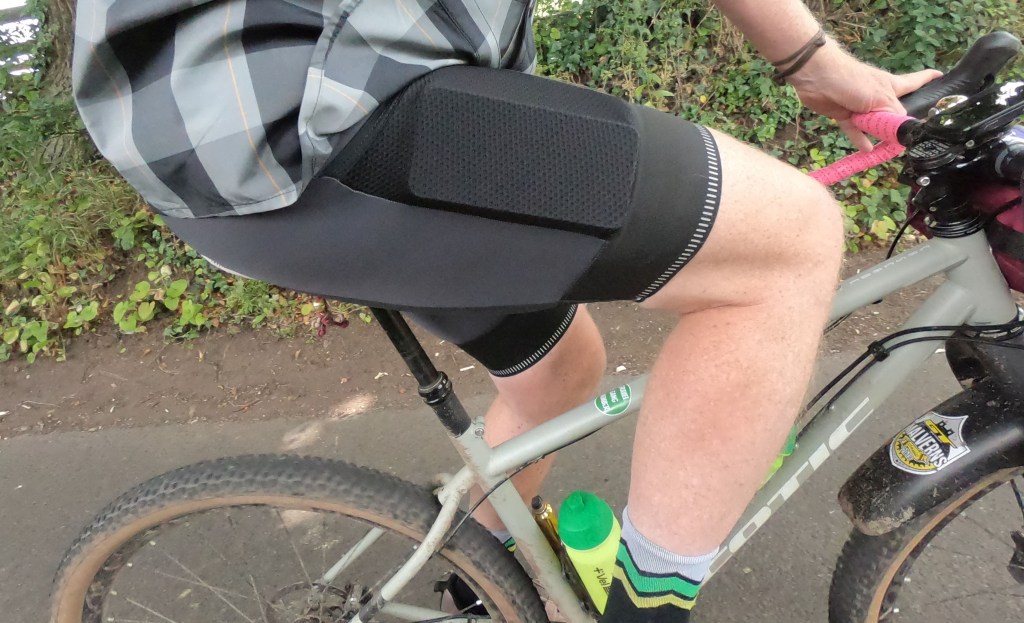
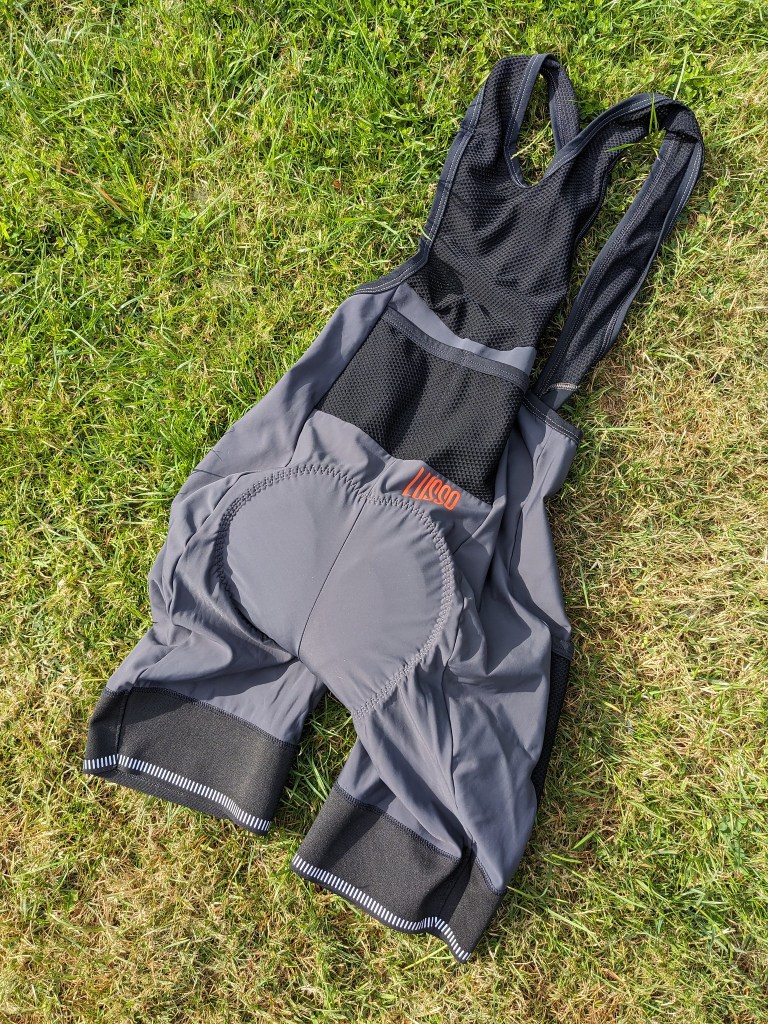
Designed as part of Lusso’s Terra range these bib shorts are hand made with natural and sustainable fabrics from Italy. They have two rear mesh pockets and a pocket on each thigh.
The bib straps themselves are made of the same mesh material and so there is plenty of breathability. the end of the legs has a wide elasticated section that grips well without digging in. The thigh pockets swallow a modern smart phone easily so gels and energy bars can be stowed securely. Even with something heavy like a phone the pockets never felt baggy or restricted movement
The material feels luxurious against your skin and the pad feels just on the right side of reassuringly thick. It supported me comfortably over short and long distance rides, with and without chamois cream. I’d have no qualms about wearing these on a multi day trip in hot or cold weather (both experienced during the test period). The rear pockets were useful but as with all cargo rear pockets near to your body heat if you intend to carry something moisture sensitive in there it may be as well to bag it in something waterproof as it can steamy in there. Thankfully I haven’t crashed in these shorts yet but after many rides including those in wet and gritty conditions they continue to show little signs of wear. They also wash very well, keeping their shape and the pad remains supportive.
Sizing is normal, I usually wear an XL short being just over 180cm tall and the XL terras felt good, although I might go up one size for a longer bib strap. Lusso offer returns so you can get the correct fit.
It is also great to see some different colours from the usual boring black most shorts come in, the Lusso Terra’s can be purchased in slate (pictured) or thyme both have pockets in a contrast colour.
The Lusso Terra bib shorts are quite simply a great feeling and looking short that will support your adventures over many rides. The fact that they are hand made in the UK and Lusso’s stance on sustainability makes them stand out above other quality shorts in the same price bracket, definitely check these out when you are looking for your next pair of shorts.
you can find out more about these shorts, Lusso and their thoughts on sustainability on their website here
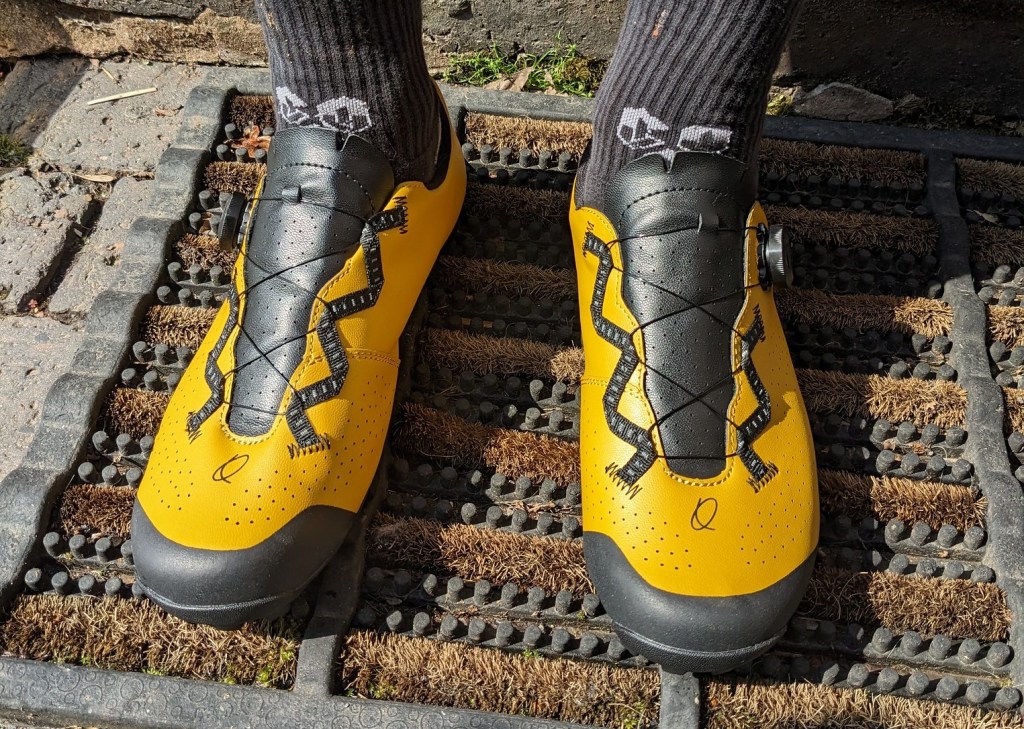
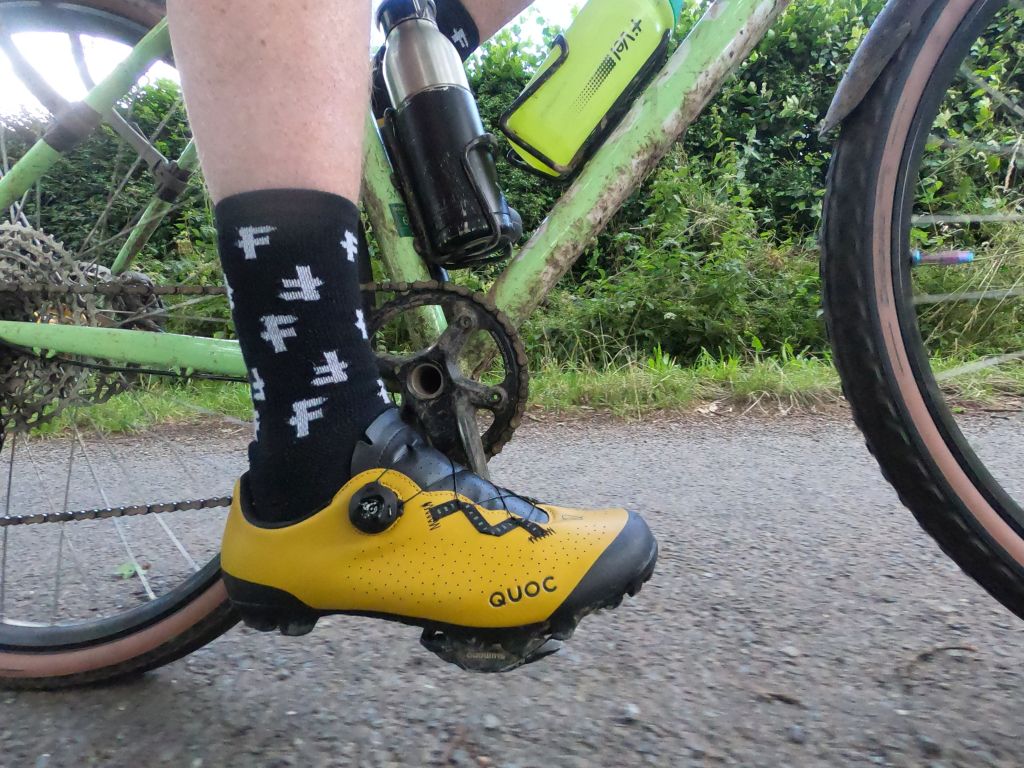
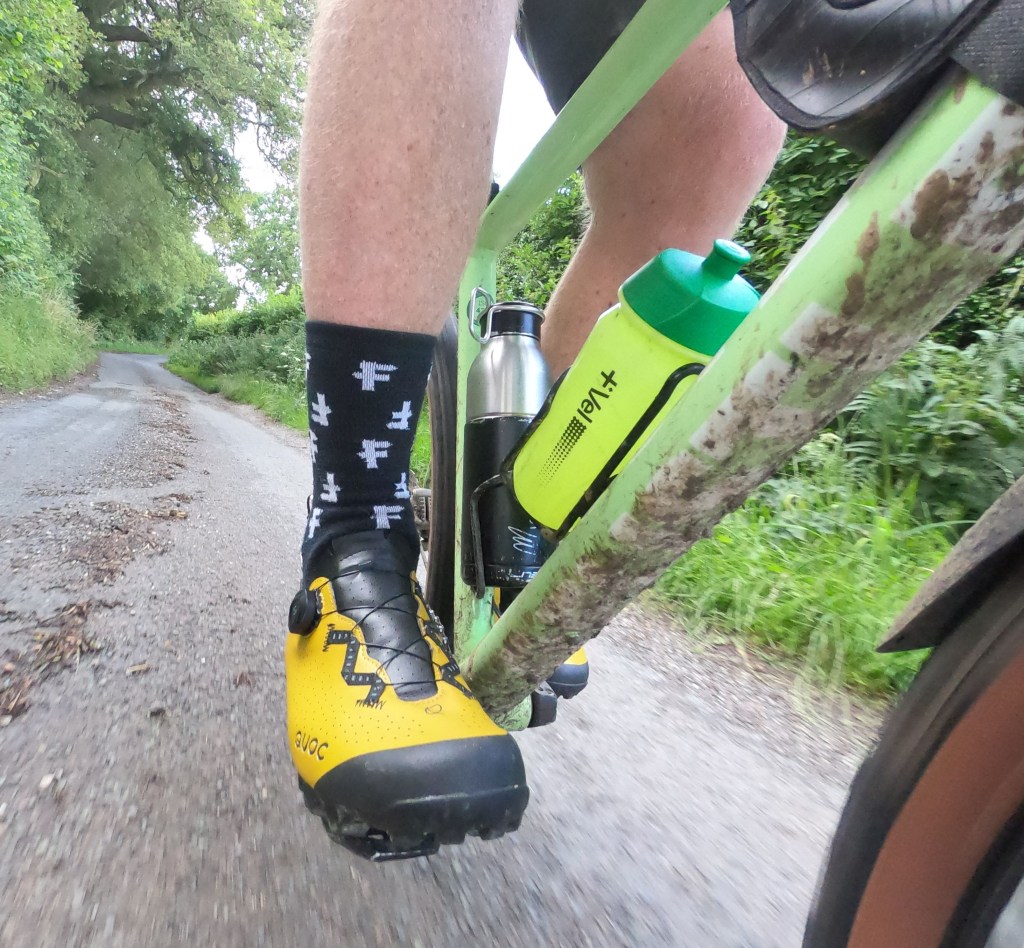
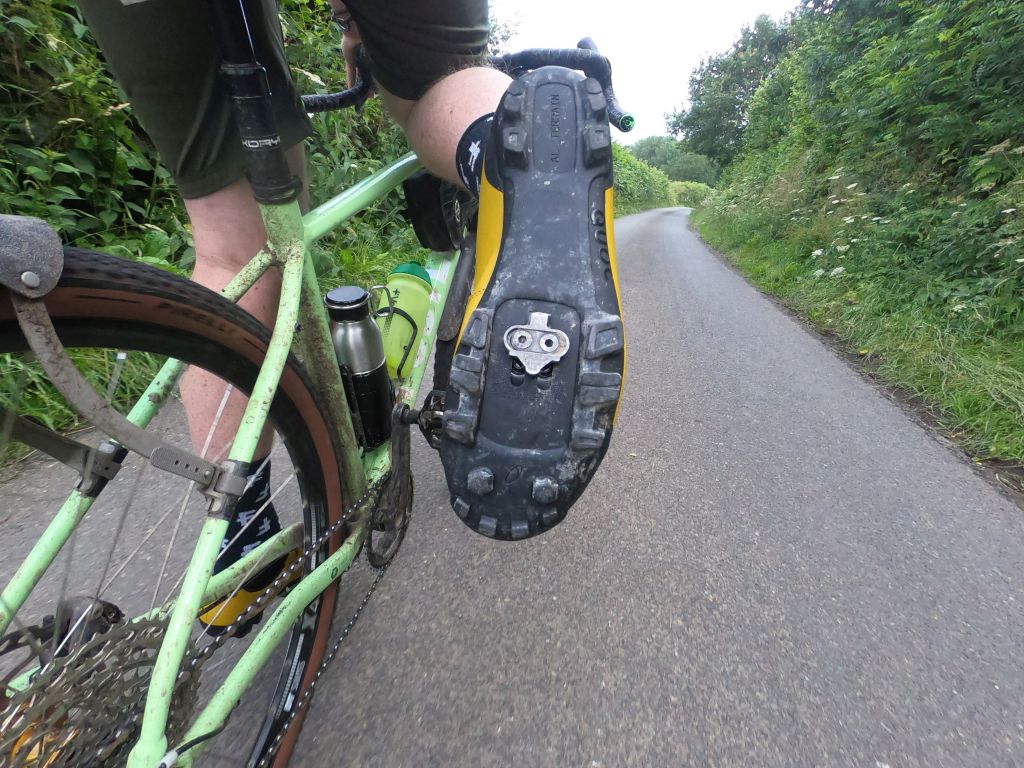
There’s lots of cross over in footwear between Gravel riding and mountain biking, a good cross country mountain bike shoe makes for a great gravel bike shoe too. The cleat system allows the use of double sided clip-in pedals, something I find essential for off road riding, they are stiff enough in the sole for all day riding but have enough give to allow for walking unrideable sections and some don’t look iut of place at a mid ride pub stop.
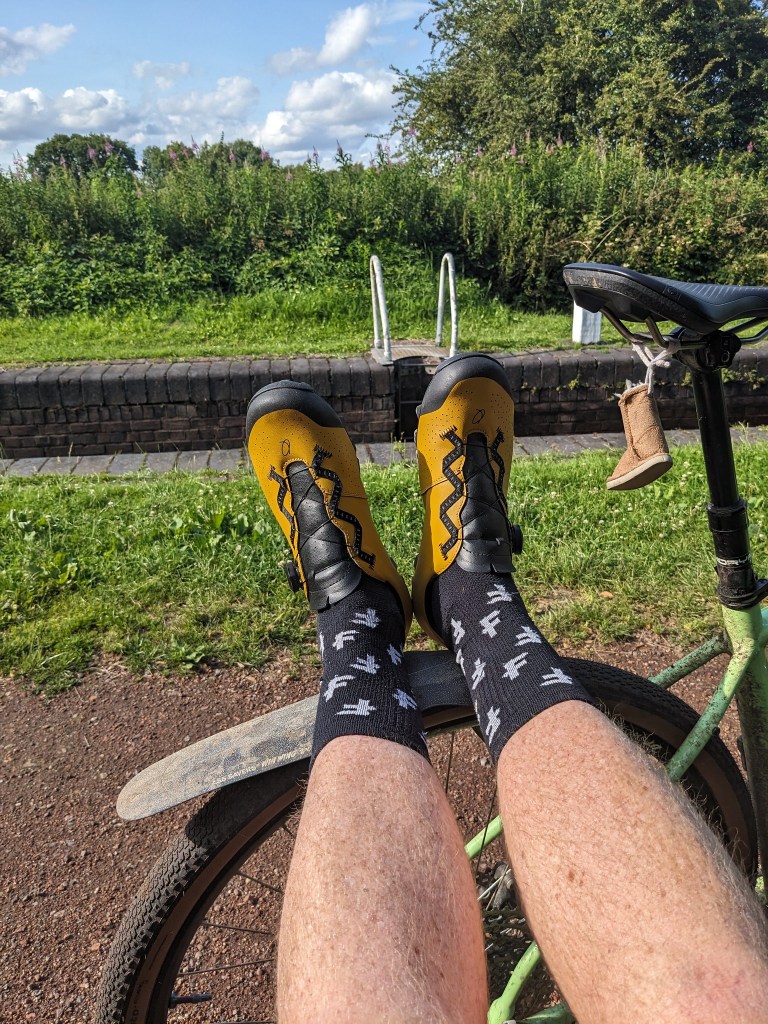
Quoc do a range of shoes for road, touring and MTB, they sent me these Escape models to try out. I asked for the amber colour as A) I really liked it and B) I thought they’d stand out better in the pictures!
The shoe comes with a polyurethane upper which is easy to keep clean and a glass fibre reinforced sole with rubber tread that works well on all but the slimiest roots. The tread clears well when filled with sticky mud. Quoc use their own Boa-like closure using a turn-able dial that makes micro adjustments on the fly really easy. The upper has punched holes for breathability and the “lace” fitment is reflective. The heel padding is comfortable and I experienced no heel lift throughout the test. The toe cap guard did a good job of protecting the shoe from damage. Power transfer to the pedals felt great and I couldn’t feel the pedal through the shoe when pushing down, something essential for long days out to reduce fatigue and avoid foot hot spots.
The shoes are stiff but manage walking well, I’d say they are at the more racy end of the spectrum though and maybe hike a biking up a mountain path would be possible but a bit more give in the sole might be better. It’s always a trade off between pedalling stiffness and walking in any cycling shoe though. The shoe has the option of fitting studs in the toe for extra grip when say in a CX race and running with the bike.
The Quoc shoes look and feel great, it’s refreshing to see a different approach to shoe design. It’s also good for me at least, that these shoes are not full of mesh on the upper, Quoc have punched tiny holes instead. Too many shoes seem to be designed for hot weather and their vents are perfect if you only ride in summer or in countries with high temperatures but I live in the UK and suffer with cold feet so this may mean I can extend their use into the colder months. This lack of venting doesn’t seem to affect the breathability though as (in contradiction to what was just written) during the test period the UK welcomed it’s hottest June for years!
The Quoc website gives a good fit guide and askes you to measure your feet rather than stick to your usual size. In the event my usual size corresponded with the guide size after measuring. The shoes felt comfortable both on and off the bike so. So you’d think everything was rosy and perfect then, well not quite.
Firstly and in no way affecting pedalling performance, the shoes creak!, more so off the bike when hike a biking (more like walking into cafes) but sometimes when pedalling too. This may lessen as the shoes wear in though. What I found that was an issue for me was the cleat position. Even with the cleat set as far back as it would go on the shoe it felt too far forward. It felt like I was pedalling with my toes rather than the ball of my foot. I’ve compared the Quoc shoe side by side with my normal cycling shoe and to within less than a millimetre they are exactly the same length sole but my usual shoe has much more cleat adjustment and I’ve not got that cleat all the way back either.
This cleat position makes you feel like you are gripping the pedal with my toes and after 30+ miles this starts to make my feet ache. I’m pretty sure the shoe is the correct size, the size guide and my feet tell me so but I do wonder if the next size up would give more cleat adjustment? I fear though that would bring with it some heel lift and the associated problem of wearing shoes to big for my feet.
The Quoc Escape Off Road shoe is a well made quality shoe with good pedalling dynamics and in my opinion looks great but if you like your cleat quite far back I’d look carefully at the sole compared to your current shoes carefully before setting them up so you can return them for a different size pair if needed.
You can find more information on the Quoc Escape off Road shoe here
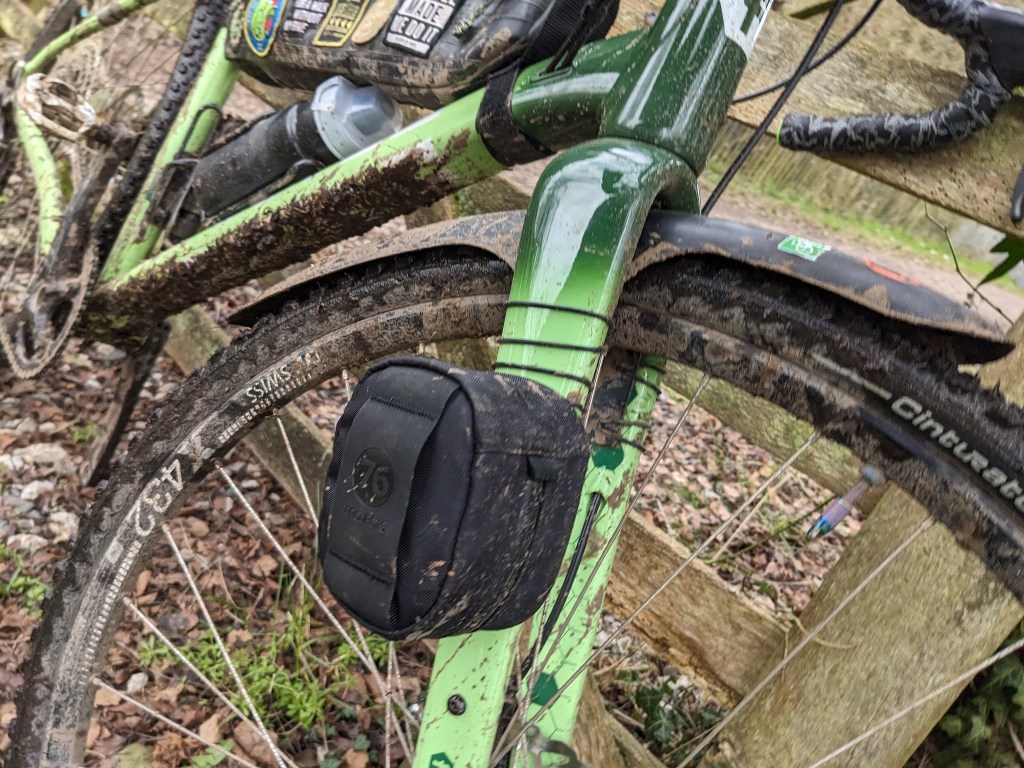
I’ll come straight out and admit it, I do not like top tube bags, they are never the right size, they suffer from floppy bag syndrome unless you use a stabilising system like the excellent 76projects one reviewed here or, and by far the thing I like the least about them is that when you stand up on the bike to climb or sprint my knees rub on the bag! I know this is a personal thing for me and that the vast majority of riders don’t suffer this but having mentioned it on instagram quite a few other people said they had the same issues.
One of those people was James at tailfin.cc. Tailfin have recently added top tube bags to their excellent range of bike packing kit and this included this tapered design said to be perfect for those of us with a knee inwards pedalling action. I immediately emailed Tailfin and James was convinced the new design would solve my issues, as it had for him and sent me one to try out.
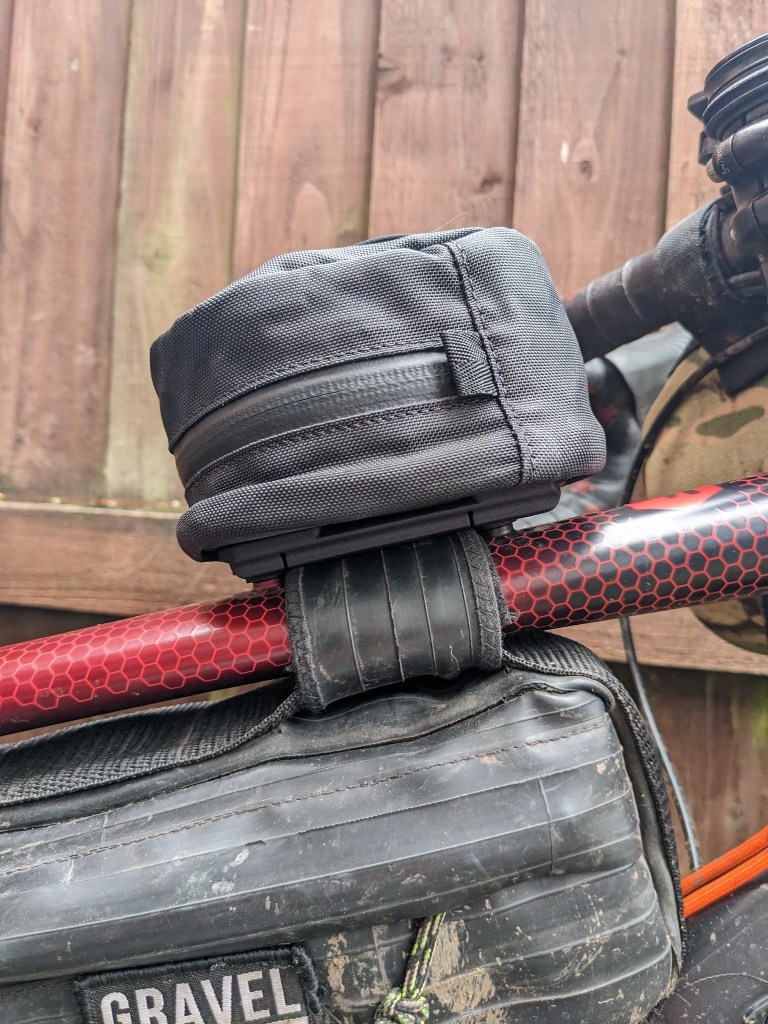
The bag is a dual design and can be bolted to your top tube if you have the mounts for a super clean look or using the supplied straps it can fit just about any frame design. The straps thread through two very sticky rubber mounts that grip the top tube of your bike like limpets! If you are bolting the bag on the bolts go through the middle of these mounts giving a even more tenacious grip.
The bag material is a welded design and comes in two varieties, a zip version (only option on this 0.8L pack) or zip or flip lid for quick access on the larger versions. Tailfin describe it as a sculpted design to be knee friendly. This means the bottom tapers towards the top. The bag does not come with head tube strap as tailfin claim it doesn’t need one. Inside is one large compartment with a cushioned insert and a side pocket.
I first used a bike that allowed a bolt on bag and immediately tried to make it top heavy by putting heavy items at the top inside it and then going for a ride. Straight away I noticed the difference to other bags I’ve tried in that my knees didn’t touch it! I tried to dislodge the bag by deliberately riding over rough ground and it was rock solid. It became a silly game of leaning the bike over or trying to rattle it from side to side just to make the thing move at all! It was all in vain, no movement. This also meant accessing the bag via the zip on the move was simplicity itself, open and closing to grab a snack was easy and i got so confident that it would open and close I didn’t even have o look down. This 0.8l bag was just slightly too small to fit my pixel 5 smartphone so if you want to keep a phone in there go for one of the larger sizes but for energy bars, Gregg’s sausage rolls, emergency Haribo and tools it is spot on.
Tailfin bolt onTailfin strap on
Next i swapped to a bike without mounts and fitted the straps, a word on those actually as they were top quality and worked so neatly with a tiny holder to hold any over lap on the strap they looked good too. Any fears that this mounting system would be looser were unfounded, again the bag was rock solid (this time on a MTB).
The tailfin top tube pack has been on but never off various bikes since April and that says everything you need to know from a self confessed top tube pack hater! The shape works fantastically with my knees, I’d say 95% of the time my knees don’t touch it. On other bags it was the other way around with my knees hitting them to the point of snagging knee warmers. Tailfin are correct, it does not need a head tube strap to be stable. Using the bolt on method and the lack of needing the head strap means the pack looks very good and tidy indeed. The fact that is it functions superbly and the fact that is is 100% waterproof too is just icing on the cake.
The tailfin top tube pack is currently £52 and that sounds like a lot of money, this cost means it is in the same price bracket of some bespoke bag makers stuff but, from a design, materials and function perspective it is worth every penny.
you can see more details on the Tailfin Top Tube Pack on the Tailfin website
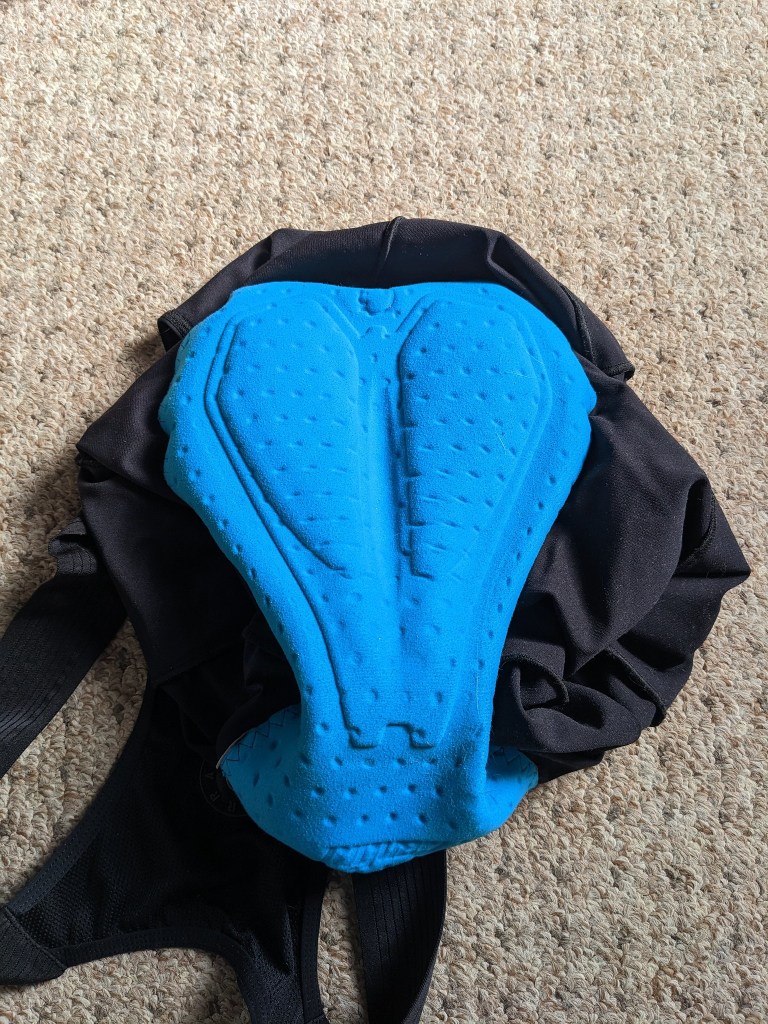
A gravel specific saddle? No sniggering at the back! When Wilderness Trail Bikes started showing their new range of saddles the one labelled “Gravelier” obviously stood out to me. I messaged the guys at WTB UK and asked if I could test one of the new seats to see if there was such a thing as a gravel specific saddle and they very kindly sent one out to me to try out. Saddles, and it seems silly to write this as it’s blindingly obvious, are a very personal thing. We all have the same bones in our body but that is where the similarity ends. Because we are all different the fact that a particular saddle might be very comfortable or uncomfortable to me doesn’t mean it’ll be the same for you. So take any saddle review you read with a pinch of salt. I can tell you how the saddle interacts with the seat post, the quality of the construction and how it performs in different conditions and how hard wearing it is but really at the end of the day the only way for you to know if a saddle works for you is to try it and do so over many miles. Yes, I know, that is difficult to achieve without forking out some cash on something you might hate. So what I’ll do in this review is tell you how this saddle compares to my regular saddle and to the many I’ve ridden in the last 53 years. Don’t forget though that your bum might see things differently!
tested in a variety of conditions!
My regular saddle is a Charge spoon, they don’t even still make them so I’ve been looking for an alternative for a while for the time when the back stock o those models dries up. I’ve always liked the look of the shorter fit saddles, again this is silly because you should be looking for comfort first not looks but hey, I’m a bit of a tart when it comes to shiny bike parts. The WTB Gravelier is around a third shorter (246mm) than my charge and has a cut out in the middle, said to ease perineal pressure. If you’ve ever been on a ride and felt numbness down there then that could be caused by that pressure. WTB say gravel riders tend to sit more forward and so the saddle accommodates this with a narrow front and a curved shape that widens towards the back. personally it think i sit the same on all my bikes .
The material is generally smooth with little dimples and is just the right balance of grippy/slippery. There is nothing worse than a saddle that grips onto your shorts when you move around on it or slide your bum off the back to counter balance the bike on a steep descent or one that you slide off forwards on when you brake hard as the saddle has such a frictionless surface. On this the WTB is perfect. The rails on this model are titanium, it weighs a hair under 210g on my kitchen scale, there is a lighter carbon railed version. Fitting the saddle was as easy as your seat post makes it (some seat posts are a right pain to swap saddles on) as the rails are standard size and there’s plenty of room for fore-aft adjustments. I set this one so the rear would have been in line with the saddle I swapped out as I felt that would be a good place to start. This made the front look very short in comparison to my old saddle but as written above, comfort before looks.
A new saddle always feels weird to start with and so the first decent length ride was spent adjusting the saddle angle, it ended up pretty flat in relation to the ground and i moved it forward slightly on the rails. I also raised the seat post a few mm as the distance from the rails to the top of the saddle was less that my old saddle, bear all this in mind when you try any new saddle.
The Ride I received this saddle back in May when the UK was having a very wet late spring/early summer so I got to try it in a variety of conditions, wet and muddy, dry and dusty and rides with all that going on at the same time. The saddle has a little padding, just enough to support you without feeling like an over stuffed sofa but with a bit of give for cushioning over the rough stuff. The titanium rails help here as they have a springiness that you wouldn’t notice riding along side watching the saddle but are glad of over longer distances. I’ll admit the first few rides I wasn’t convinced but more position adjustment trial and error and I came to like the saddle more and more. Lots of short 50k rides and the longest so far being 120k proved that the saddle was supportive in the right places and the hole in the middle did seem to work. When swapping to my other bike with my regular saddle I could definitely feel pressure down below that I didn’t feel on the WTB. I’m still not sure if this is gravel specific though as I’ve tried it on my MTB too and it was equally as comfy and easy to move yourself back over it for steep descents.
I can honestly say this is the best “short fit” saddle I’ve tried so far (fizik, selle Italia, san marco, specialized and prologo to name a few). I think WTB should change the name though as it’s good enough for a lot more bikes than just the gravel models
more details on this saddle can be found on the WTB Website
UKGC Podcast latest episode just went live, Russ Roca, along side his partner Laura run Path Less Pedalled, a website and youtube channel that is a refreshing change to most of the others. PLP is about riding for fun, not worrying about average speed or what you wear to ride in, but Russ can tell you more about that as I embark on my first trans atlantic podcast. Russ was on Montana and I was in Worcestershire, that will explain the sound issues we had. I hope those don’t spoil the great chat I had with a true enthusiast for “real” cycling.
listen via the link below or search for uk gravel collective cycling podcast where you normally listen to your podcasts
You are probably going to scoff at this next statement but I’m going to go ahead with it anyway and that is that wheels are very hard to review!
Ok, I know you are rolling your eyes thinking this guy is crazy, he gets sent a set of carbon rimmed wheels to test out and review and he says its hard! he doesn’t know he’s born!
Of course you are correct. But look at it this way, if you get sent a product and it lives up to all expectations and there are zero issues or anything you’d change it’s going to make for a pretty boring review right? Well read on and see. if you scroll away now you might miss out on something actually worth the money.
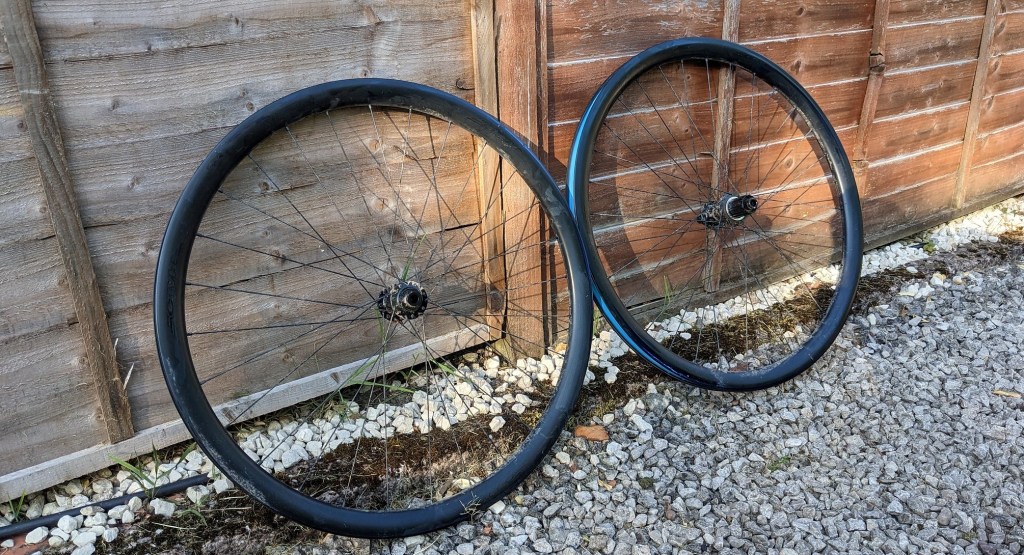
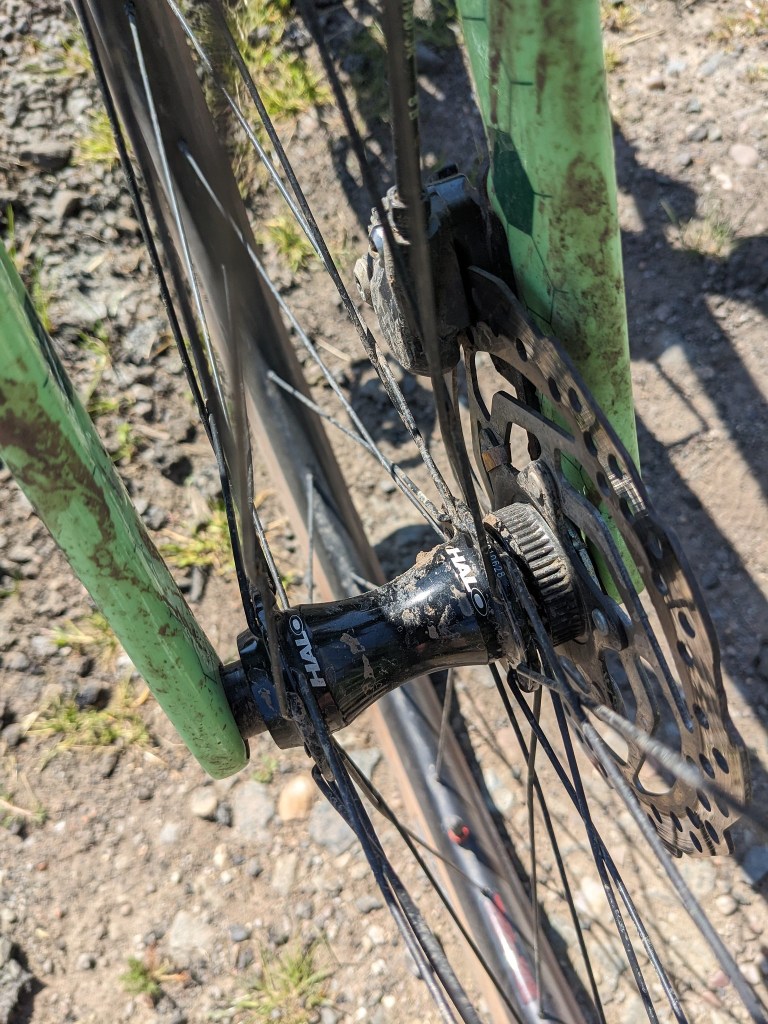
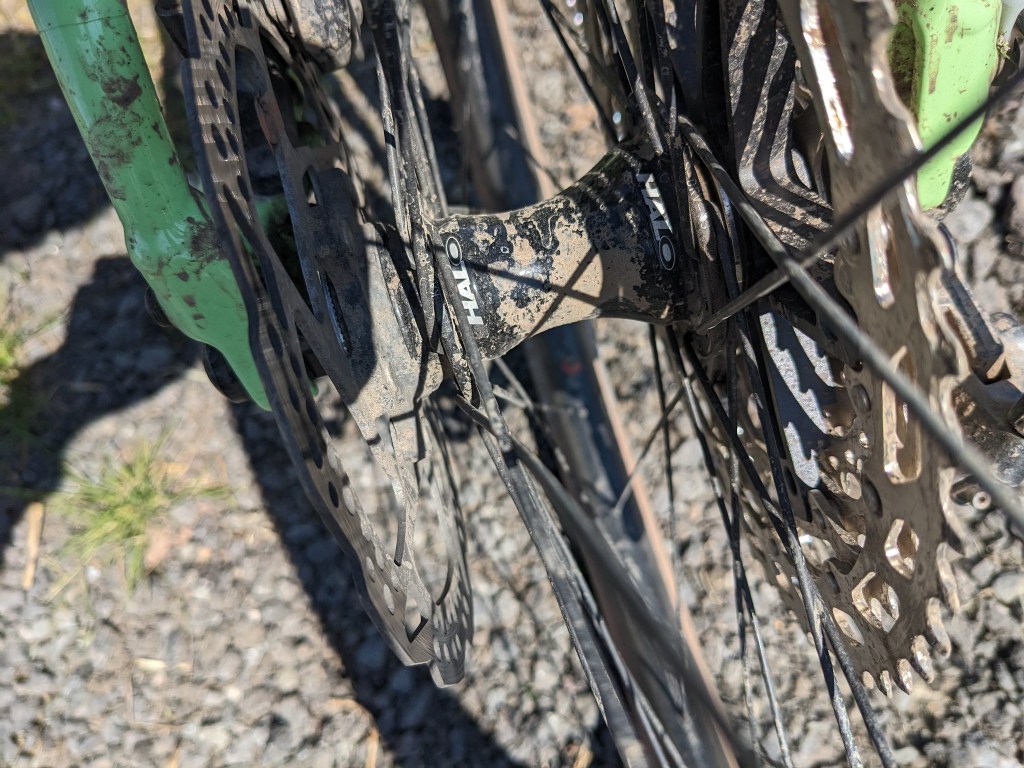
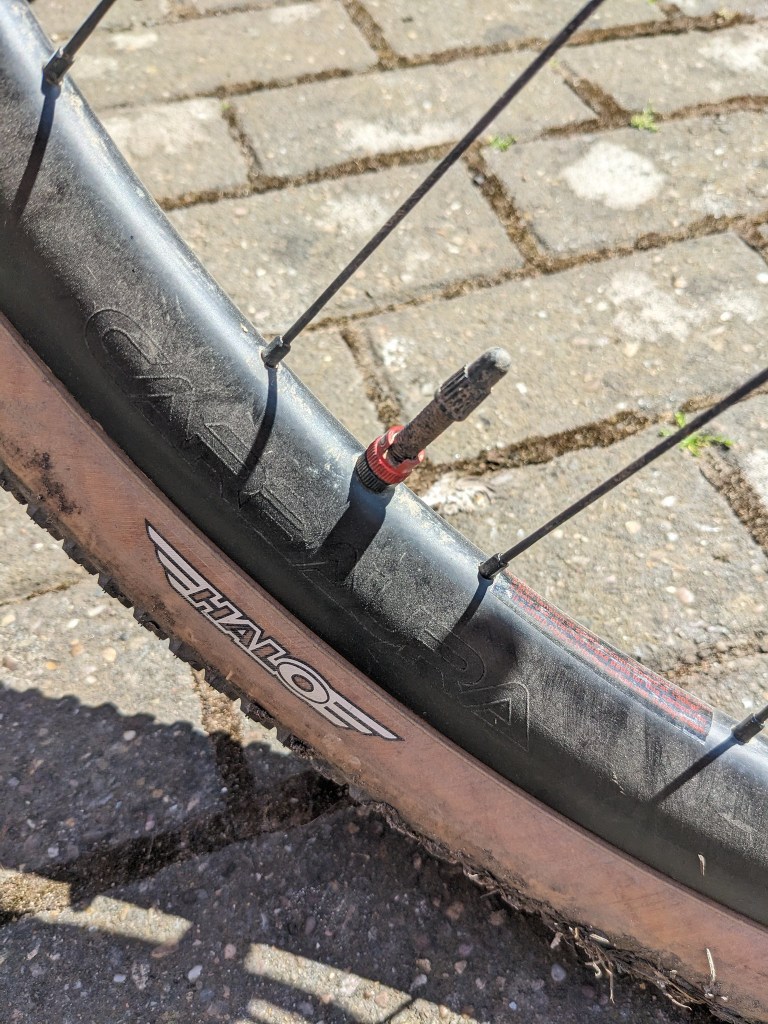
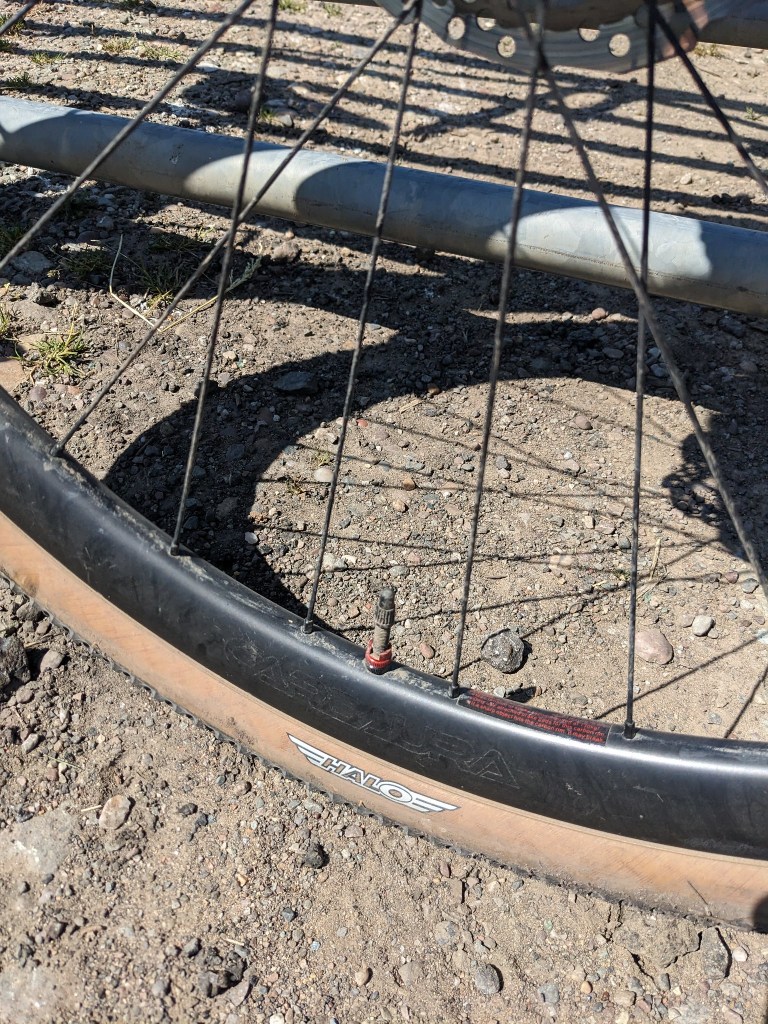
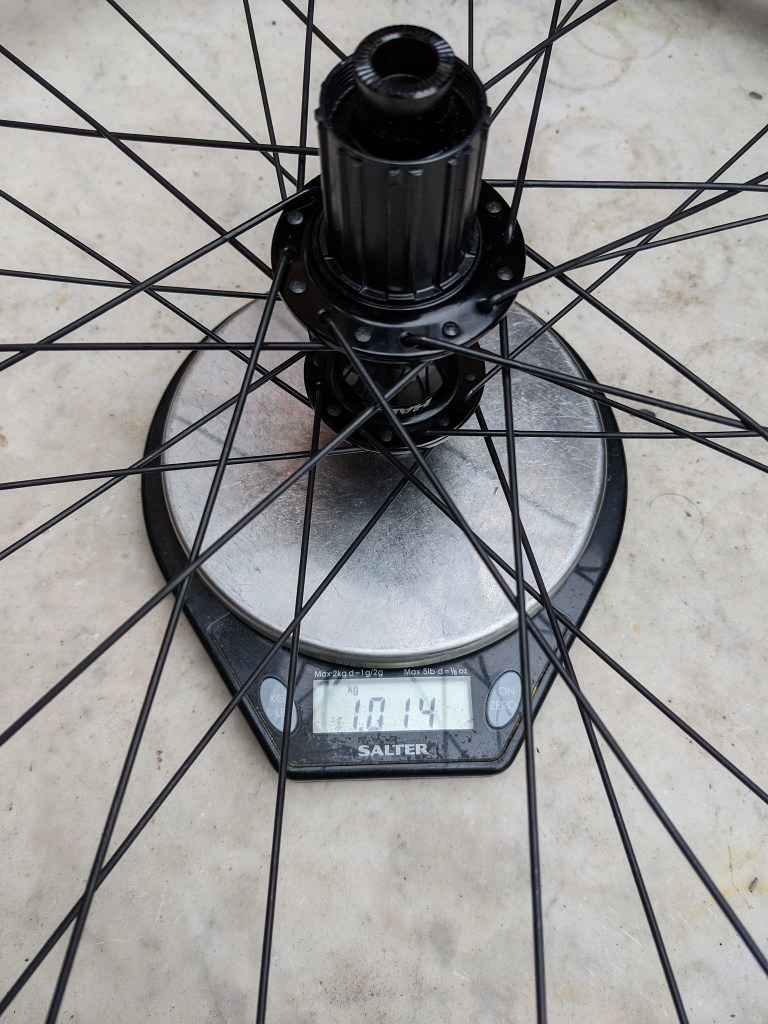
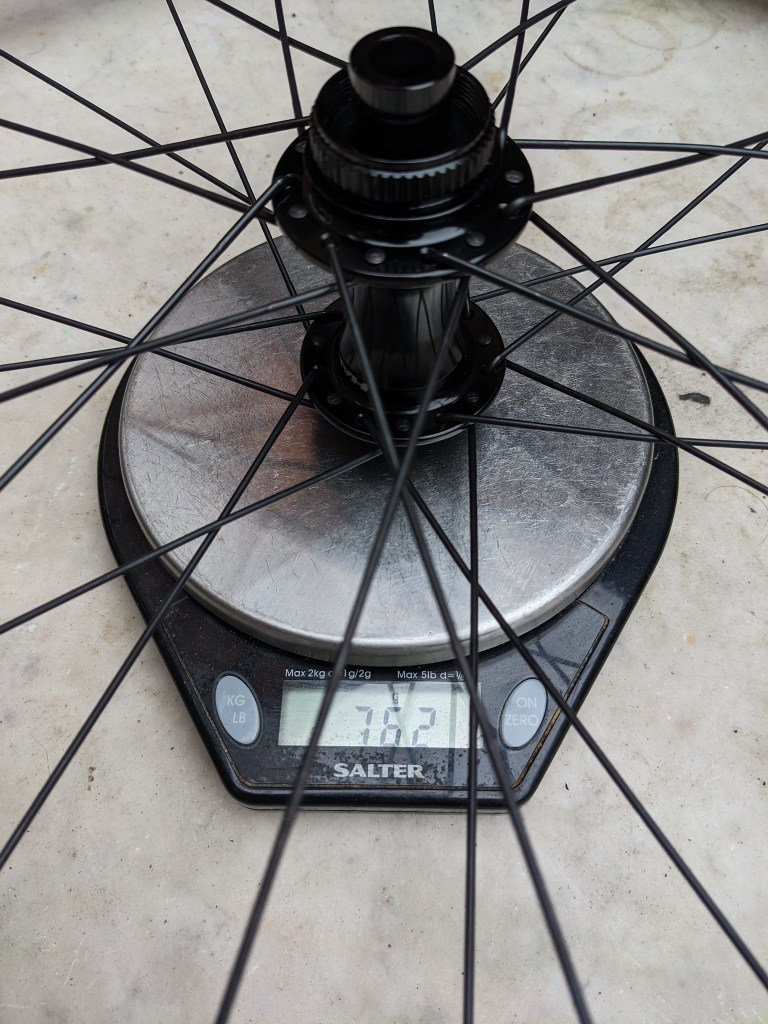
Halo XCD 35mm wheels are hand built in the UK, the rims are 35mm deep with a 26mm internal width allowing up to 50mm tyres and come pre-taped and tubeless ready. The spokes are a standard J-bend with brass nipples 28 front, 32 rear. The hubs feature sealed bearings, a 120 point engagement freehub, available in Sram or Shimano fitting and are 100/142 spacing.
Before starting the review properly I want to go through that list above and what it means. First off spokes, the fact that these wheels don’t come with a fancy one off standard spoke specific to the wheel is terrific, no apologies for the alliteration. This means pretty much anywhere in the world in the event of a broken spoke you’ll be able to find a replacement and if in a bike shop the mechanic won’t swear under her or his breath and start telling you how long it’ll take to find a replacement spoke. Believe me, I’ve been that bike shop person and seen the look on riders faces when you tell them how long it’ll take to get a spoke and how much it’ll cost. Brass nipples are the icing on the cake. Max points to Halo for this.
26mm internal width rims mean you can fit any gravel tyre on the market today, you can even fit 28mm road tyres if you are that way inclined. 35mm deep rims add stiffness in the right places (I won’t mention Aero, but that too) without acting like a sail for cross winds and also means you don’t get that awful rumble noise you hear from deep section wheel rims on tarmac. Add all this together to give max points again.
120 points of engagement on the free hub does two things, makes take up when pushing on the pedals almost instantaneous and makes a great sound a bit like an angry wasp trapped in a dangle mug, which strangely isn’t annoying at all to me but I have had comments from other riders who can hear you come up behind them! Sealed cartridge bearings mean the wheels should last longer between bearing changes and when it does come time to swap them it’s quite easy with the right tools, Points? go on then!
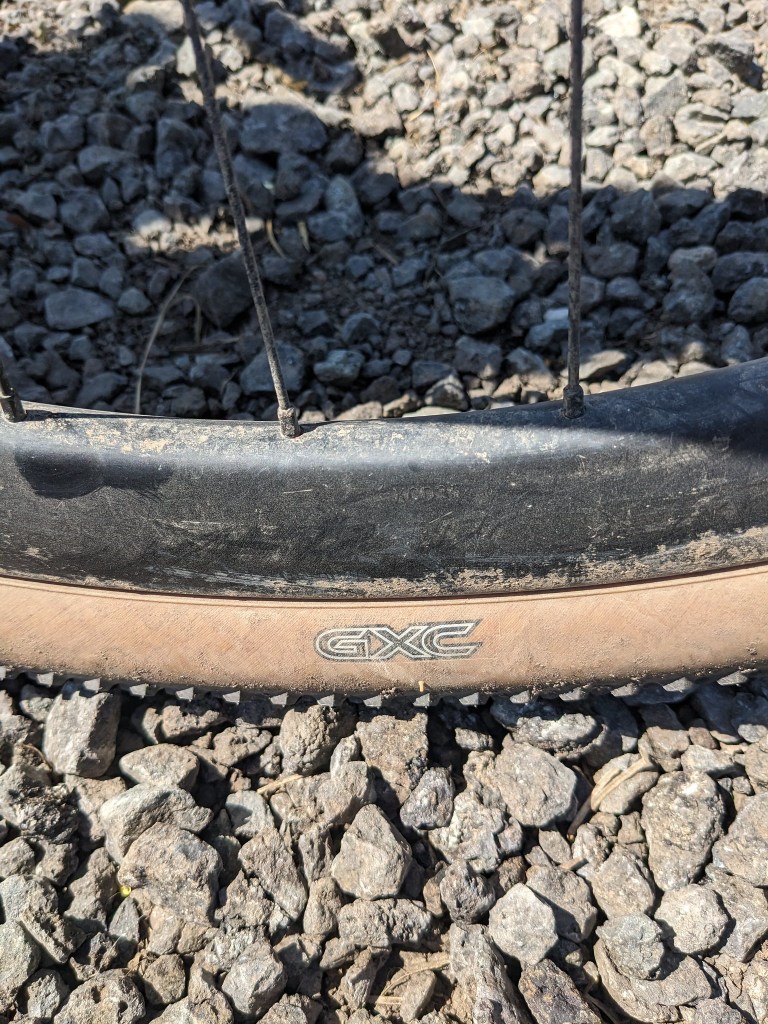
The Review I think you can tell I like the sum of the parts so when all that is put together how do they actually ride? I fitted Halo’s own GXC tyres and Halo tubeless valves and sealant. As mentioned above the rims come pre-taped so I took a risk and added the sealant to the tyres before they were fully seated on the rim. I usually seat the tyres then add sealant via the valve. I took up my standard track pump and went to work. The tyres seated first time! that does not happen very often at all and I’ve swapped a lot of tubeless tyres during various tests. Impressive. Since I received the wheels in February they have been put through some very dirty filthy conditions
From frozen mud, over the rim watery mud, clay that is so much like peanut butter like that the wheels wouldn’t turn to at last some dry and very bumpy singletrack and bridleways of summer riding.
I’ve got to say I’ve had absolutely zero issues with the wheels. They’ve stayed absolutely true despite my highly suspect riding style. They are light at Just over 1700g but not superlight where you’d be scared to take them on some routes. I’ve also had zero tubeless incidents since the first set up and the Halo sealant
has lasted in the tyres until the day I packed them to return some 4 months later. The valves also did not clog. The bearings were smooth throughout the review period despite some regular soakings in the early weeks. The rims showed a few battle scars at the end bit no damage and some soap and water always brought them back to their matt black best. despite a couple of absolute soakings and stream crossings the bearings have remained smooth and noise free.
So there you are, nothng to report which makes for a boring review really but when it comes to wheels boring in the reliability side of things is great! No one wants excitement from their wheels imploding!
The wheels at time of publishing have a price of £950 per pair recommended price but lower if you search around.
Nearly a grand for a set of wheels is a lot of money, but given that they are made without any propriatory spokes or weird size bearings that a lot of their competition have plus they seem reliable, again over some of their competition I’d go for a set of Halo Carbaura wheels if i was my money.
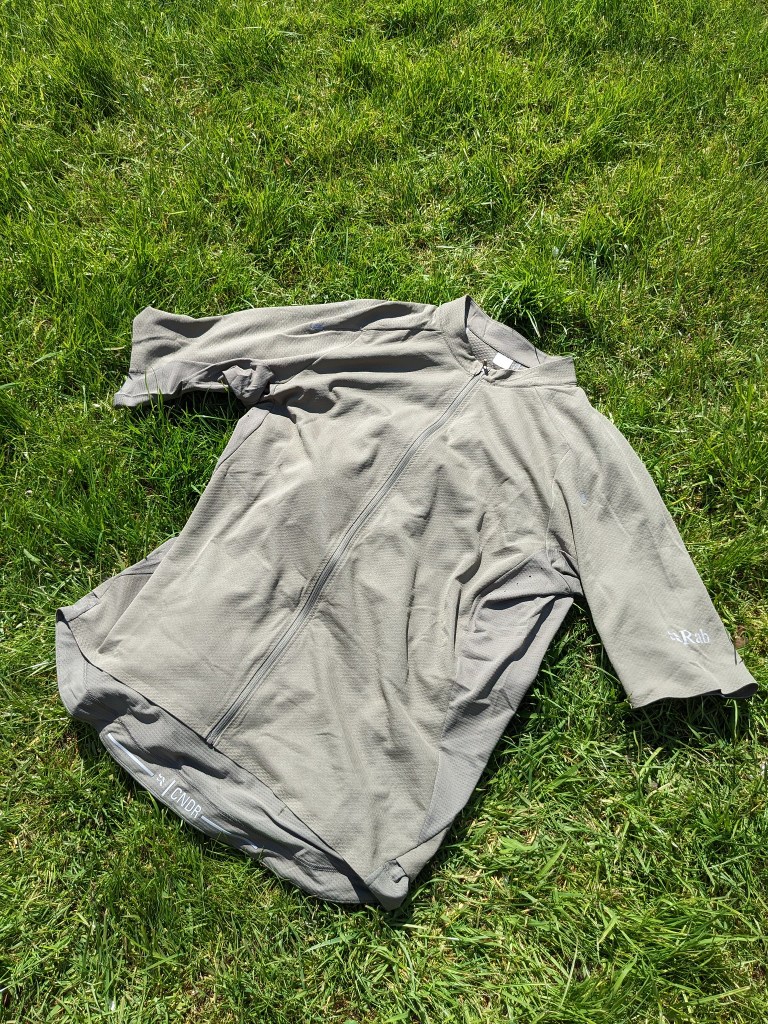
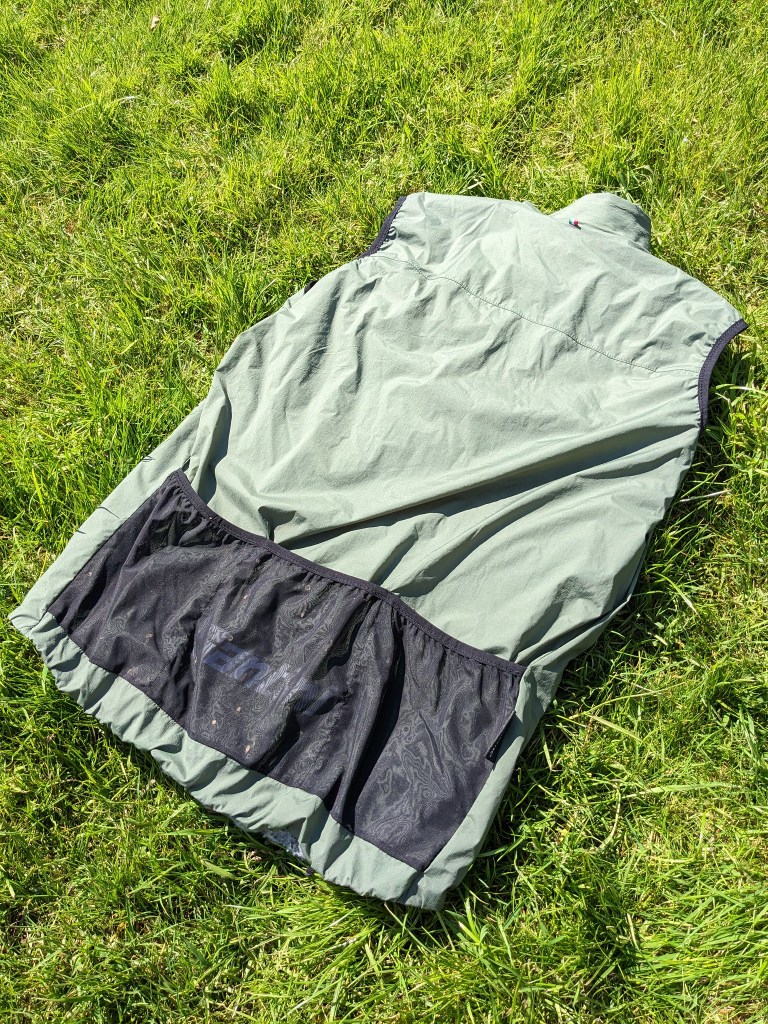
Well known for their outdoor range of clothing Rab have recently released a range for cycling. The guys at Wild Cycles who are partnered with Rab for some of their events suggested to Rab that it would be a good idea to send me some kit to try out. They kindly did and so it’s time to see if Rab are jumping on the band wagon of the gravel boom and just putting their name to a range of cycling kit or is it actually designed for the job? it’s going to be fun to find out.
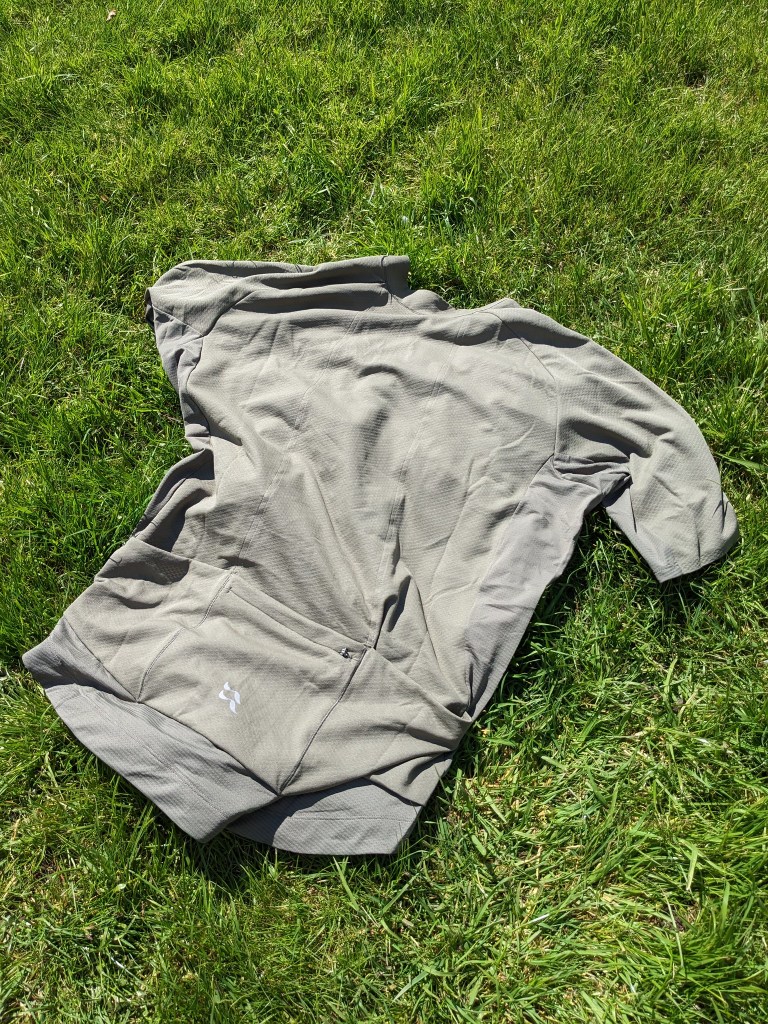
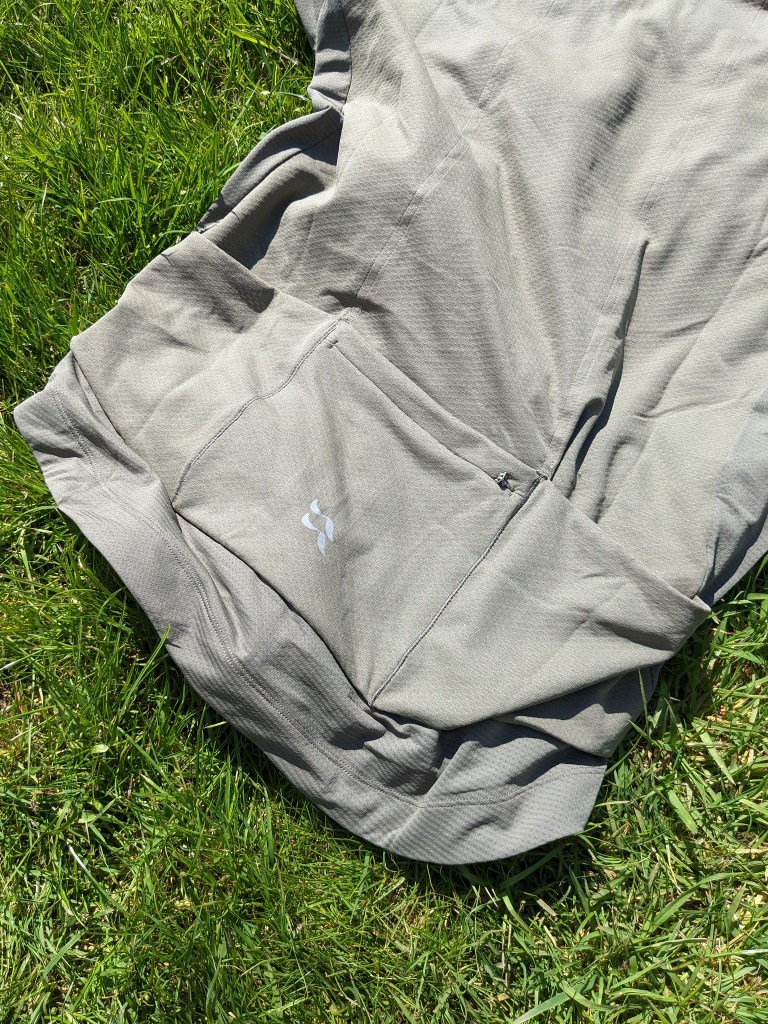
Rab Cinder Jersey Top
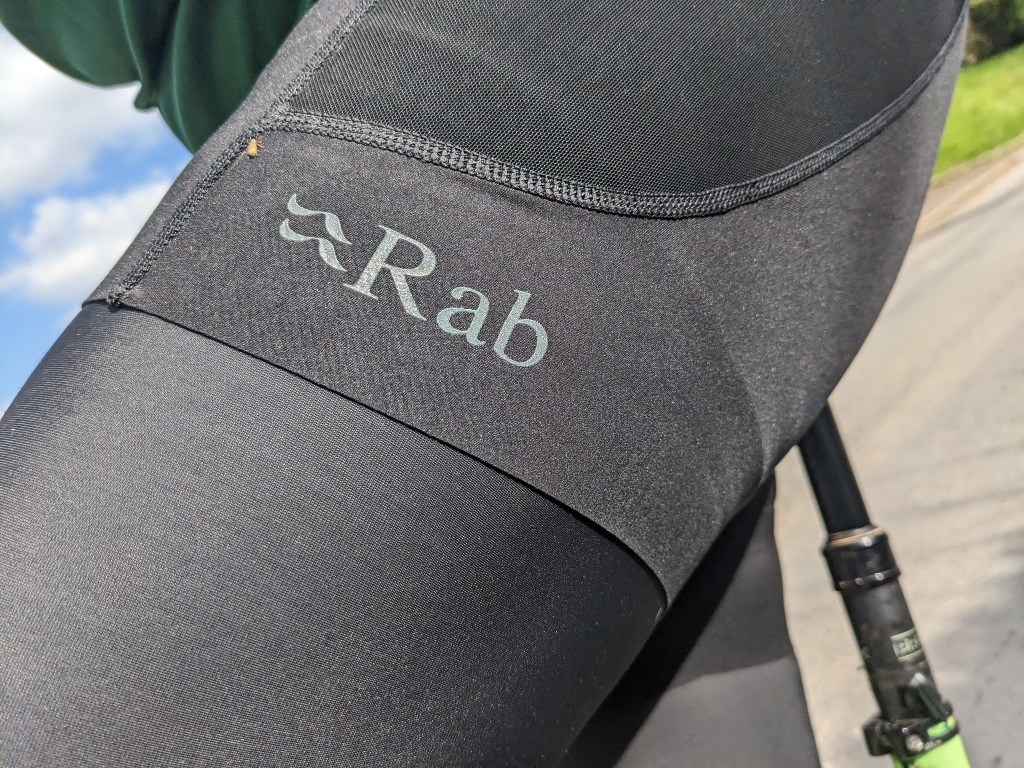
Its seems that Rab like an acronym or two going by their website. they say the Cinder jersey is made of “Motiv™ (102g/m²) with S.Café® Yarn Technology” for the main part and the secondary part is “Motiv™ Aero single jersey fabric with subtle mesh structure (85gsm) with odour control treatment” What this means in reality is that the jersey is slightly tailored but by no means “race fit” i.e. it fits real riders and that the fit guide is realistic and that the jersey is perfect for late spring and summer riding. The material feels quality and not like the usual polyester or nylon, the vented material is in all the right places helping to stop that overheated feeling you get with some jerseys. Full marks to Rab for the full length zip. the zip is easy to use with one hand and enhances warm weather riding greatly. The sleeves are seamless and stay in place without tight elastic. Three pockets and one zip pocket on the back mean there’s plenty of stash room for essentials or emergency cake stops.
Riding in the jersey is great, it’s comfy and not overly tight but not baggy, perfect for my style of casual riding. Because of the light weight of the fabric you’ll feel like you are not really wearing anything. This does mean that if you overload the rear pockets the weight will pull the hem down at the back and the neck up at the front. stick with bars and gels rather than lardy cake and all is good though.
A great, well thought out Jersey from Rab
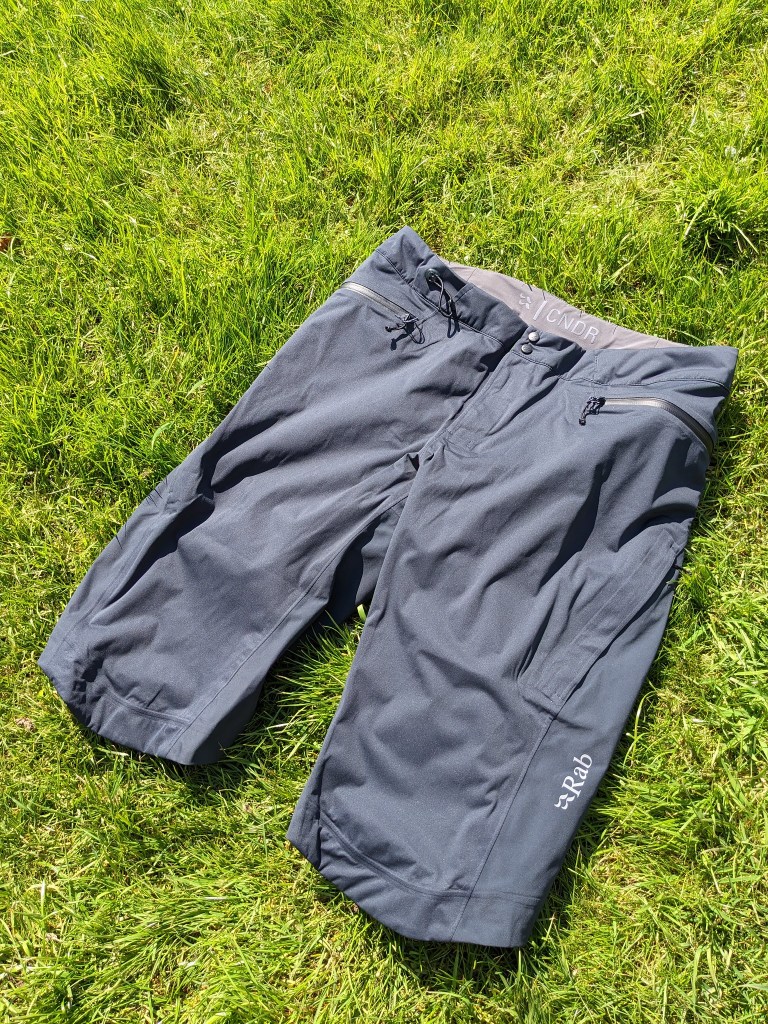
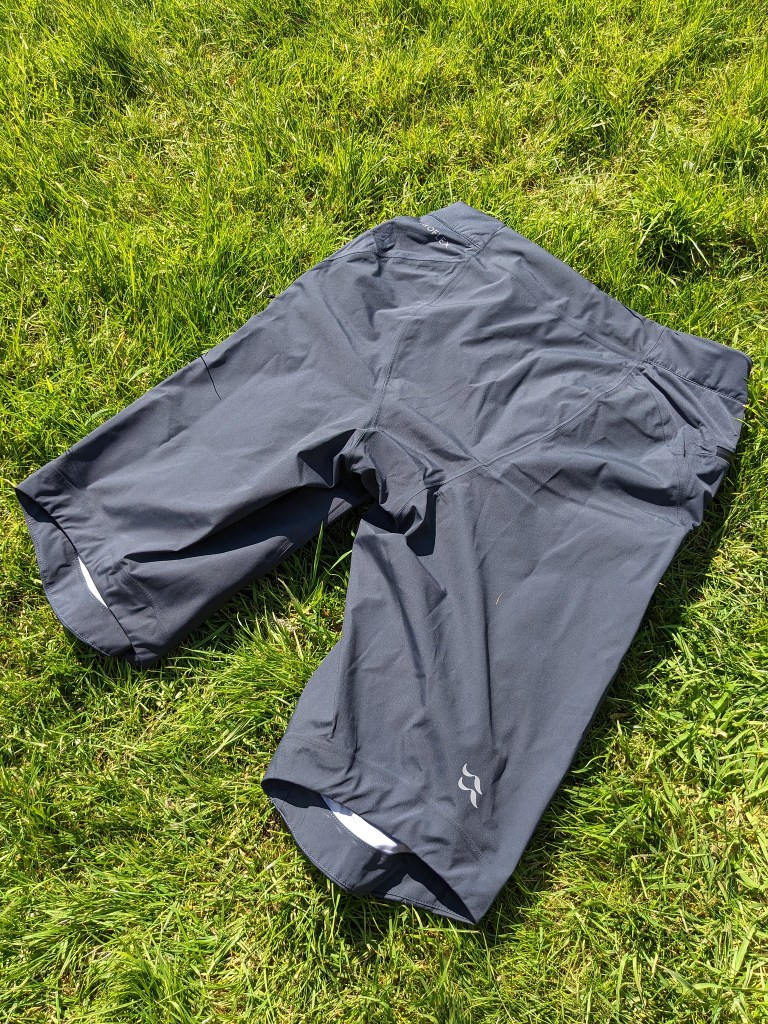
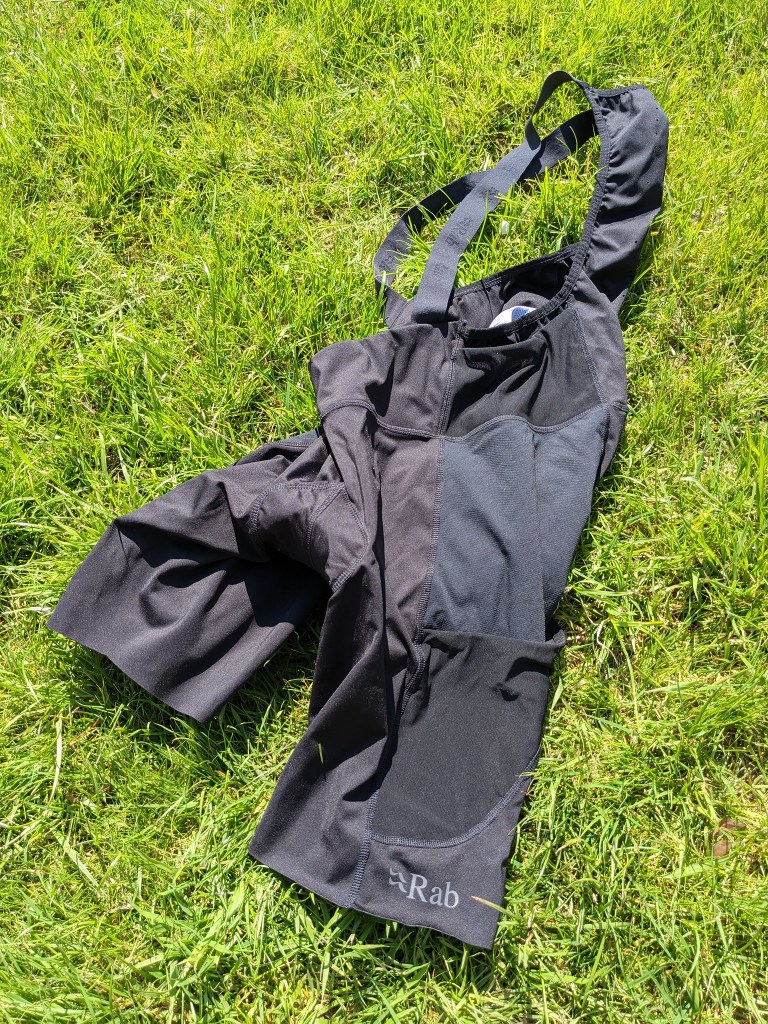
Rab Cinder Kinetic Waterproof Shorts
As these were sent out in the middle of March I did worry that I’d not have the opportunity to test these out properly, after all it was nearly spring, best time of the year for riding…..hmmm we then proceeded to get one of the wettest springs for years, frankly I blame Rab!
I’m not going to cut and paste all the acronyms and names of the fabric for these, it’d take up half the page! what you want to know is how they feel and are they actually waterproof. So, feel. to the touch they feel absolutely fantastic, the fabric has such a soft velvety quality to it on the outside and doesn’t feel plastic like on the inside like a lot of waterproof shorts seem to. The blight of waterproof shorts normally for me is the rustle, that awful sound that shorts make when pedalling, well full marks Rab, the rustle here is at a minimum. The shorts are cut for the pedalling position and just wide enough at the knee that if you wanted to wear thin knee pads you could, so good for MTB too. the top of the knee is slightly longer than the back for extra coverage. I think I would prefer a slimmer fit option, I don’t wear pads so don’t need that gap. The size guide again is realistic, there is a pull cord to adjust fit for cafe stops and the fly zipper and press stud fastening is secure. The shorts have two side pockets and two zipped thigh vents which double as access points if you are wearing cargo bibs underneath. The only downside I’d say is they don’t pack down very small to be able to carry them as an emergency short but if it’s already raining before you start your ride they are comfortable to wear over long distances and time.
They claim to be waterproof and I can honestly say they 100% are. One ride of 25 miles home from work took me through 3 torrential rain storms, the kind that fill up your shoes with water within seconds but my backside and legs remained dry, call me impressed. The shorts have a good level of breathability too and on the aforementioned ride I was clammy from the riding effort but no more so than if it was a hot day wearing non waterproof baggy shorts.
Again, well designed, someone who rides a bike must have had a hand in the design. Recommended
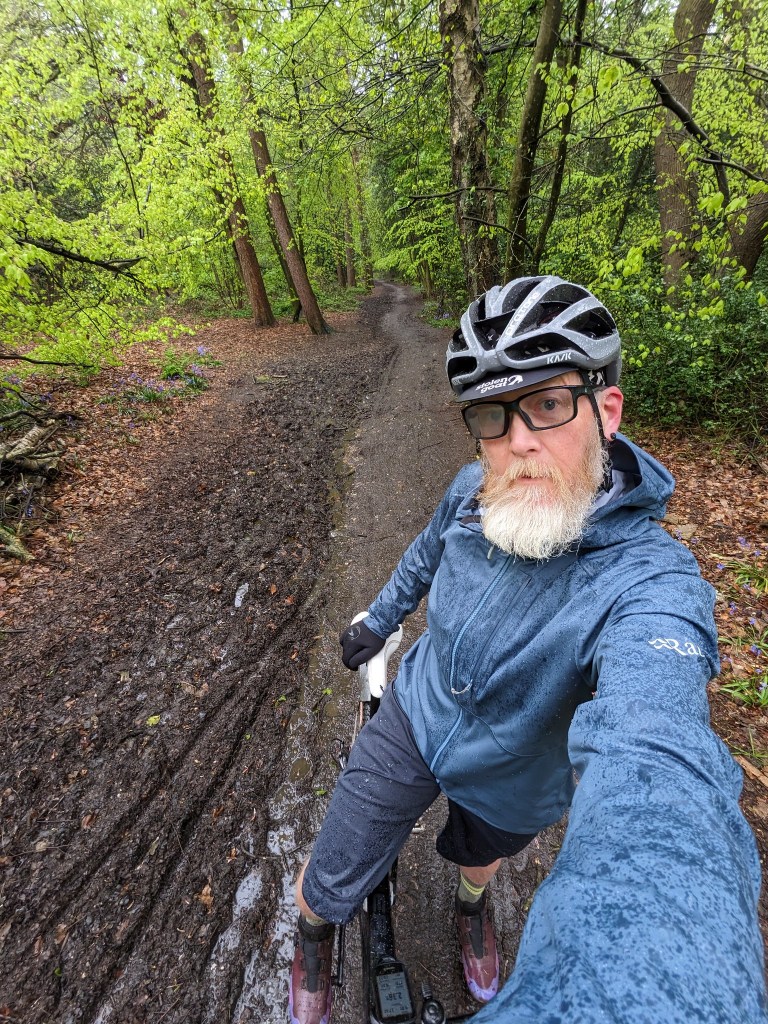
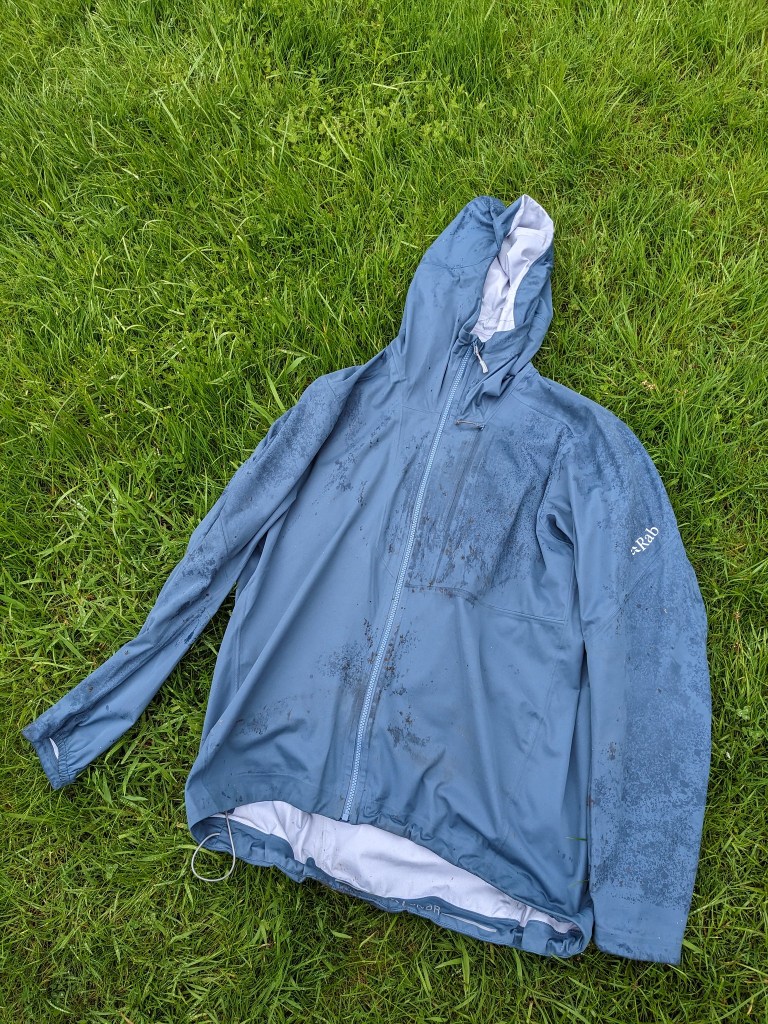
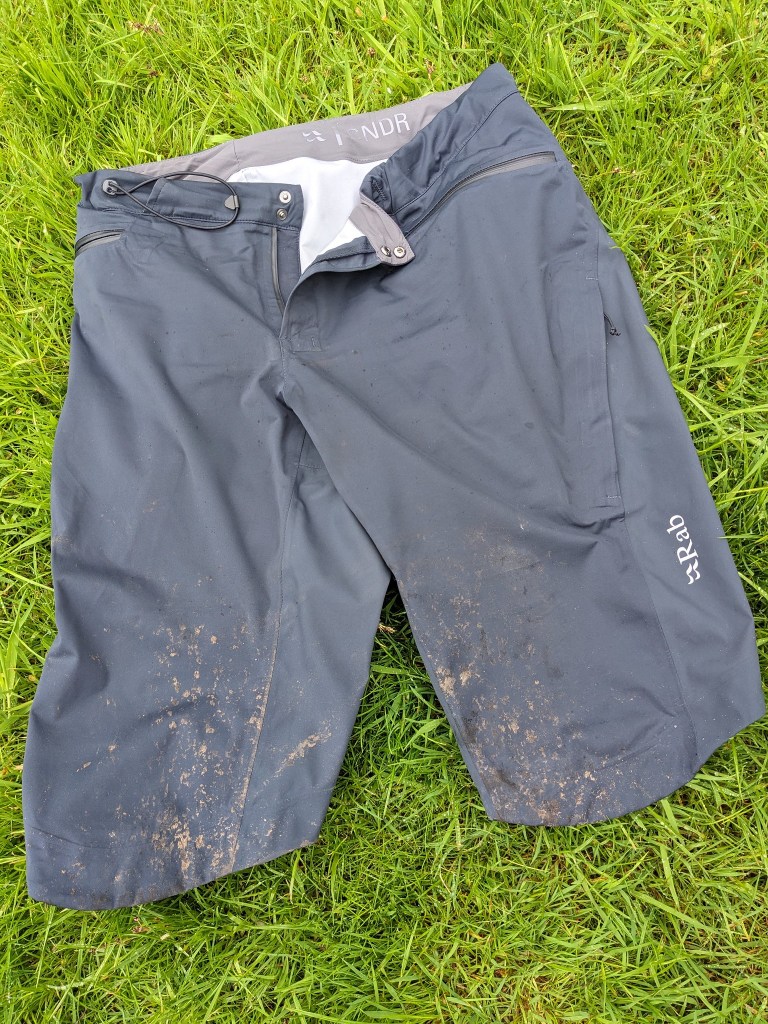
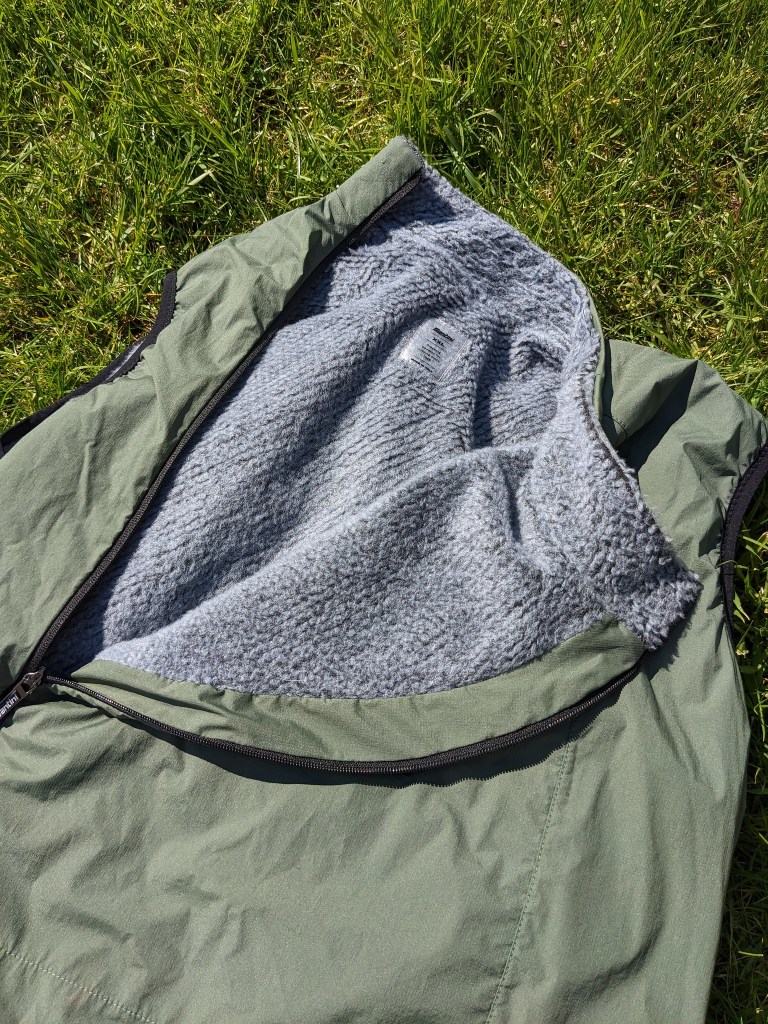
Rab Cinder Kinetic Waterproof Jacket
The wet weather again came in useful for testing the kinetic jacket, which has that lovely soft feel the waterproof shorts do. Rab says the jacket has the feel of a soft shell with the properties of a hardshell and I can echo that. The jacket has a non detachable hood big enough to fit over a helmet that features a stiffer peak at the front and a cinch cord to stop flappage. There is a chest pocket and a rear zipped pocket. The jacket is made from recycled materials.
In use I can say the jacket is 100% windproof, waterproof and very breathable. Having a wet spring is good for waterproof testing but also brings higher temperatures with that rain. it’s easy to over heat when doing a long climb or a big effort normally but although I did warm up inside the jacket I didn’t feel uncomfortable. The sleeves are long enough in the cycling position with half elastic fitting, this means you can pull the sleeves up for cooling if the rain stops and you don’t want to take off the jacket. As with the shorts, it’s not a roll up and stash in your bar bag jacket, it doesn’t pack down small enough. I’d watch the sizing on this one though. I normally take an XL in jackets but this one feels quite big, especially when leaning forward on the bike, there seems to be a big space in the jacket bulge between the front and my chest, maybe it was just because i was only wearing a jersey and base layer underneath and in winter when this jacket will come into its own i will be wearing more layers, one to look at carefully. At the end of wet rides I was bone dry underneath. Again impressive.
This jacket is so nice I’ve started to wear it off the bike too….never mind the mud splattered on it!
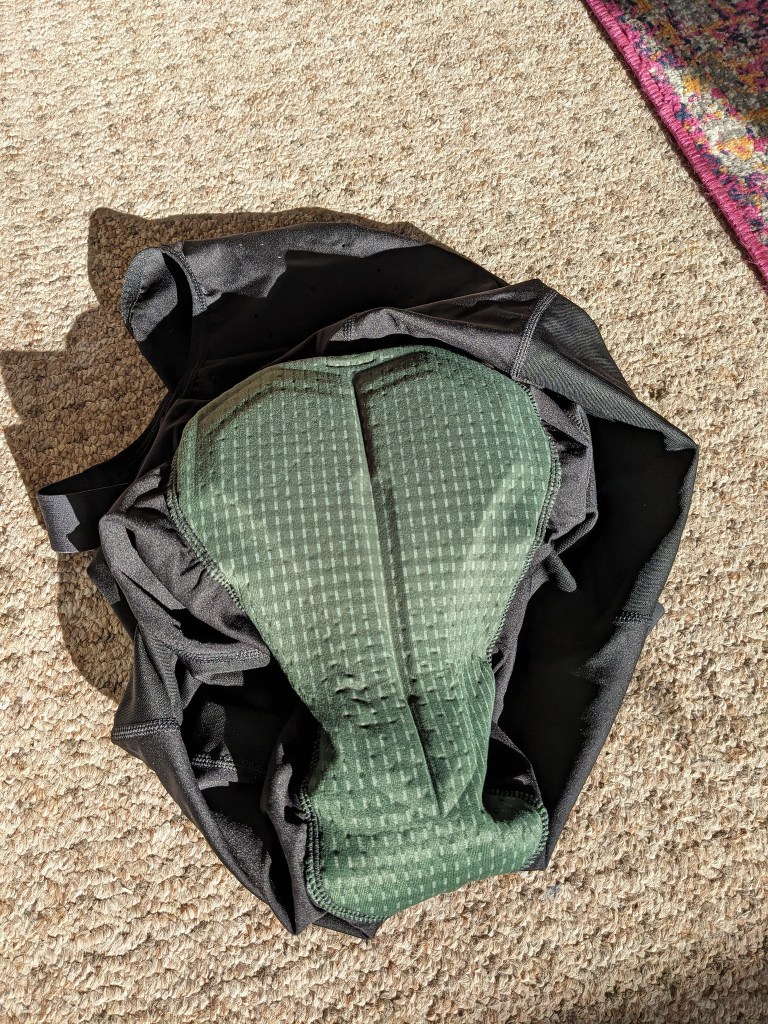
Rab Cinder Cargo Bib Shorts
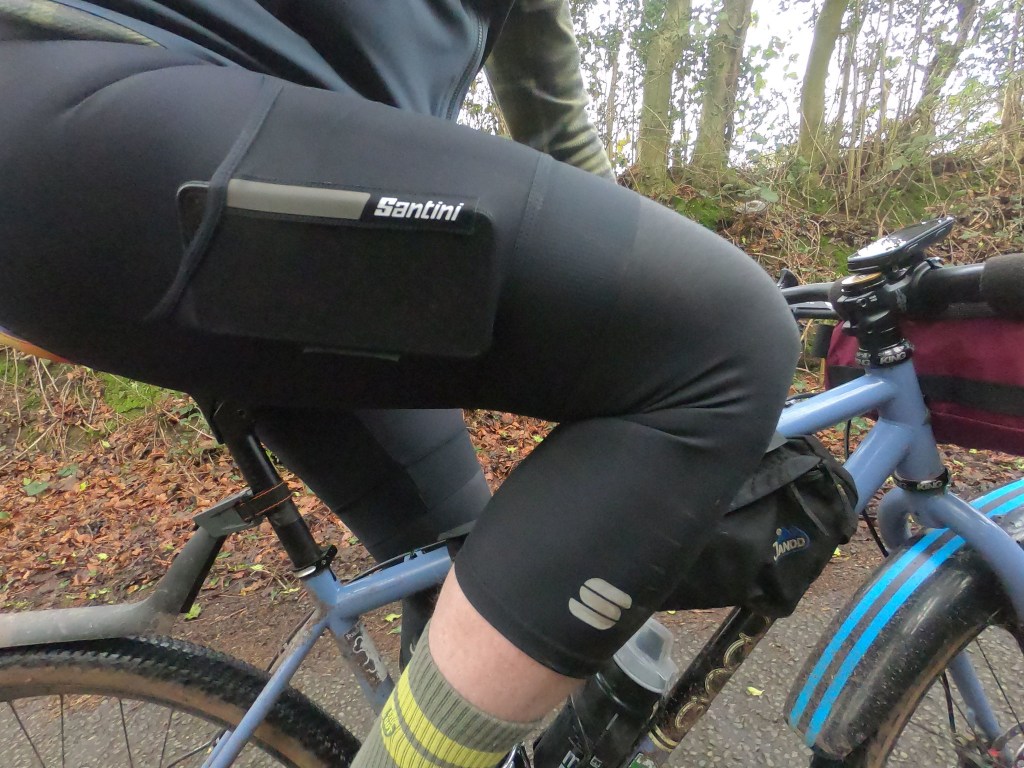
I was a cargo short sceptic, I’ll feely admit it but now after trying a few versions I am a big fan so these cargo shorts from Rab with their “Elastic Interface® Gravel Performance chamois” had to be good to compare to the opposition.
Its usually the case that bib shorts need a few wears and washes to mold to your body shape before they feel truly “yours” the Rab cinder shorts were no exception but after those initial rides I found I was a little disappointed I didn’t have two pairs so I didn’t have to wait for them to come out of the wash.
The shorts feature the traditional bib straps and short, they don’t come up to high at the front, so pee stops are achievable without being a contortionist, (I can’t obviously speak for the women’s version in that function) there is a pocket on each thigh deep enough to keep a large phone/banana/sausage roll in without them falling out and two mesh pockets at the rear. The material has a DWR (durable water resistant) coating and Rab say the shorts are body mapped for support and low abrasion.
As mentioned, after a couple of rides I was hooked on these shorts, they feel thick enough to offer some protection in a crash and yet are very light weight. They seem to cosset you in a lovely hugging way that your favourite jumper does. I’m not sure what makes the pad “gravel performance” but it is comfortable over long distances and that’s even on an MTB! The thigh pockets are not baggy and feel secure enough to put something valuable into. I put my phone in mine but obviously that’s a silly thing to do, you wouldn’t want to fall on it so don’t try that at home kids! The leg grippers are unobtrusive and move with you rather than having a vice like feel or flappy. Sizing here is spot on, I’m usually an XL for length being over 6ft and these fit perfectly.
The only downside I can think of with these shorts is that I don’t have two pairs! Can I have another pair please Rab, pretty please with a big hug?
At the start of this review I wondered if Rab had just rebadged an off the peg range of cycling clothing as their own just to be in the scene but I’m now sure that this is not the case.
Rab have sat down and thought about the Cinder range, they’ve used their experience of outdoor wear and applied those materials and know how into their cycling range. From wearing the kit I can tell that whoever designed it is either a cyclist or knows about cycling.
Bar bags are big news in the gravel/adventure bike world. It almost seems like they have become de rigueur or a fashion accessory and define you as a gravel bike rider over a road biker or MTBer. Utter nonsense of course. Bar bags are a practical way to carry a little bit more stuff than say you would on a road bike. A gravel bike might be headed far away from a road or corner shop so keeping yourself supplied with food, a jacket, a dry place for a phone etc etc so having all that handy in a place you can reach into while still riding is great. I personally hate wearing a back pack or over loading back pockets with stuff so a bar bag is perfect for me.
its not all emergency blankets and tech, you need to carry essentials too!
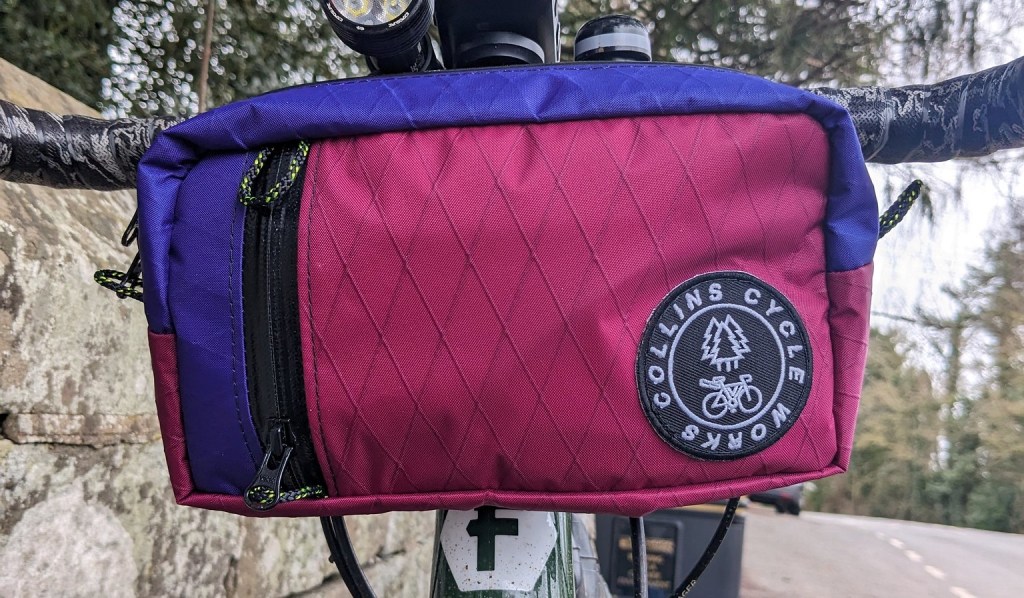
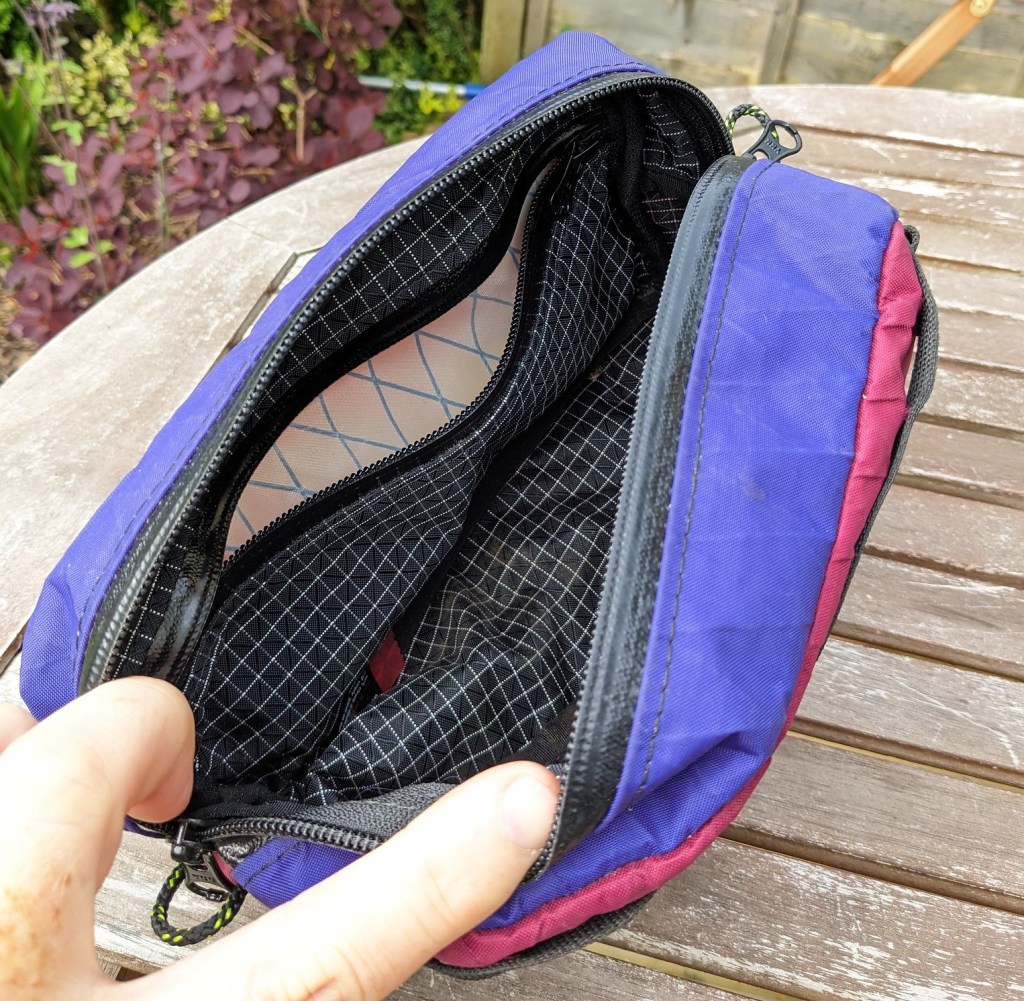
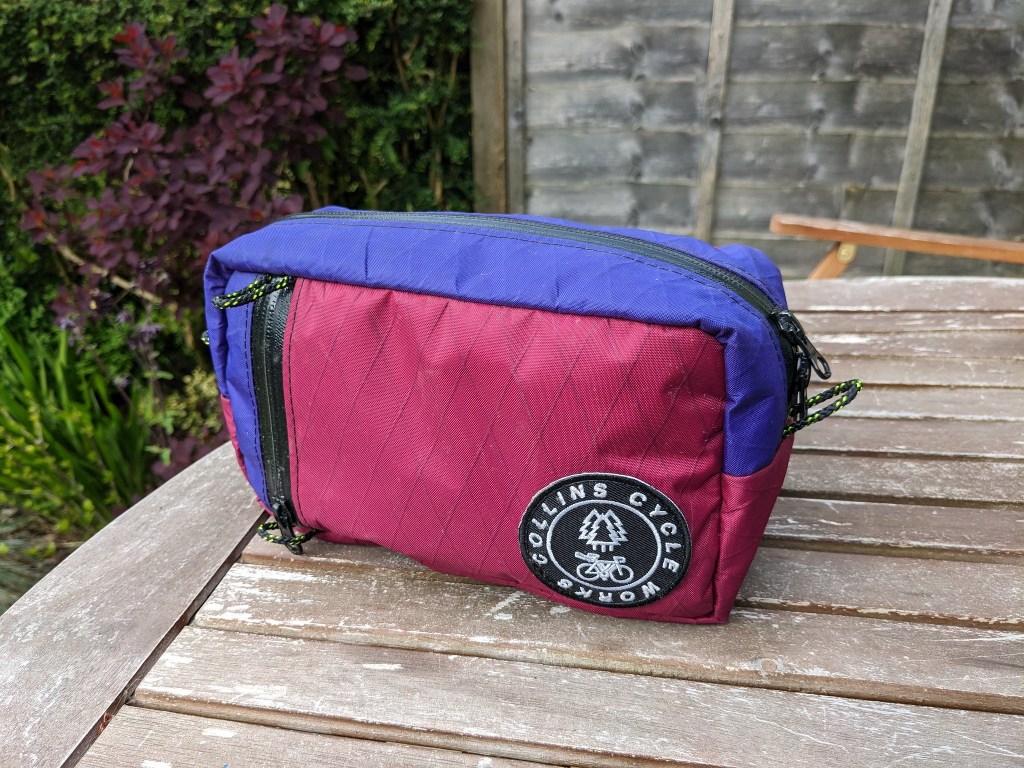
Patch from Collins Cycle Works got in touch and asked if I’d like to try out a prototype bag he’d developed. Of course I jumped at the chance and made a day of it and a 50+ mile ride over to his workshop to pick it up
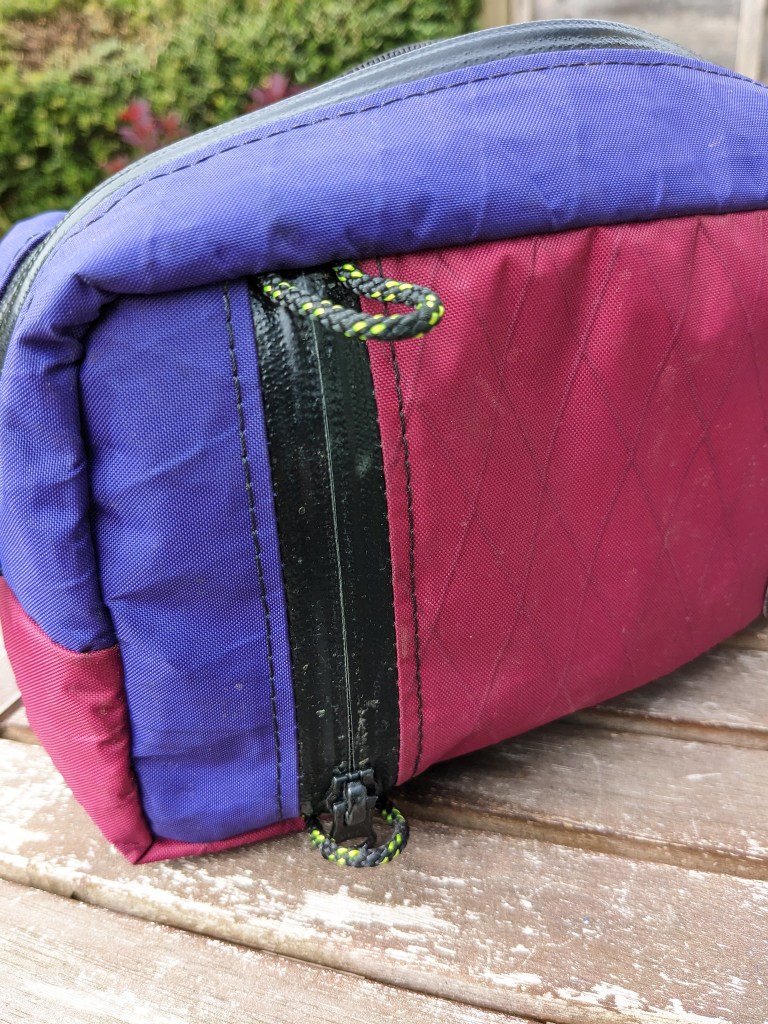
The Collins Cycle Works bag differs from the majority of bar bags as it’s rectangular rather than cylindrical. this actually makes more sense as you can put more stuff in a bag with corners and items don’t all end up rolling around the bottom of the bag rattling together. The bag is made from X-PAC VX21 a “climate neutral” fabric that is waterproof and low stretch. it has a dyneema gridstop liner and YKK aquaguard zips. The bag is I’d say weather resistant as although the fabric is waterproof it is hand stitched together so moisture might get in via the stitching.
The bag has two strips of webbing at the rear and comes with velcro attachment for the bars, the lower webbing can be used with a cord to anchor the bag to the head tube to stop any potential flapping. I tried the bag without this and have had no flapping issues even on the roughest terrain despite heavy single items or over loading the bag deliberately. on the front is a vertical zipped pocket which is useful for thin items such as phone, wallet etc. I’ve been keeping my spork and spare gopro batteries in there. Inside, the bag is lined and has an internal zipped pocket. Opening and closing the bag is easy using the double ended zip. Depending on what you have in the bag access is easy while on the move even though the bag doesn’t have a stiff liner.
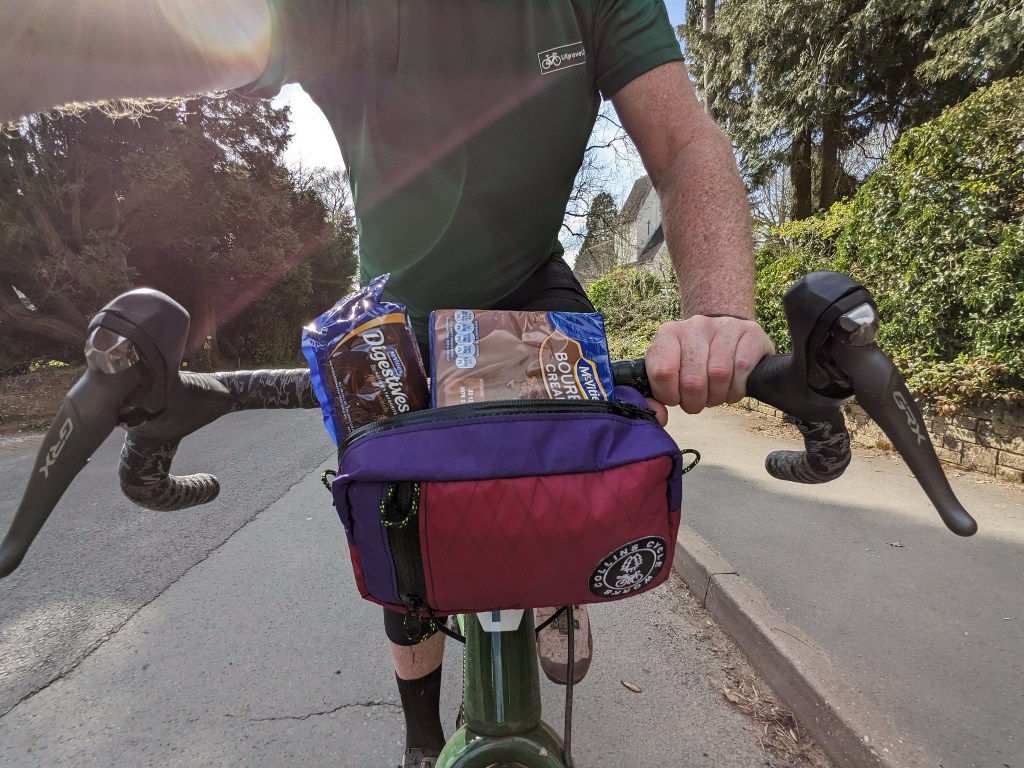
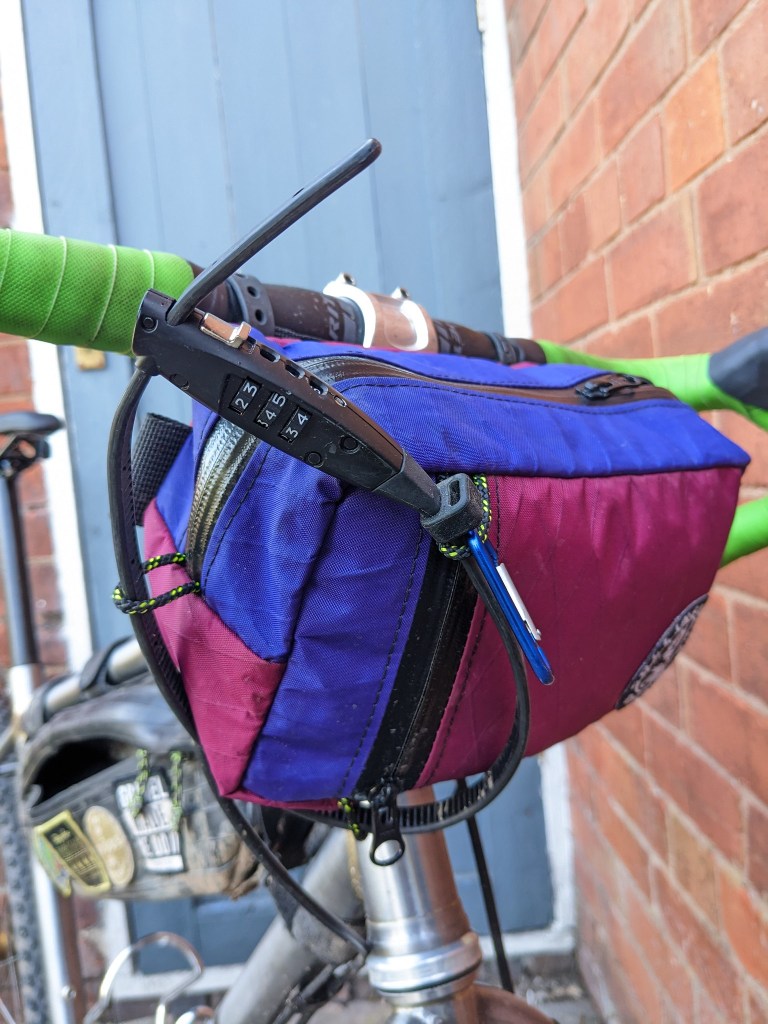
I’ve managed to fit, phone, wallet, gopro, waterproof jacket, cap, gloves, multitool in at the same time and still had room to fit snack bars. The beauty of the rectangular design is that there always seems a corner to push some more stuff into. I even threaded my cafe lock through the loops on the front of the bag.
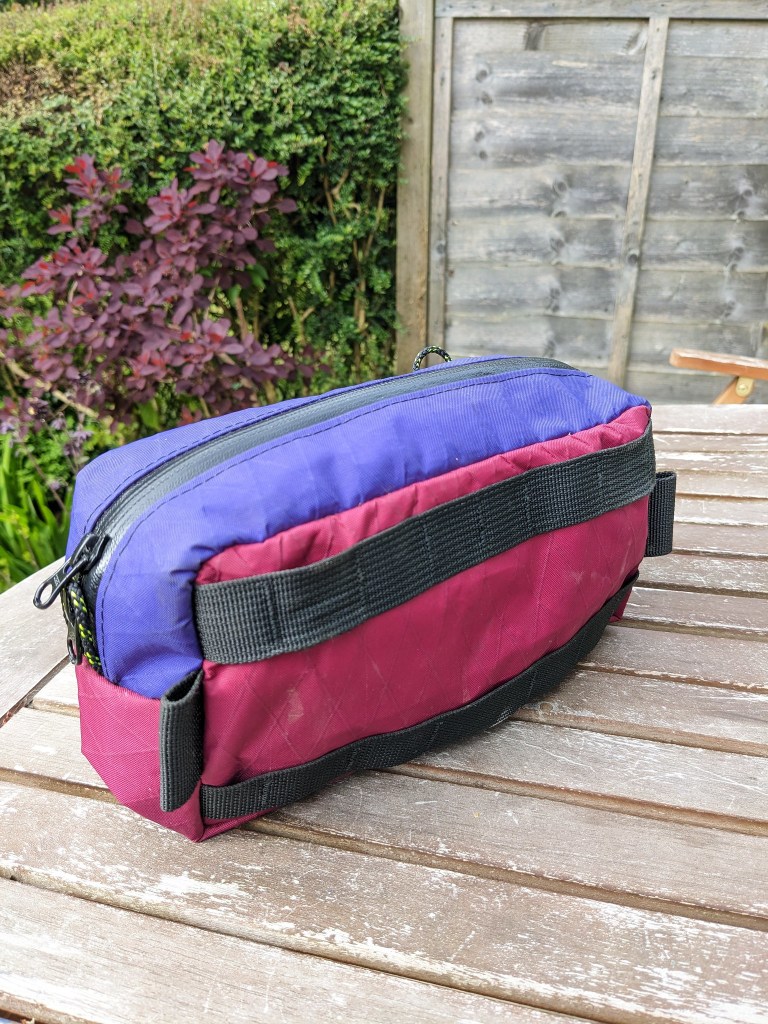
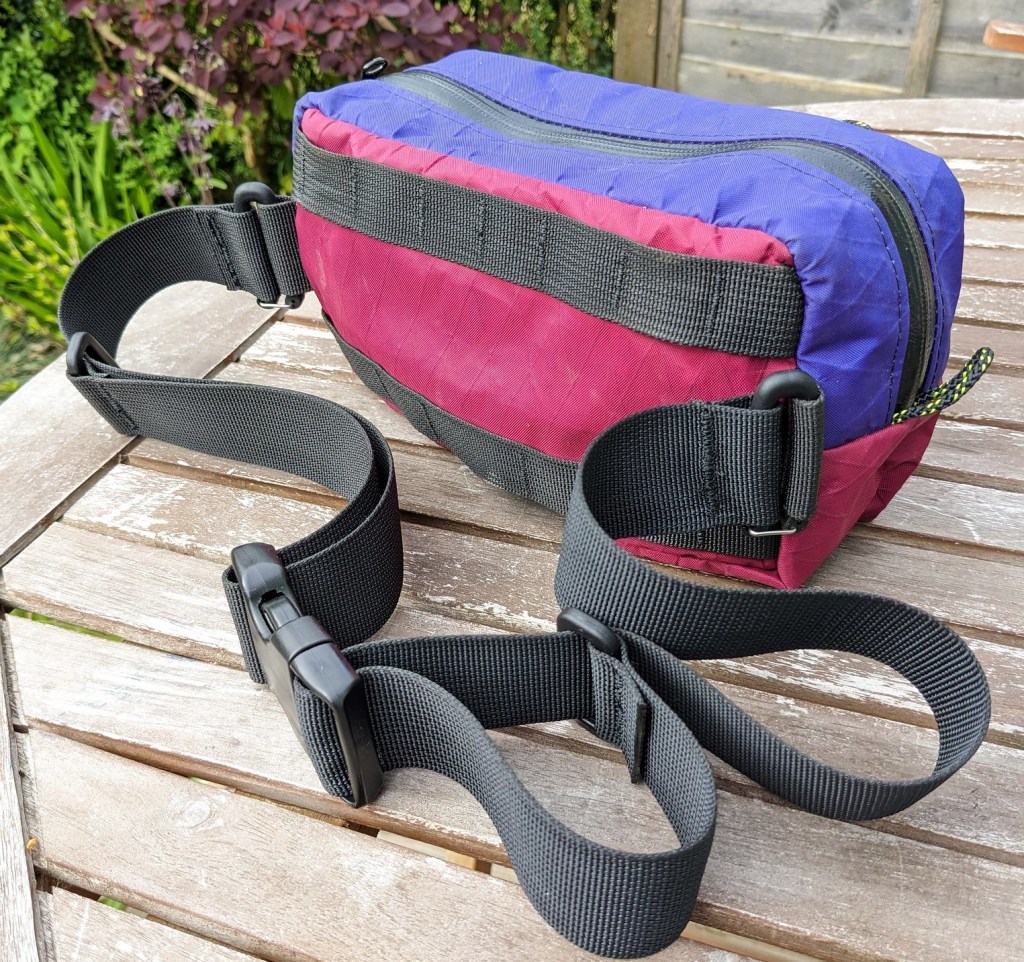
The bonus feature of this bag is that it can be converted to a waist bag too. The permanent loops on either side of the bag fit to a spring loaded full adjustable strap with snap buckle. Don’t like the bag on your bars? wear is around your waist. Want to leave the bike and go for a wonder or into your accommodation for the night? unhook the bag, quickly add the strap and off you go.
I have put this bag through the mill, it has seen duty on 4 different gravel bikes and an MTB, it has quietly got on with it’s job despite me trying to force too much stuff into it or strapping stuff onto it. It doesn’t even look used after 3 months of constant use. The material really is hard wearing. because of the constant swapping between bikes i swapped the velcro loops for voile straps as they are quicker to undo. if you are buying this bag for just one bike then the velcro supplied is secure and strong.
The Collins Cycle Works bag is ultra reliable and versatile, they are made to order so you can spec lots of different colours. I really like this product and the fact it is made within riding distance of my house makes it all the more perfect. Collins Cycle works is a one person industry and that personal service and knowing someone’s passion has gone into making it is just icing on the cake.
Collins Cycle Works website can be found here the 5.0 bag will soon be in production, Patch says there may be a few tweaks and it will retail at around £50 see more on the CCW instagram
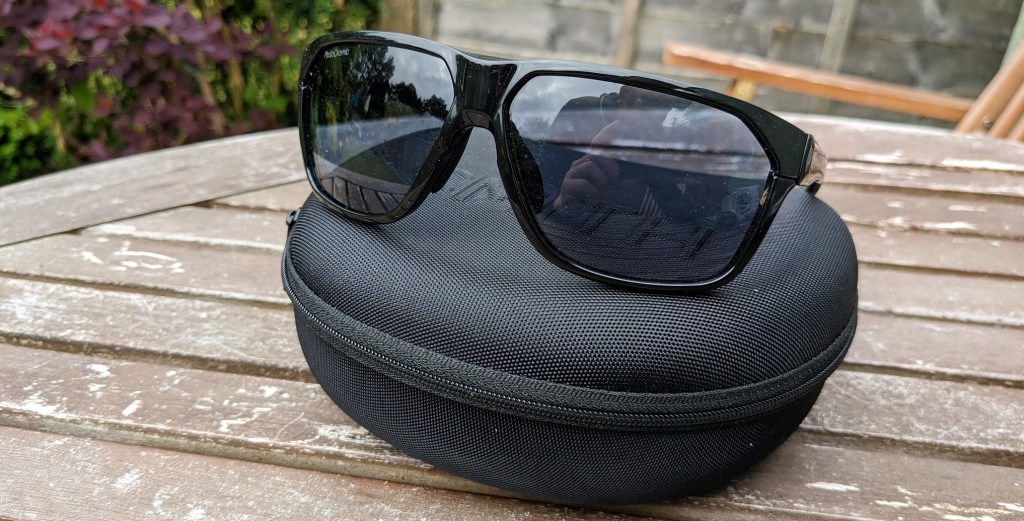
Keeping your eyes protected when riding is in my opinion, essential. Trail debris being flicked up, insects smashing into your eyes and the UV of harsh bright sunlight all can at the very least ruin a favourite descent and at the maximum cause irreparable damage to your eyesight. Wearing eye protection is something I don’t even think about when I get dressed for a ride, it’s now so automatic.
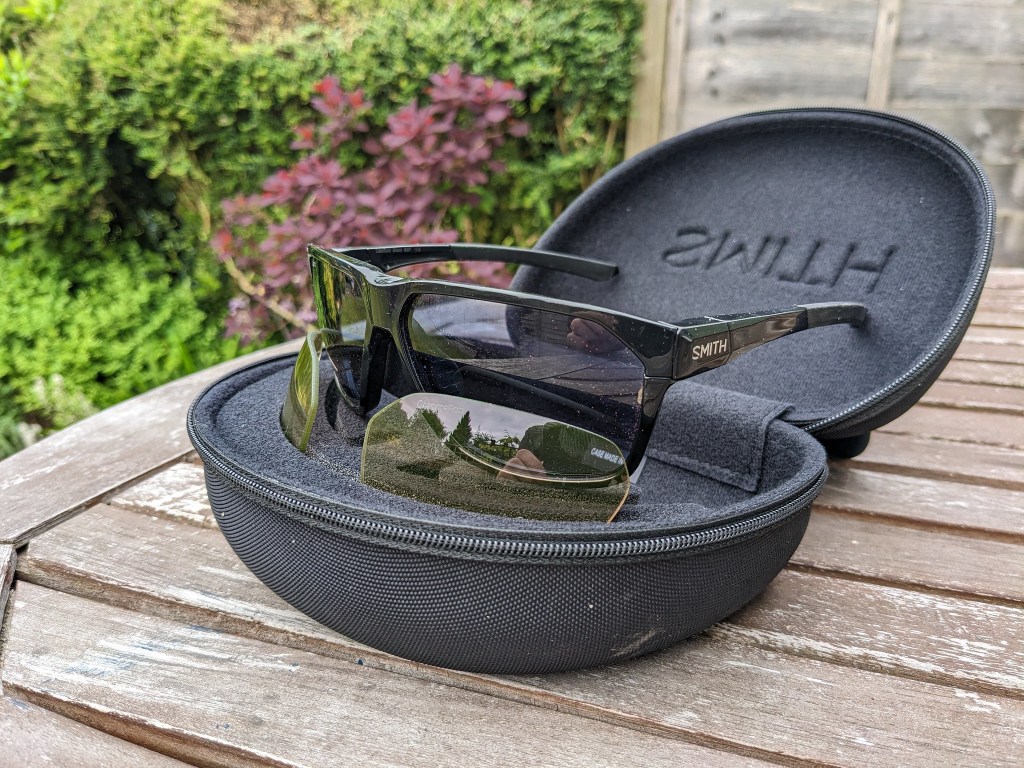
So while wearing something to protect your eyes is needed it doesn’t have to be a pair of ugly safety glasses. Why not be safe and look good at the same time? Smith Optics sent me a pair pf their Leadout Pivlock sunglasses to try out.
The Leadout Pivlock shades are a pretty classic design that is more aviator/rayban than the currently fashionable 80s throwback wrap arounds popular today (Smith also do arrange of these too). I love the look of them as they work well on the bike but also in any environment. I actually wore them all day at work as an experiment on their comfort levels. You may wonder how I got away with wearing sunglasses indoors all day and this is because the Leadouts come with a photochromic lens which goes completely clear helpfully making me not look like a sad wannabe rock star at work!
now you see themnow you don’t
The photochromic lenses work so well and the transition is quick. Quick enough to change from one to the other so going from bright sunlight to shaded forest is easy. I’ve also worn them at night on rides without compromising my vision.
The sunglasses also come with a “chroma pop” low light amber lens for flat light and early morning use. These do enhance the flat light conditions but the photochromic lenses work so well I’ve stuck to those after trying the Pop lens. Swapping the lenses is easy though with Smith’s pivlock system. Just grip the frame and gently pull down the arm and the lens can be removed and swapped.
Pivlock lens changephotochromic and chroma pop lenses
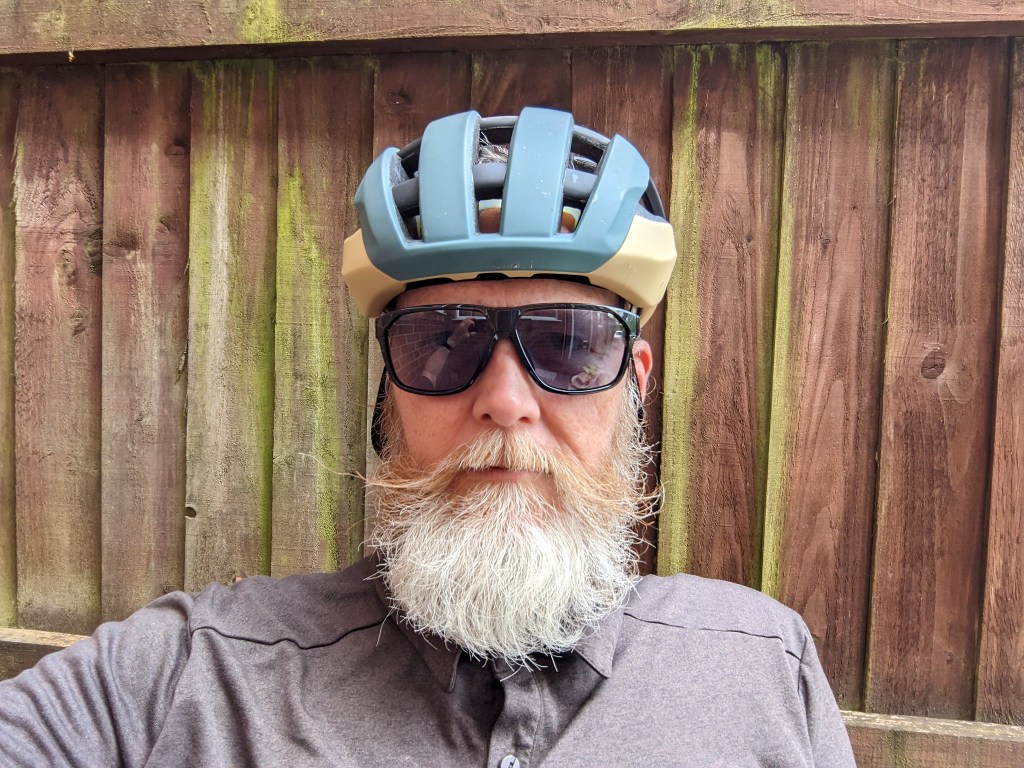
The frames play well with the Smith helmet I’ve had on test, as you’d expect, but they also sit well with two other brands of helmet I tried. They passed the all day comfort test and the nose and ear rubbers stop the glasses from moving on your face even in sweaty conditions. The non wrap around design means airflow is good so there have been no issues of steaming up. The one thing I’d change is that the right hand lens has the word “photochromic” printed on it and I can just see it out of the corner of my eye when riding and I keep thinking its an insect or dirt and want to wipe it off. In use though it doesn’t affect your vision at all.
Smith Optics Leadout Pivlock sunglasses are a wear all day classic style of eye protection with the versatility of lens that means you only need one pair of sunglasses for all your sport and real life. Now if only they did a prescription version!
More details on these sunglasses can be found on the Smith Optics website here
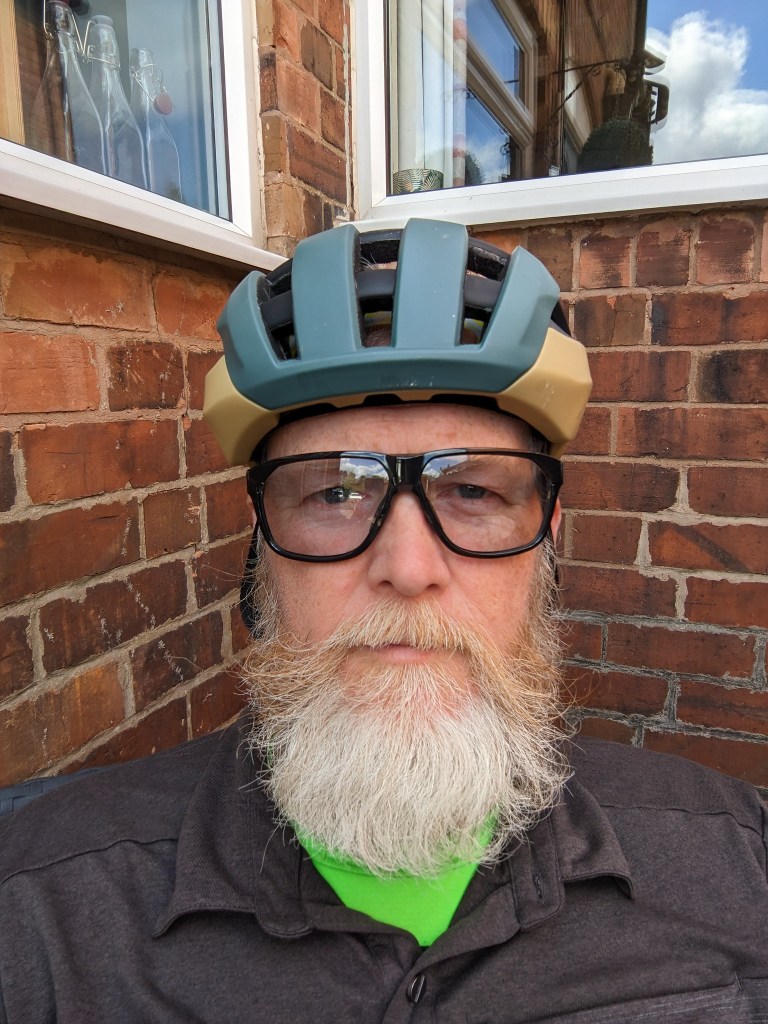
I’ve always lusted over the Smith (usually known as Smith Optics) helmet range as I really like the styling. Well known in the Ski/Snowboard scene for their helmets and sunglasses would they transfer to bicycle riding or be all style and no substance? Luckily the people at Smith UK sent me a helmet to try out, I guess they are confident in their own product so that’s a good start!
The helmet on the outside looks like the standard hard shell with an expanded foam interior but look more closely and you can see what look like straws on end through the vents. This is a material call Koroyd which gives and extra level of protection while not stopping airflow. Smith has been using this material in their helmets for a while. The helmet also comes equipped with the M.I.P.S. system which claims to reduce rotational forces caused by angled impacts to the head (details on the science of the system can be found here).
The helmet has an internal plastic cradle for fitting with a rotary knob at the back to fine tune the fit. I usually wear a medium helmet and the medium Network fitted well with plenty of adjustment to fit a cap underneath should you choose to. the helmet does come with a removeable fabric peak that velcros in round the brow. The straps have plenty of adjustment and are comfortable when riding.
I received the Nerwork Helmet at the beginning of March and so (it now being almost June) have had plenty of rides wearing it in all conditions, from hot sun, rain and even snow! My one fear about the helmet was the MIPS system, I’ve tried a lot of helmets with it but found most of them fitted with the system all creaked horribly, even some when just moving your jaw to eat and drink. The Network though didn’t in normal use. If you take it off and twist the cradle with force it will creak slightly but that never happens while riding so that made me very happy, I’ve given away other noisy helmets after one ride because of it as it really irritates me…can you tell?
In fact once it’s on your head you forget it’s there, usually there’s an adjustment period while you get used to a new lid but the Network was fine out of the box. As you’d expect the helmet works perfectly with Smith sunglasses (separate review coming) but I found they work equally as well with other brand glasses too. Theres even a suglasses port at the front for those relaxed pro rider moments! The helmet isn’t especially super light but it’s also not exactly heavy either and for the price I think it’s pretty good. There’s also a bewildering range of colours too including some special editions. check out the Smith network range here
the Smith Network helmet is perfect for gravel as it has the extra level of protection for the thrills and spills of off road riding without it looking like a full on MTB helmet. It will also not look out of place on your local road club run either. I’d definitely have another one, I’m just terrible at choosing colours!
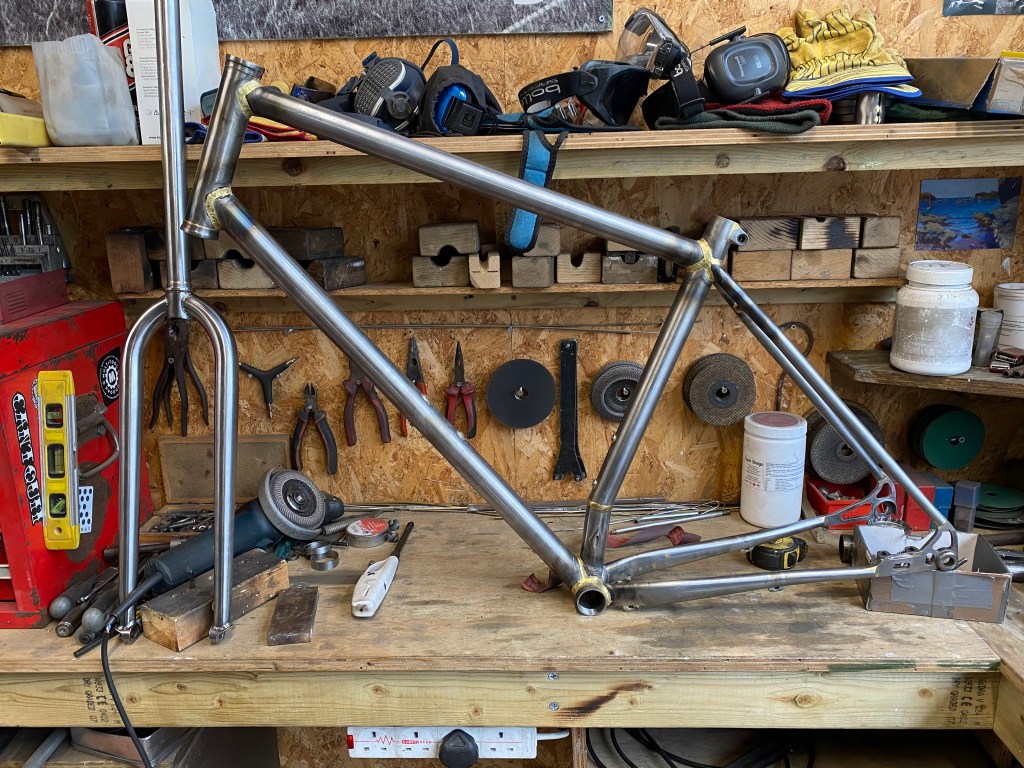
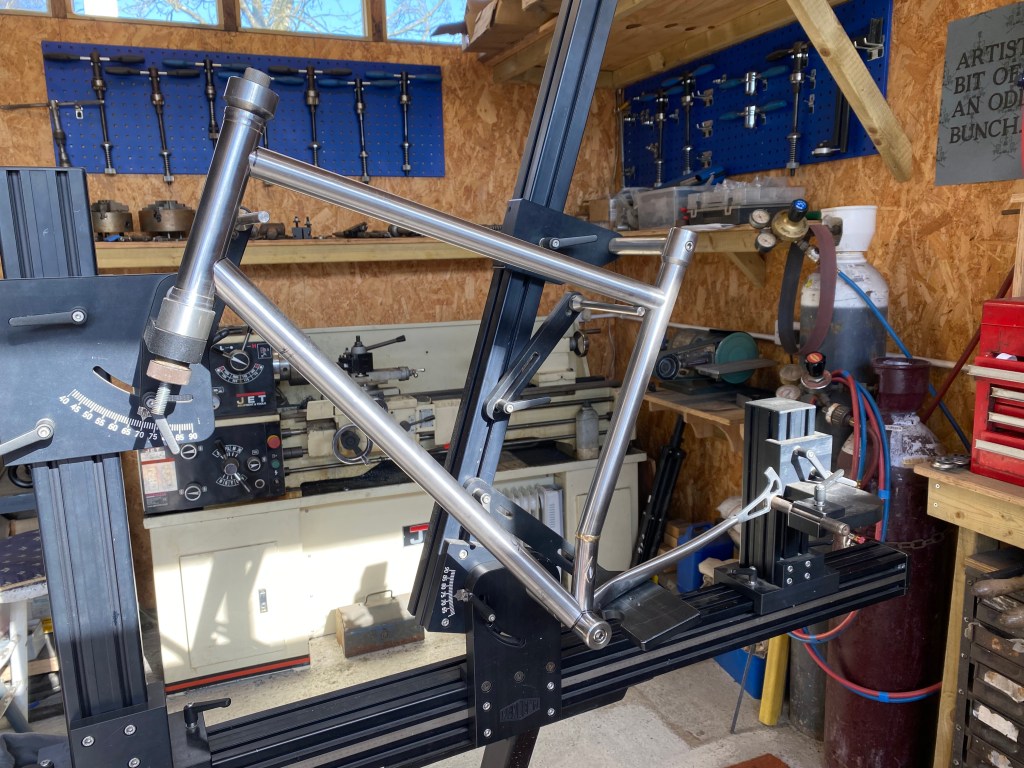
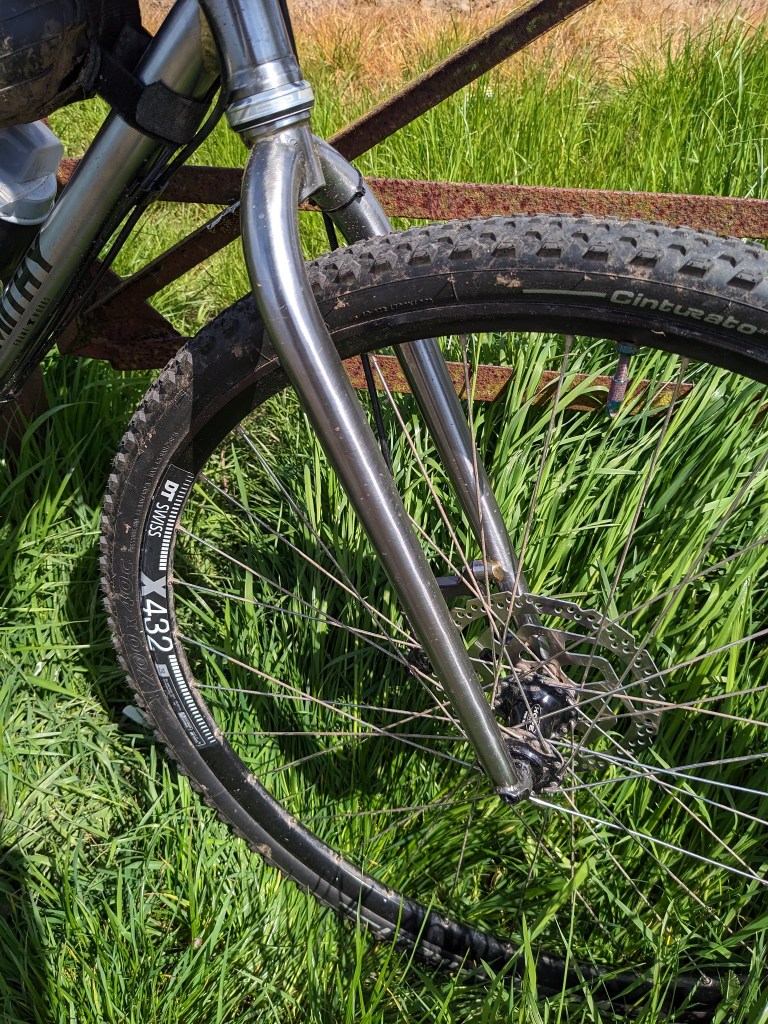
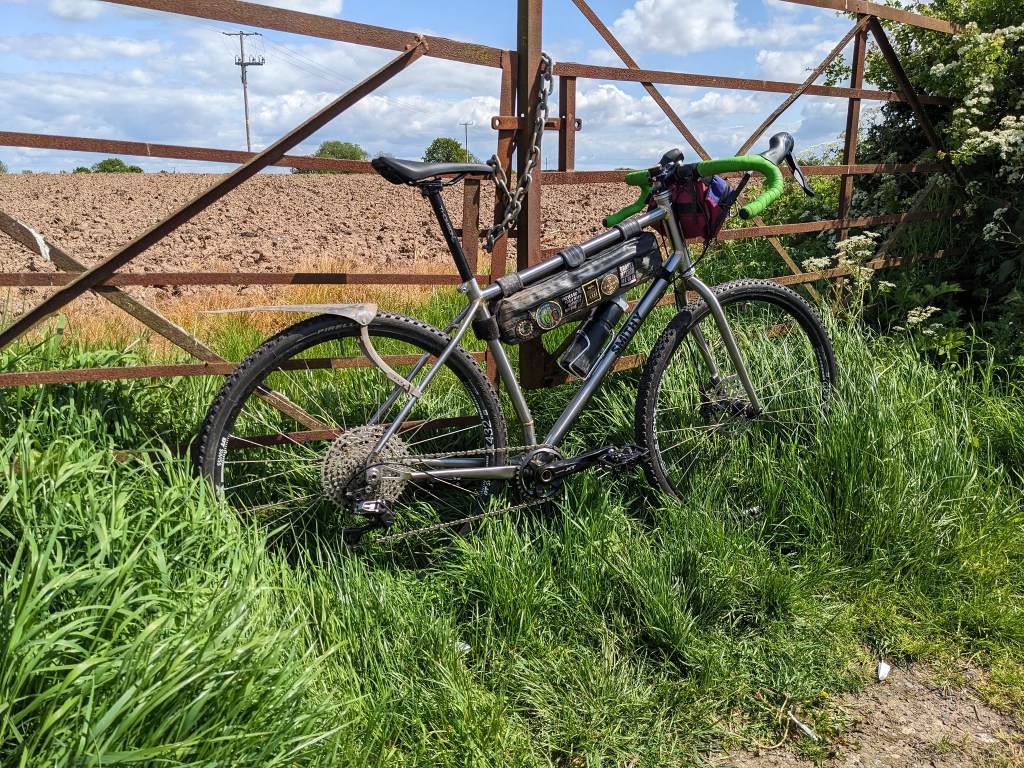
I recently visited Chris Yeomans at Smithy Frame Works HQ in Wales to record a podcast (listen here) about the history of Smithy frameworks and what to expect when asking for a frame to be built. In order to experience the process Chris asked if he could measure me and build a bike that I would like to ride. This would also give Chris more experience in building off road drop bar bikes. Chris has years of experience building MTB and flat bar gravel bikes but wanted to perfect the dimensions and angles needed for a drop bar bike. I could hardly refuse this opportunity so we sat down and I played the customer in a sort of role play (funny how i hate role play when it is in a training session at work but not when it’s about a new bike!) over tea and biscuits in Chris’s house.
We discussed what I was looking for in a bike, how I wanted it to feel, did I want a racy position or a more upright comfy all day riding bike. What was I going to do with the bike, did I need lots of mounting points for bags and bottle, rack and mudguard mounts, how big a tyre did I think I’d want to run in the frame etc etc.
Buying a bespoke bike is a lot of fun, you can literally have anything you want, you are not tied down to what a designer has added to the bike like you would have to when buying an off the shelf, mainstream brand. Obviously if you come up with the idea you want two wheels on the back and one on the front with a lorry steering wheel then Chris may point out the problems with that, although I’m sure he’d love to build something like that. So, you don’t have to be a designer yourself, just have an idea of how you want the bike to ride and what you’re going to use it for, Chris will do the rest.
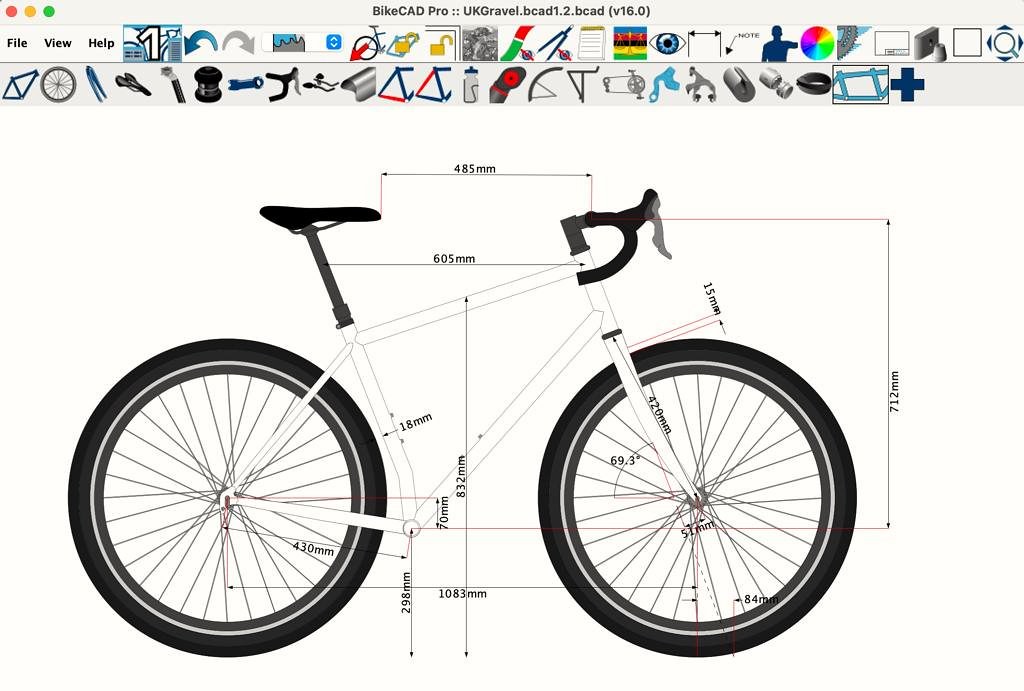
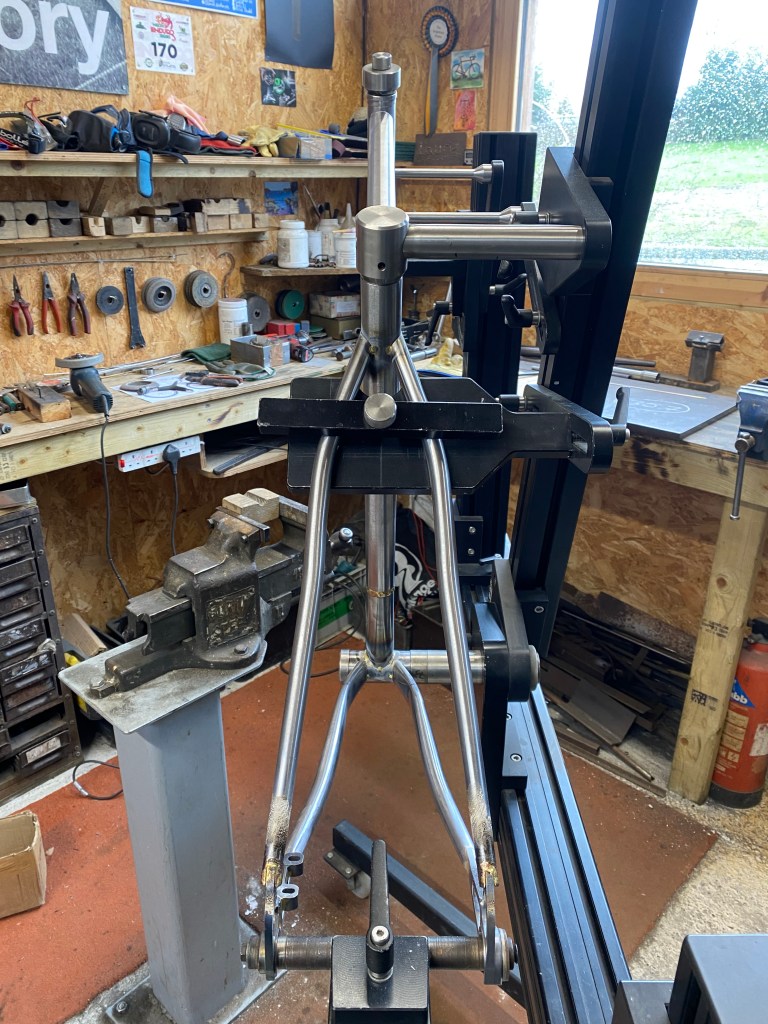
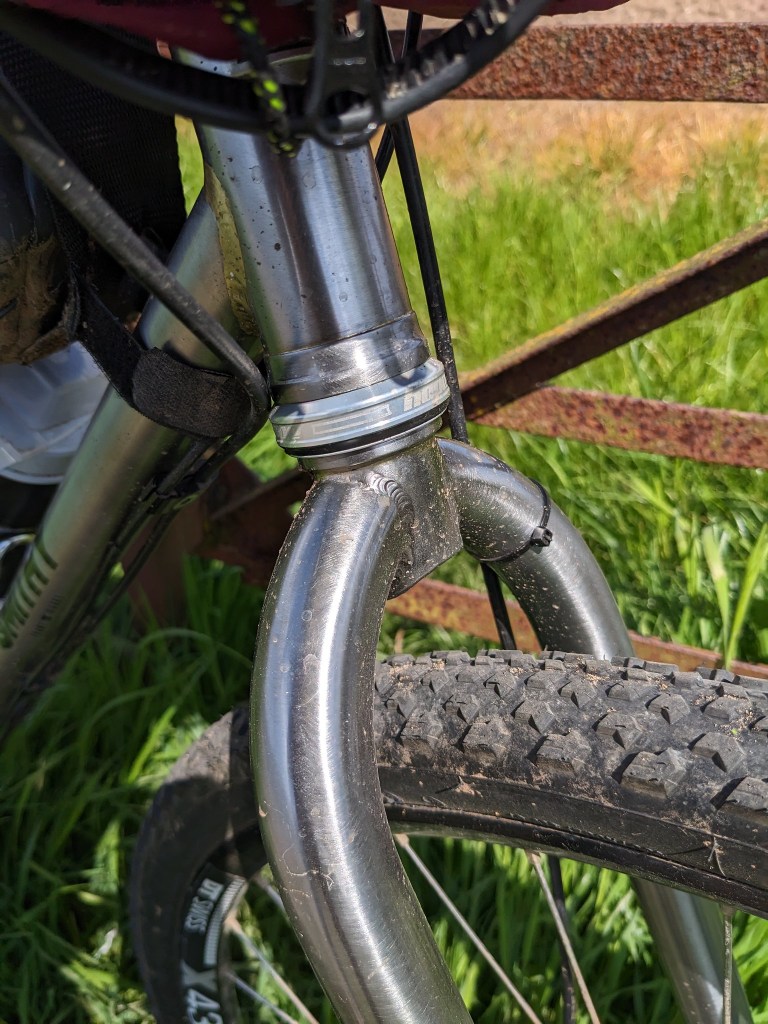
So I chose a gravel/adventure frame with room for 50mm tyres on a 700c rim in a fairly upright but still sprightly geometry. the frame would leave room for a frame bag and bottles but still be able to accommodate a dropper post if i fitted one. I wanted external cabling for ease of maintenance and an external bottom bracket. Chris designed the frame on some software on his computer around my body measurements and after another tea and more biscuits we had come up with a schematic drawing, now the only thing left to do was build it!
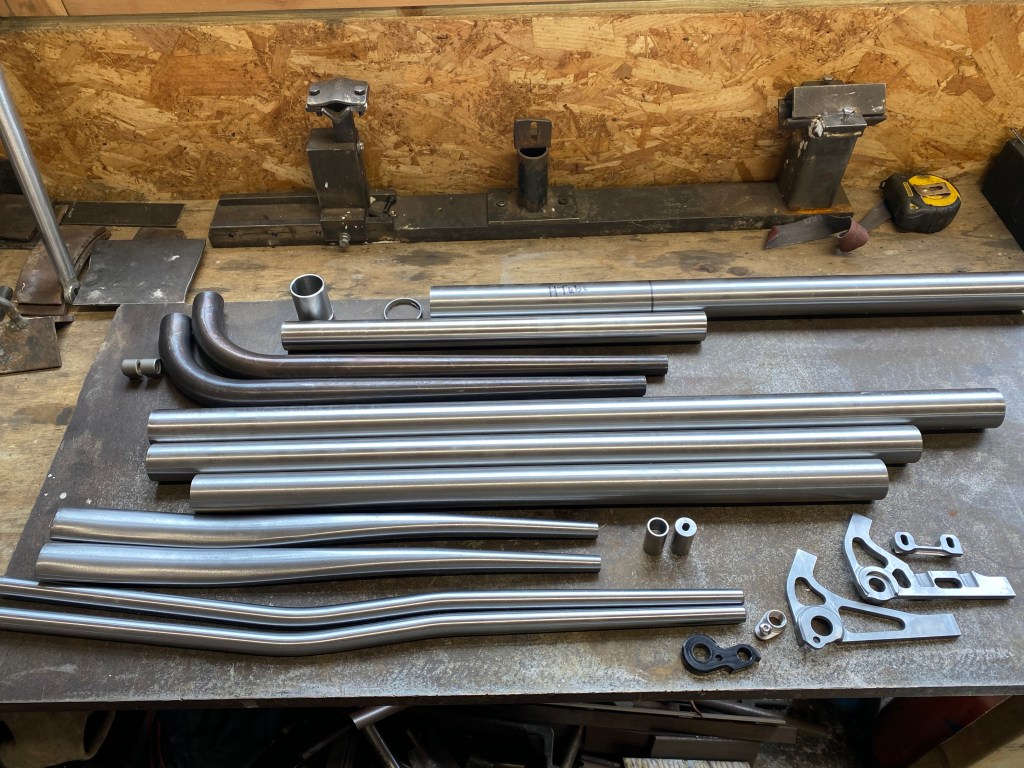
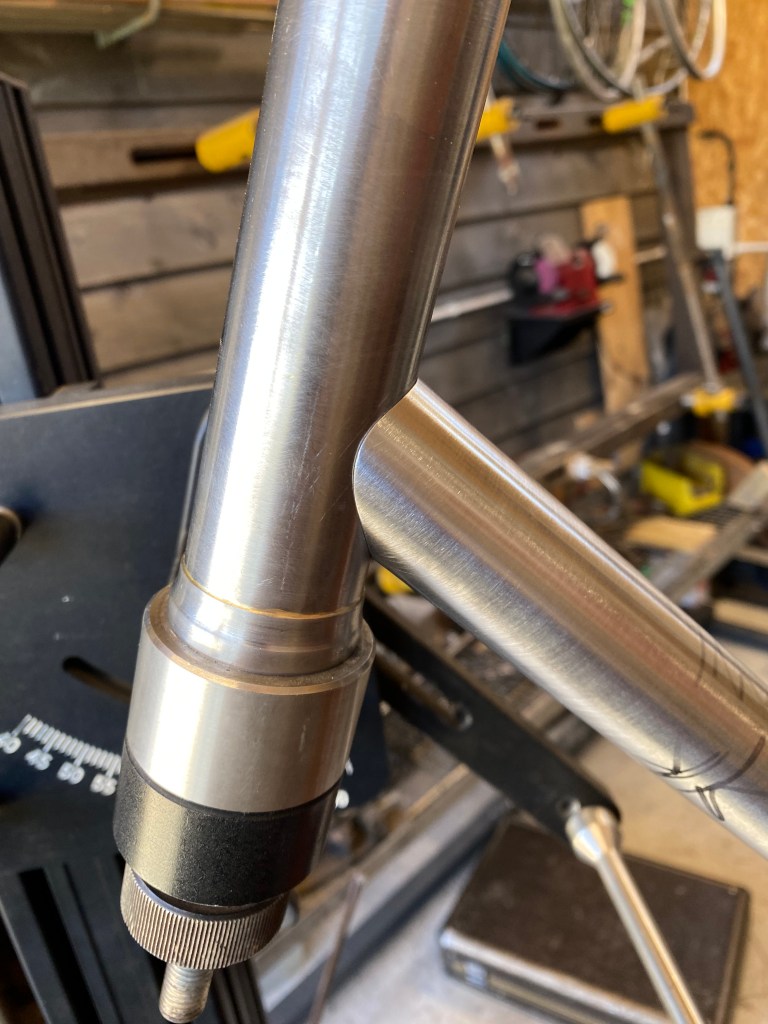
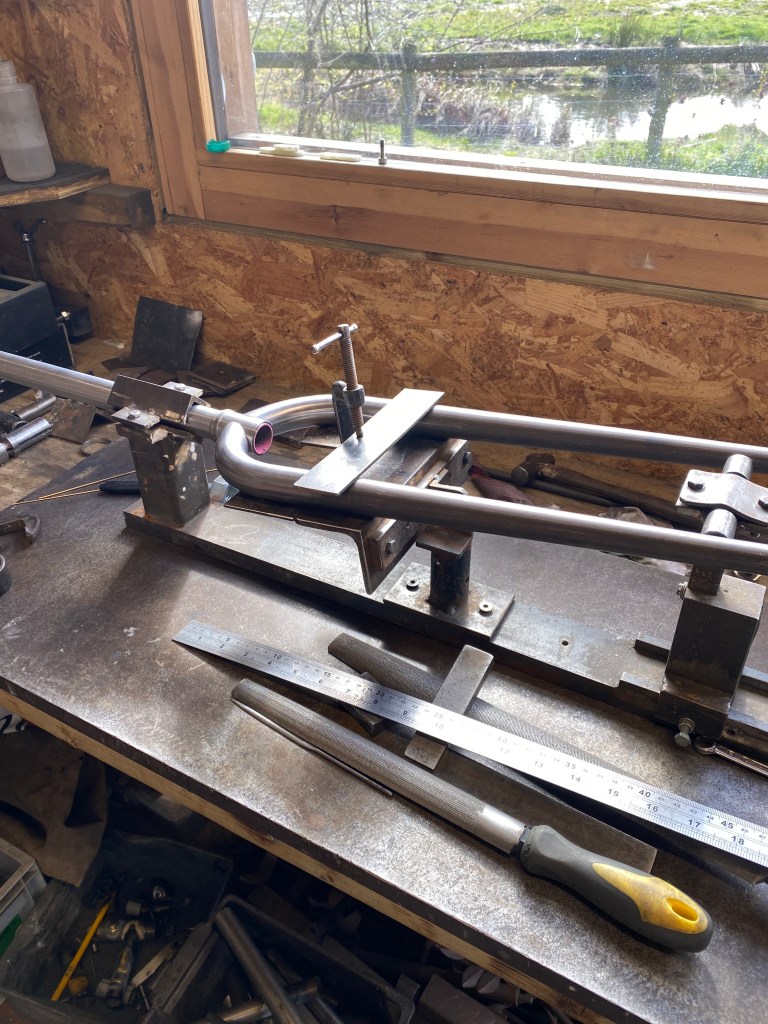
The build started from a set of carefully chosen tubes of steel that Chris than mitred, brazed and filed into a frameset and forks. I can’t believe how simple that sounds but this part of the process is where Chris’s skill comes in. To know how to manipulate those tubes, how to choose how they are butted (thicker internally on the ends where more strength is needed, more on this in the podcast) and then to braze them together has been honed over years of blacksmithing and frame building.
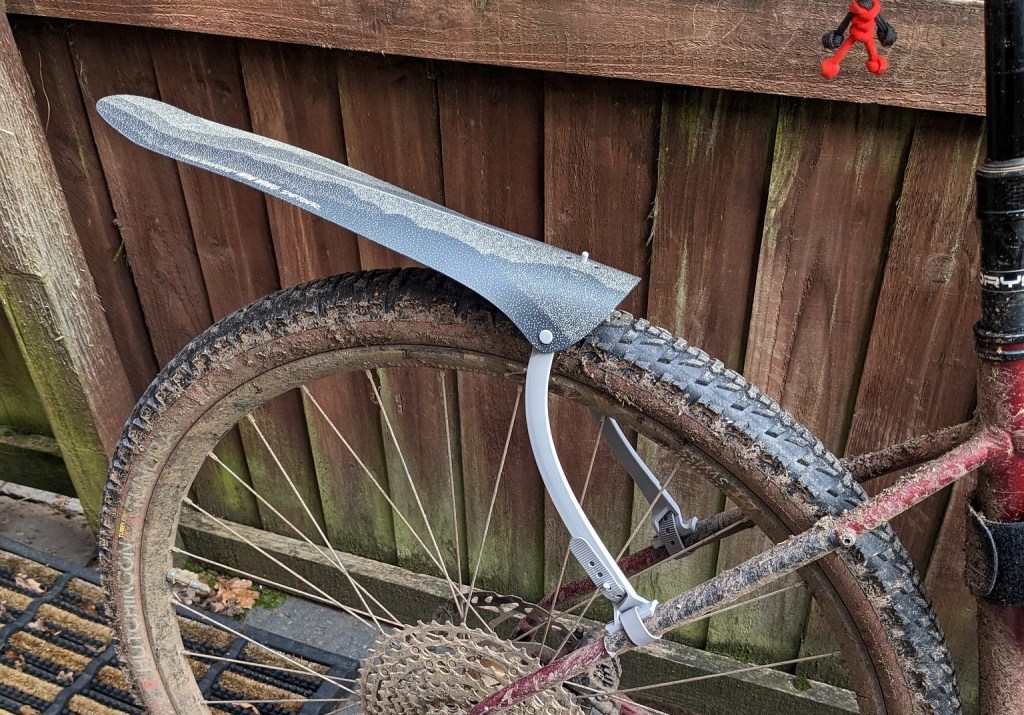
The whole process from start to finish took just over a week. This was because Chris had most of the tubing in stock apart from the flat mount bolt through rear dropouts. It was also quicker as we decided to just add a very light clear coat on the frame. We did this for two reasons. 1 – It shows of the braze-welds to good effect, and i think looks awesome! and 2 – This frame set will be for sale after the review and so the new owner can have the clear coat removed and paint it what ever colour they want. Chris has a great paint shop contact so he can arrange that too.
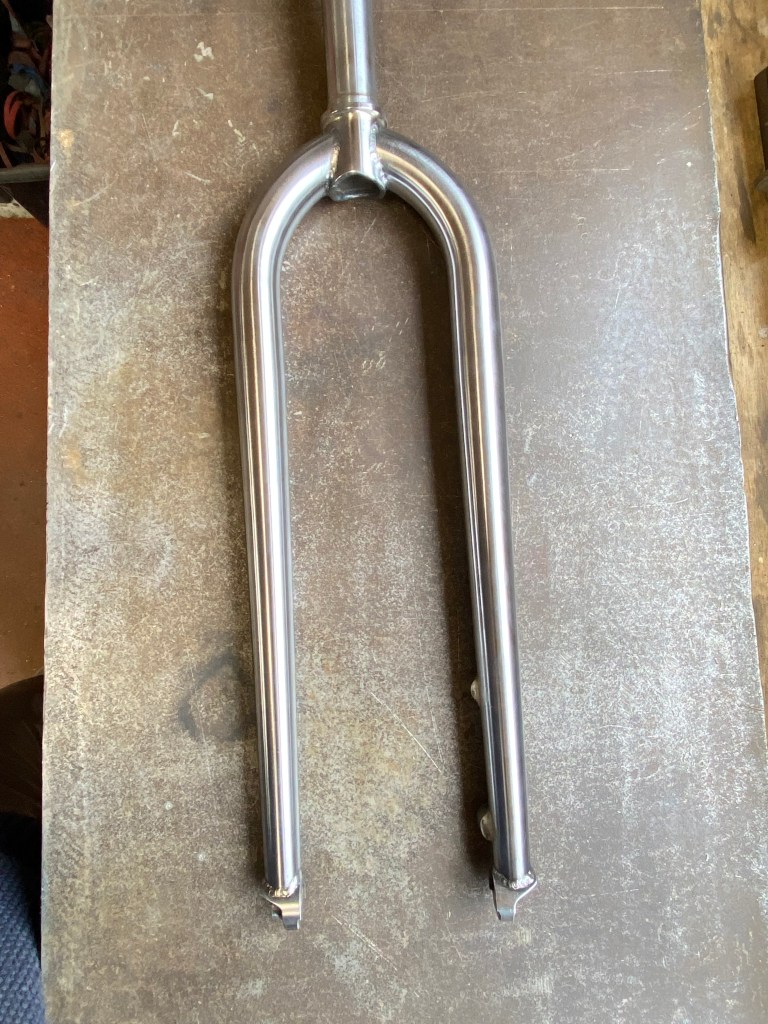
We could have done the easy thing and added a generic carbon fork but Chris wanted to build a fork in steel. Again, he’s done many MTB and road forks but wanted to do a gravel specific fork. We chose a unicrown design with bolt through drop outs
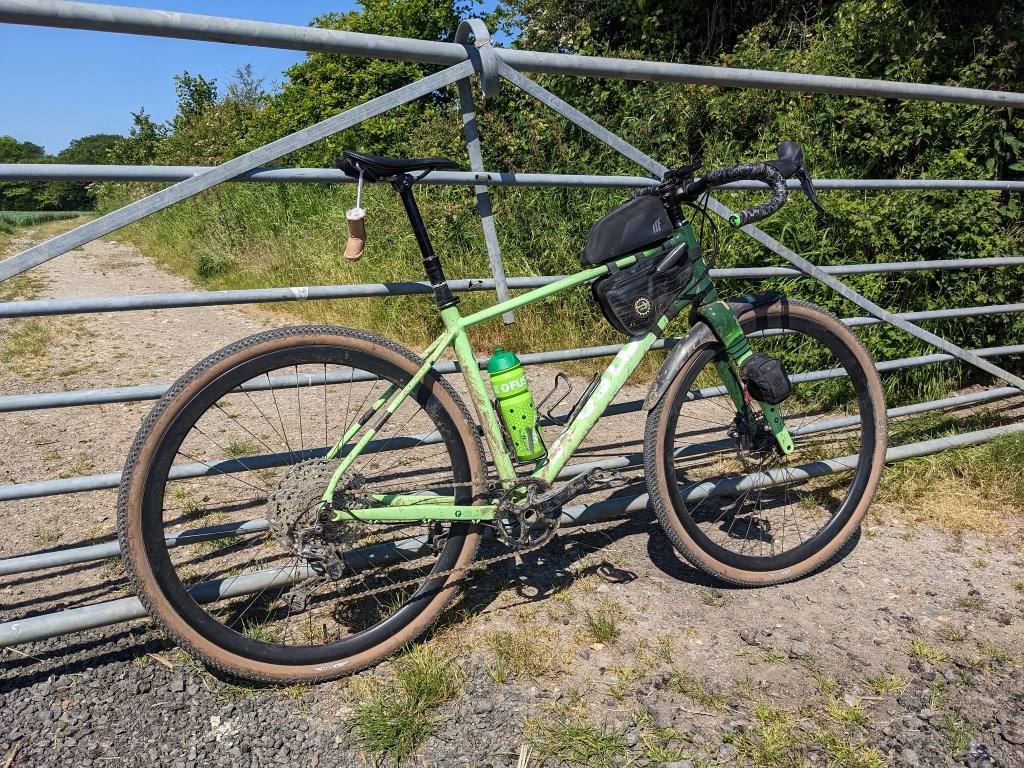
So the frame was built and I collected it and brought it home to build up and ride it to see if what we had created pedaled how we thought and hoped it might. I had to use parts that I already had, I’m not sponsored by anyone so can’t throw high end bits on this frame. i suspect this is the situation that the majority of you reading this are so I hope that it makes this review a more realistic one.
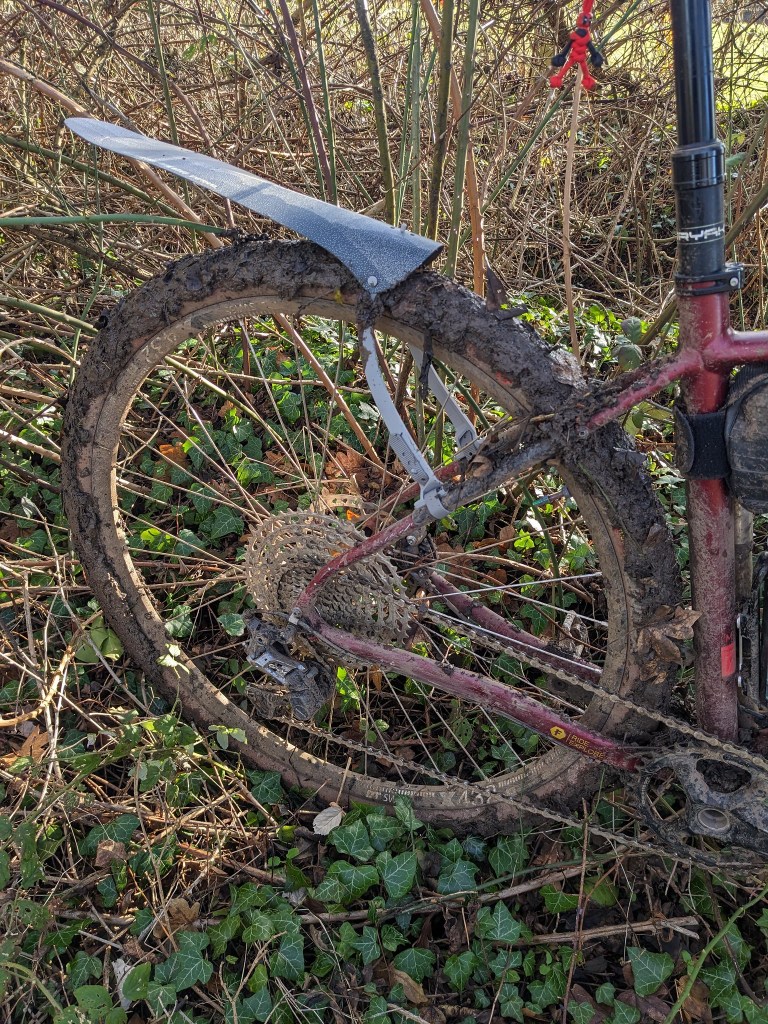
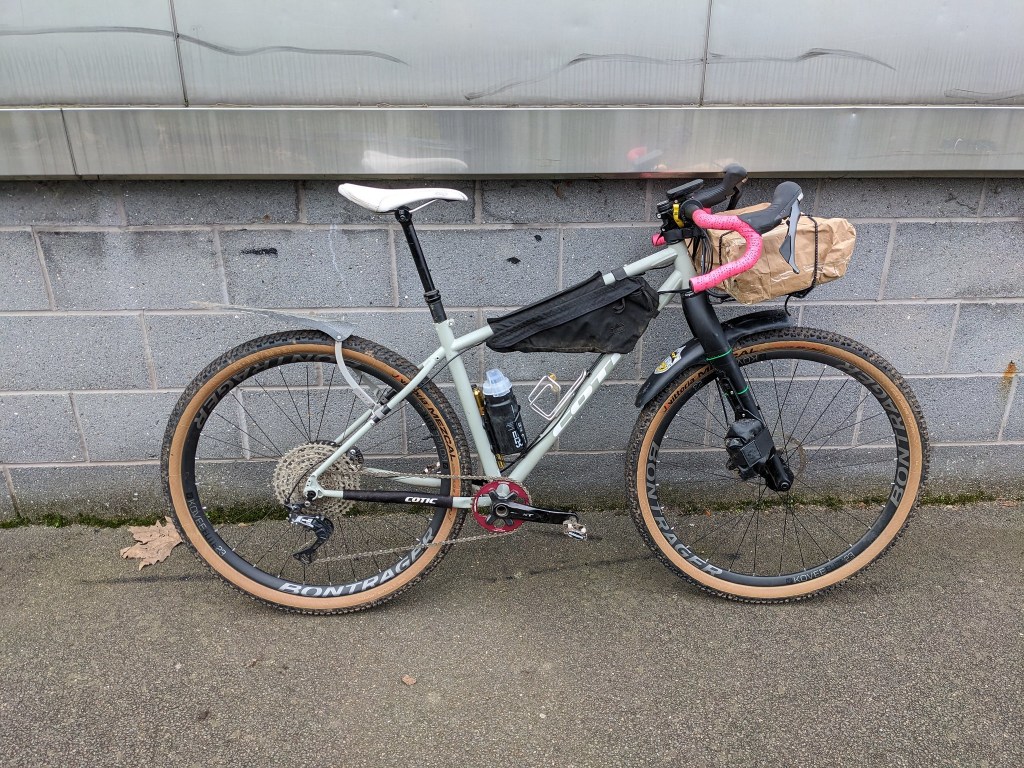
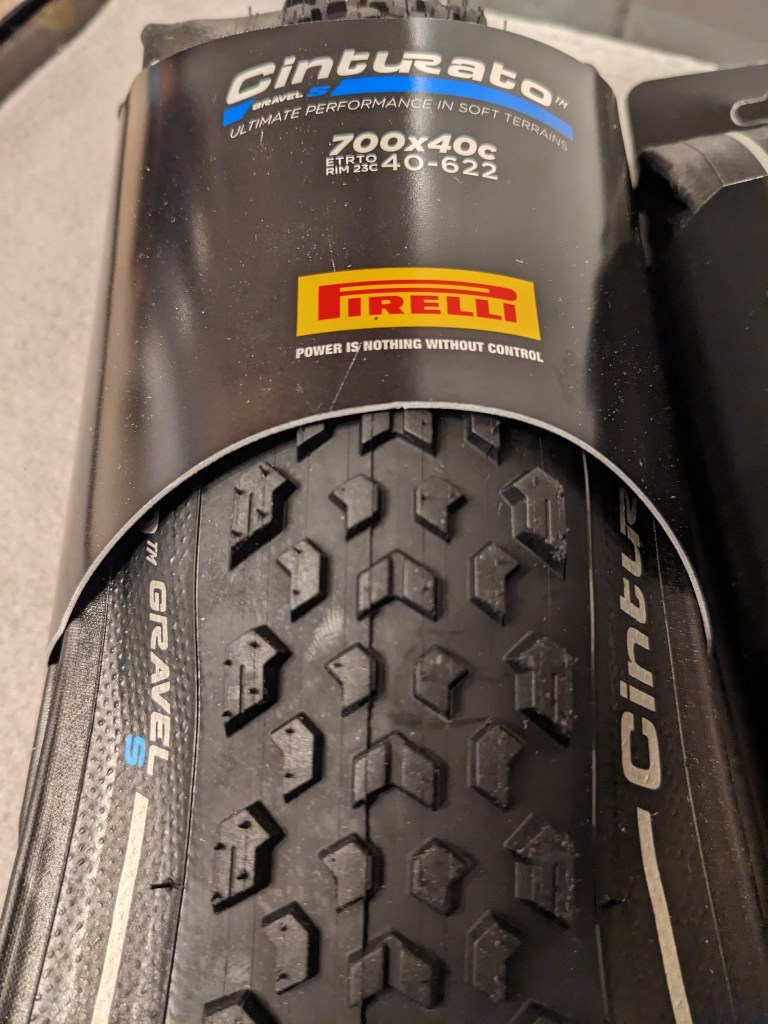
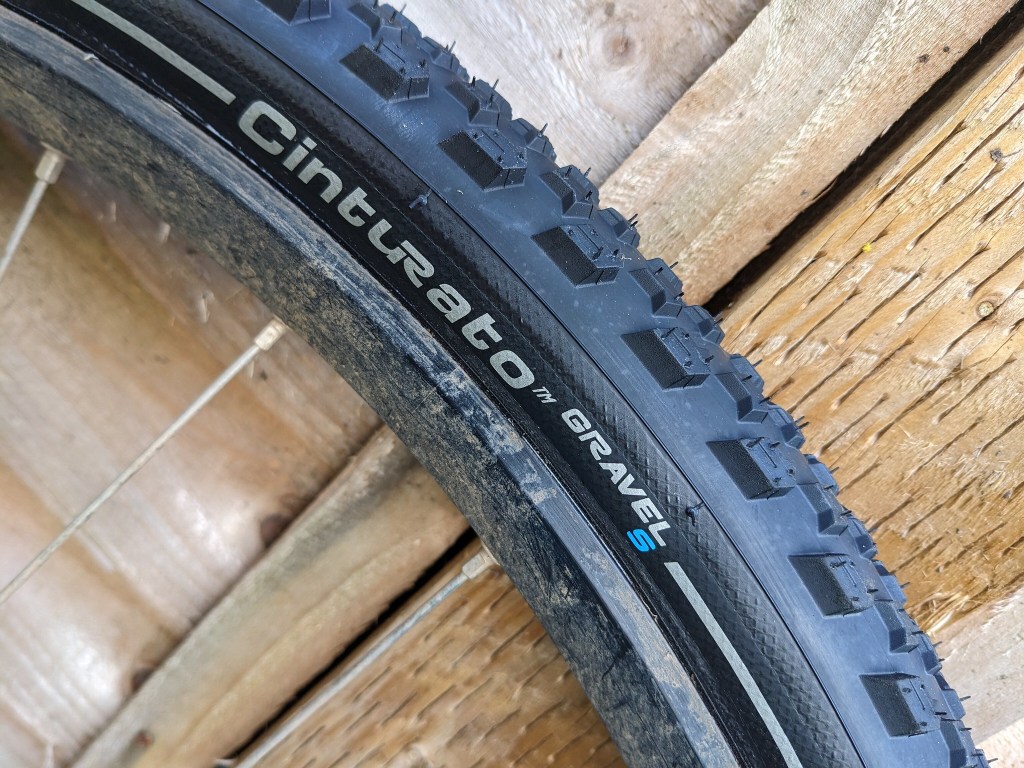
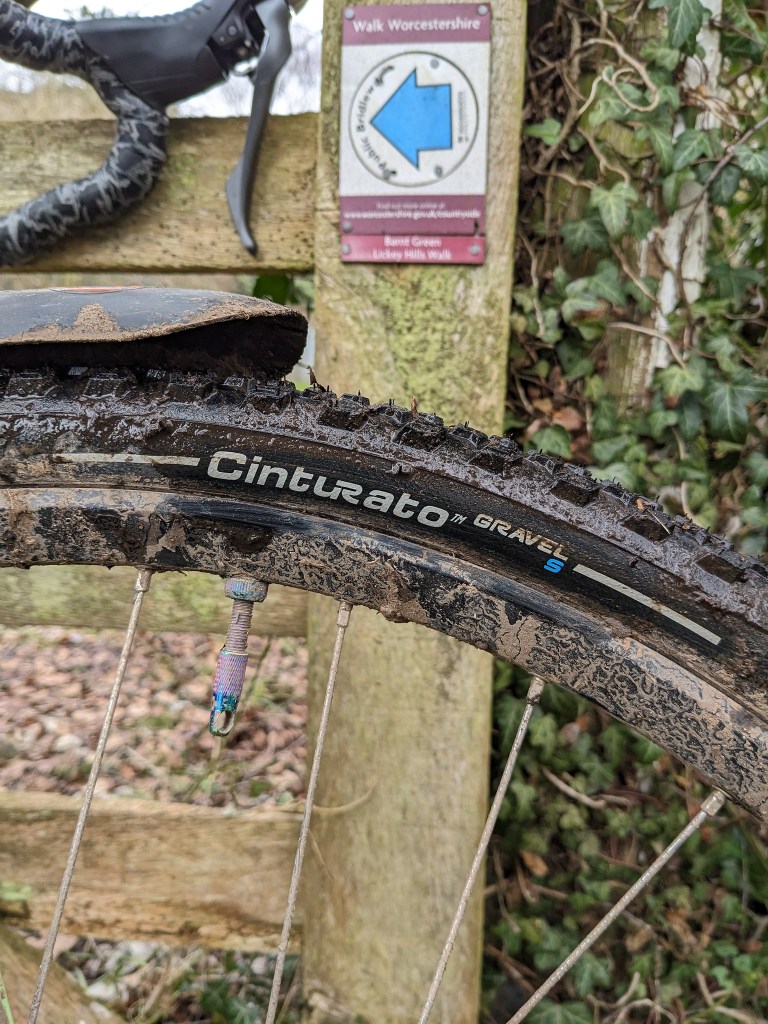
The tyres are quite narrow on this build, they are 40mm Pirelli cinturato S tyres. There’s a couple of reasons for me putting these on. The first is that if i’d put wide higher volume boots on I’d be experiencing the ride feel of the tyre rather than the frame. narrower tyres at a higher PSI for a time allowed me to see how the frame reacted to rough, stoney and rooty surfaces. Was it harsh and stiff or too flexy? The second is that despite the test period being the UK late spring, we have had a lot of rain and everywhere off road is really muddy, so those soft condition narrow tyres are a must if you want to pedal anywhere. The bottom bracket shell is a 73mm threaded one with an external BB. this was added to run a MTB chainset with a 34T ring. You could fit up to a 36T or maybe a 38T. this frame is pretty much single ring specific to allow the chainstays to curve out to fit a bigger tyre. This is the beauty of a bespoke frame though. if you wanted to run a triple chainset Chris will design the frame around that choice for you. I won’t go into the other parts as the review is about the frameset and the process of having a frame built for you. Please do watch the video below to get more info and insight into the reasons for the design.
Hopefully you’ve had chance to check out the above video where you can see the bike in action but if not here are my thoughts on it.
The design was meant to be a gravel/adventure cross over, biased more to off road than on and I think we achieved that. I don’t want to use the old cliché of “steel is real” but the frame does seem compliant in all the right places. It’s not a magic carpet ride by any means but riding the bike back to back with an aluminium framed bike you can definitely feel the difference. There’s no discernable sideway flex at the bottom bracket though so at no time do you feel all your effort is being lost, pedal turns go straight into forward motion. Riding to some trails on tarmac i was a little worried as the bike handled so well on that surface, turn into a curve at speed and the bike holds its line tenaciously even with the knobbly tyres on, I though maybe we’d got the geometry too biased to road riding. The first venture off road soon put those fears to the back of my mind though.
Over my local routes which are a mix of loam, polished pebbles and exposed roots and muddy single track the bike felt right at home. A good test is to find a section of trails and see if it’s possible to ride no-handed. The bike was stable enough to do this without me hand-hovering over the bars. the more distance I covered the more confident I became. Around here we tend to ride the MTB trails too and I was confident in the bikes ability to drop into some smooth descents, the dropper post will help a lot with this too. The dimensions felt spot on, the tall head tube meant I could ride on the drops comfortably for long periods and also gave me extra control on the rough stuff without feeling too upright.
The most surprising part for me was the fork, I’ve ridden a few steel MTB rigid forks and as they are usually longer length they are generally not too harsh (29″ suspension corrected forks). The Smithy FW fork is shorter and yet seemed to soak up all the chatter from the pebbles and roots. Look down when riding and you can see the very slight fore-aft flex that makes them feel so good. Climbing or sprinting though there’s no unwanted side to side movement. I think this explains the tarmac performance and the road holding in turns.
The one drawback usually with any steel frame is the weight, This frame weights a hair over 2.2kg for the frame. its by no means heavy compared to off the peg steel frames but compared to a carbon frame it does lose out. however this bike is not about being super light, this bike was designed to take you over all terrains in comfort, multiple mile rides where you get up the next day and do the same again, and again the next day. Load the bike up with bags and camping gear and it’s a nice smooth stable ride which means you’ll have energy to spare for pedalling rather than wrestling the bike to stay on track. This doesn’t mean boring though, throw off those bags and this bike will rag through your local single track leaving you giggling and wanting more.
if calling bikes ATBs (all terrain bicycle) was fashionable again then this frame would be definately in that genre.
On this frameset you probably won’t win the UCi Gravel worlds but you could ride it around the world!
The whole process from start to finish has been a joy, Chris has listened to what I wanted and added a few suggestions of his own, communication was regular about different aspects of the build. You could visit Chris in Wales and he’ll happily discuss your new frame while you are both out riding the fantastic trails he has right from his doorstep. After all the designing and hard work in his workshop Chris has come up with this great riding frame and fork.
Oh, and the name, as mentioned in the video above, the frame didn’t have a name when I picked it up and there have been quite a few ideas for it but in the end Chris came up with “Graean” which he tells me is Welsh for “gravel”
To be able to say a bike was specially made for you and you get to choose how it rides and how it looks is a truly great experience and I totally recommend you have a chat to Chris if you fancy something special.
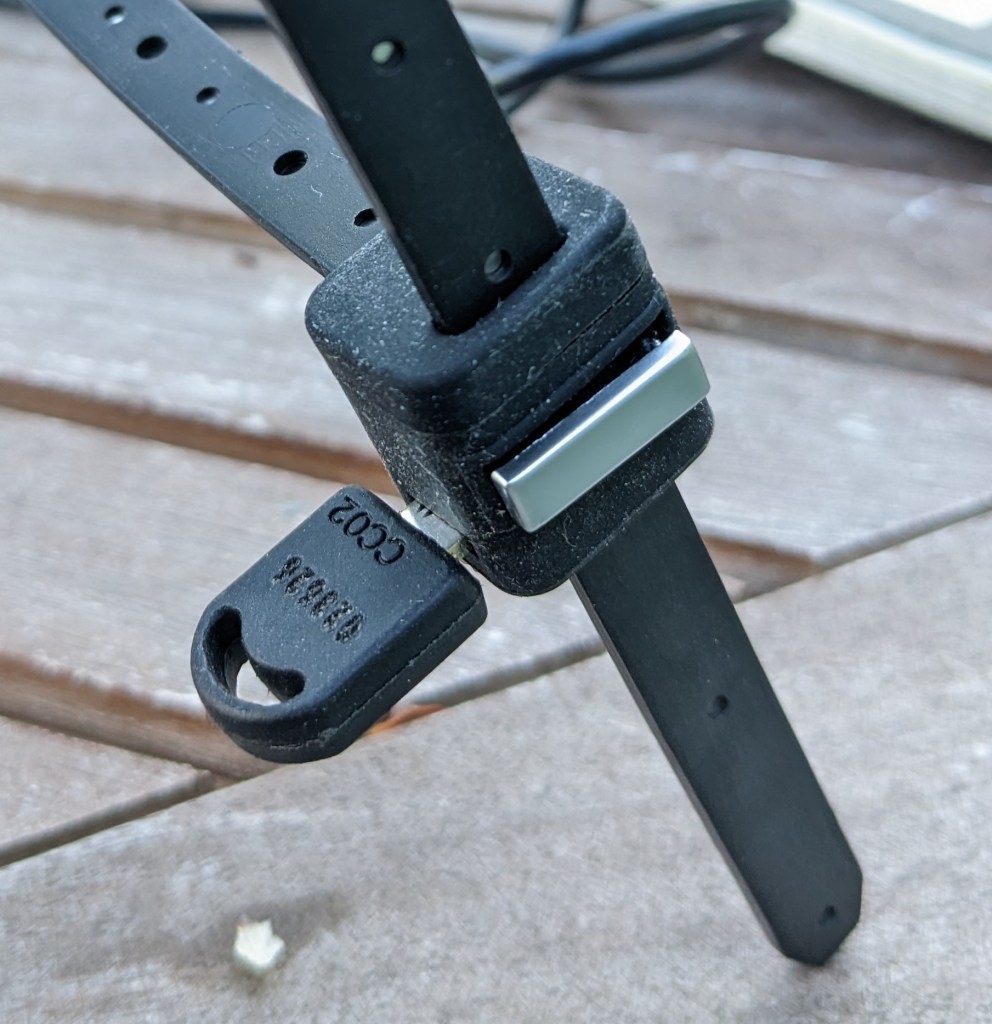
I’ll come right out and say it, I really don’t like locking my bike up when it’s out of my eyesight. But, as I ride quite often solo and need to stop to refuel (read-eat cake) it’s sometimes unavoidable. I do choose venues that allow me to see the bike when it is leant up outside though.
My normal life job location means I can’t easily commute by bike so I don’t need a big lock to leave at work or in a bike shed and I certainly don’t want to haul a heavy lock around with me on pleasure rides so I take what I call a cafe lock.
My definition of a cafe lock is something that I can strap around the bike frame to an immovable object while I’m inside buying pastries (but can see the bike through the window). Which will stop the opportunist thief walking past and wheeling my bike away while I’m busy.
No lock is impregnable, given enough time anything can be grinded (ground?) snipped, levered or bolt cut and the two here on test are no different. What they will do, and it sounds harsh, is deter the thief who likes easy pickings to leave your bike alone and take one that isn’t locked up.
So the lock needs to be long enough to go through the frame but not be unwieldy, be light enough that you’ll actually take it with you and have an easy lock-unlock system.
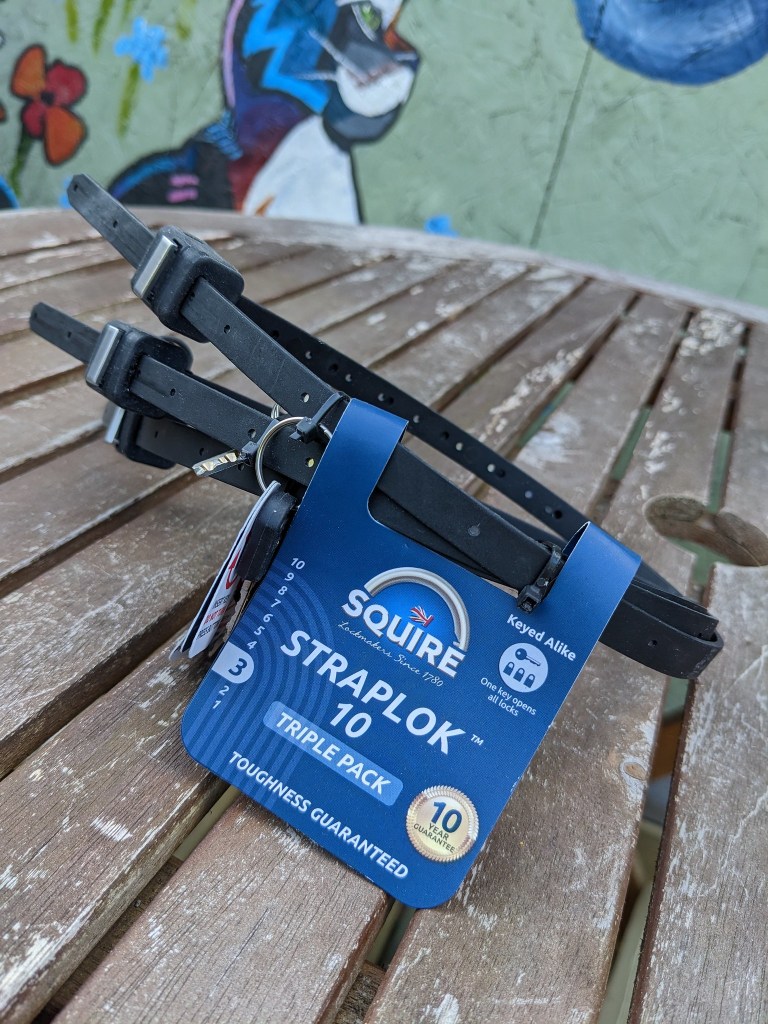
Straplok 10 fits all the wanted criteria and the set given to me comes as a three pack for £44.99 or singles at £16.99 so pretty good value. The length is 450mm so easy to lock a gravel or road bike to say some railings, even a standard mtb. Full suspension or Ebikes with much fatter frames or complicated designs might be more of a creative exercise.
Dimple Key Straplok 10Why wouldn’t you go in?
The lock comes with what Squire call a “dimple key” and this just needs to be inserted, not turned and then the sliver bar depressed to release the lock. the lock has a nylon/plastic covering over a 10mm stainless steel core so it shouldn’t do damage to your paint work. The lock is easy to pop in a bar bag or thread through some of the daisy chain webbing you get on bags these days. Pull the lock through tight and it’ll fit in a jersey pocket.
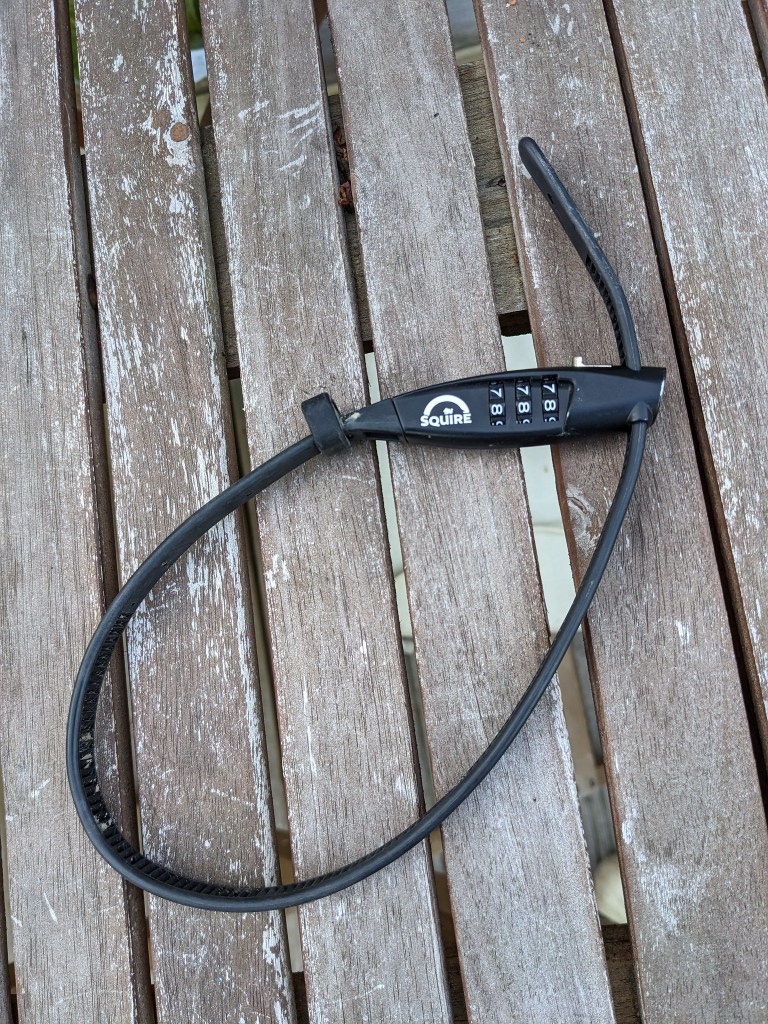
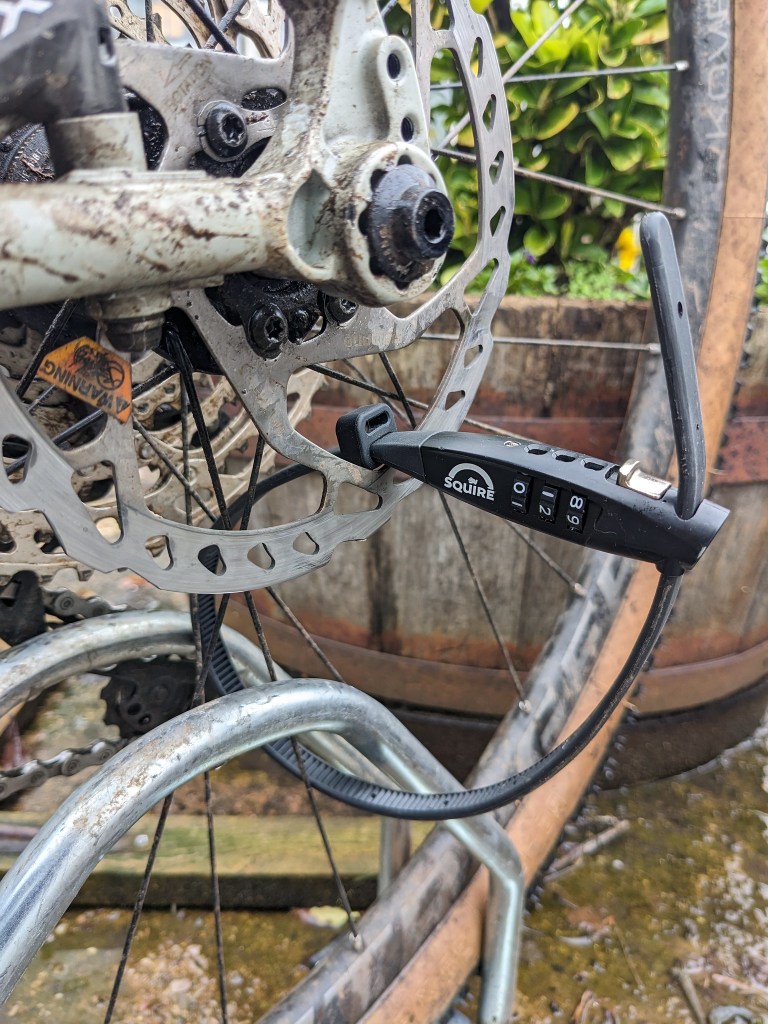
Straplok Combi 10 also fits all the criteria and comes as a single unit at £19.99. Again, length is 450mm with a plastic covered 10mm stainless steel core so all the comments about the key entry Straplok with regards to capacity and ease of carrying apply here too. Where the combi differs though, you probably guessed from the name, is that it has a combination lock. 3 digits on a rotating barrel lock and open it.
Straplok combi fits to bags easilySquire Straplok Combi 10 in action
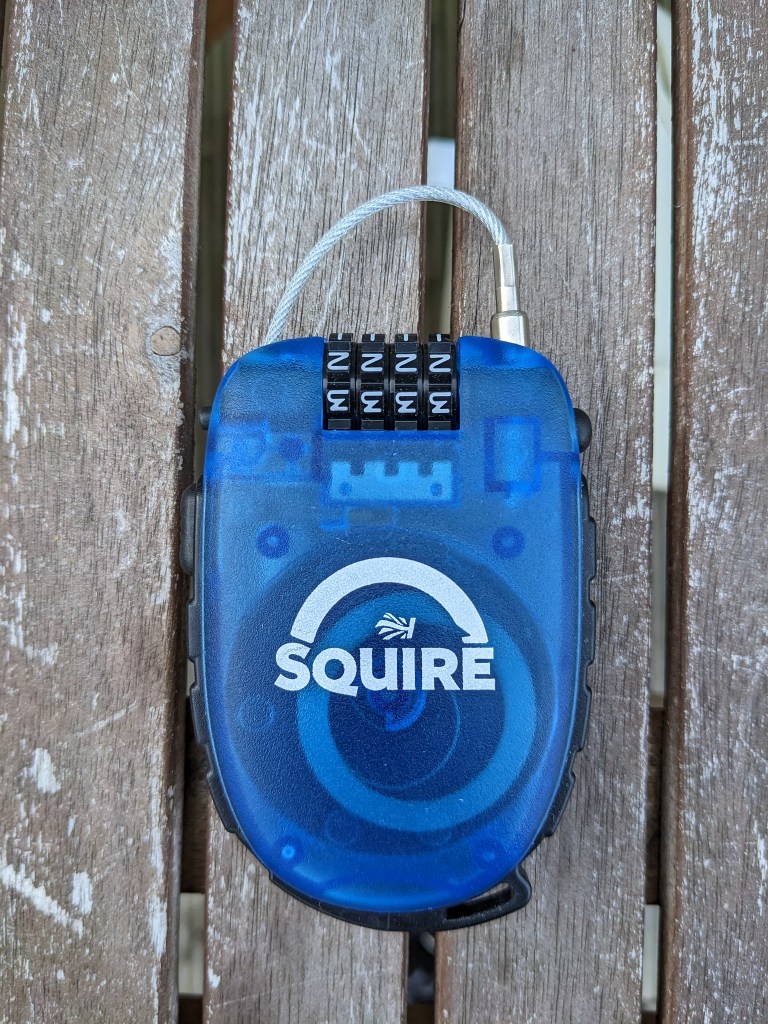
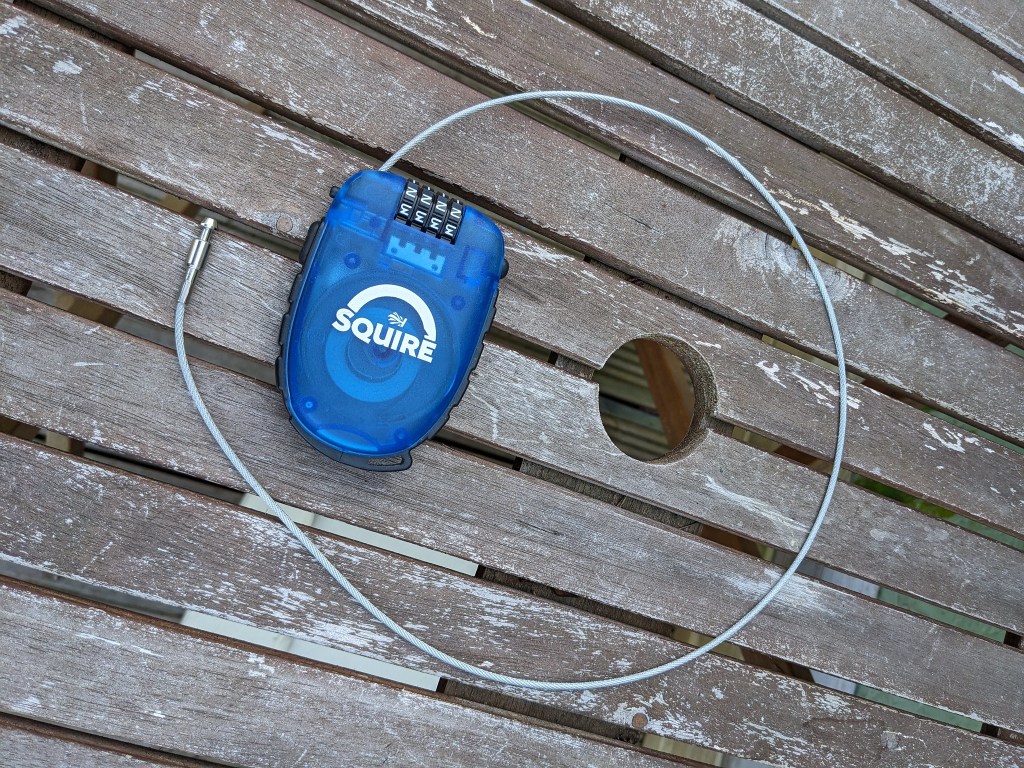
Retrac Max again meets all my needs and also has a combination, this time 4 barrels. It has a plastic case that houses 900mm of PVC coated steel cable. You pull out the cable and press the button on the side to retrac(t) it. The plastic feels brittle but has not cracked during the test period and I’ve dropped it on the floor a few times. It is small enough to easily fit in a pocket or bag and is less intrusive than the other two designs
All these locks will 100% do the job asked of it. it will be a very mild deterrent to the casual thief but no more than that. In my circumstances though, that is all i need.
Out of the two locks I much prefer the combi versions compared to the key operated lock for the simple reason I know I would definitely lose the keys! Both combi versions are much better as a take one thing solution to the problem. I like the simplicity of the strap combi to the blue plastic one though. The Retrac is clever with its one button reel-in feature but those inner workings put me off in the event of a jam or weather ingress (neither of which happened during the test I have to add) and to that end after the first few uses of the key entry lock and the Retrac I’ve used nothing but the Combi 10. It threads nicely through the cords on my bag or sits inside my other bag and is very simple to use which is good on a freezing day when hinger knock has struck and you don’t want to be messing about with keys etc. Think of it as a very big lockable cable tie and it gives me a little piece of mind while I choose the best cake to have, and that’s always the hardest thing on my rides!
I was very fortunate to meet up with the UK representative of Santini Cycling at a bike show earlier this year and we discussed if Santini would consider sending out some of their cycling kit for me to review. I’m very happy to say that Santini’s HQ in Bergamo came back to me with a resounding yes. It’s great to see that a premium brand is so confident in their product that they are willing to send out kit for an unpaid , unbiased review.
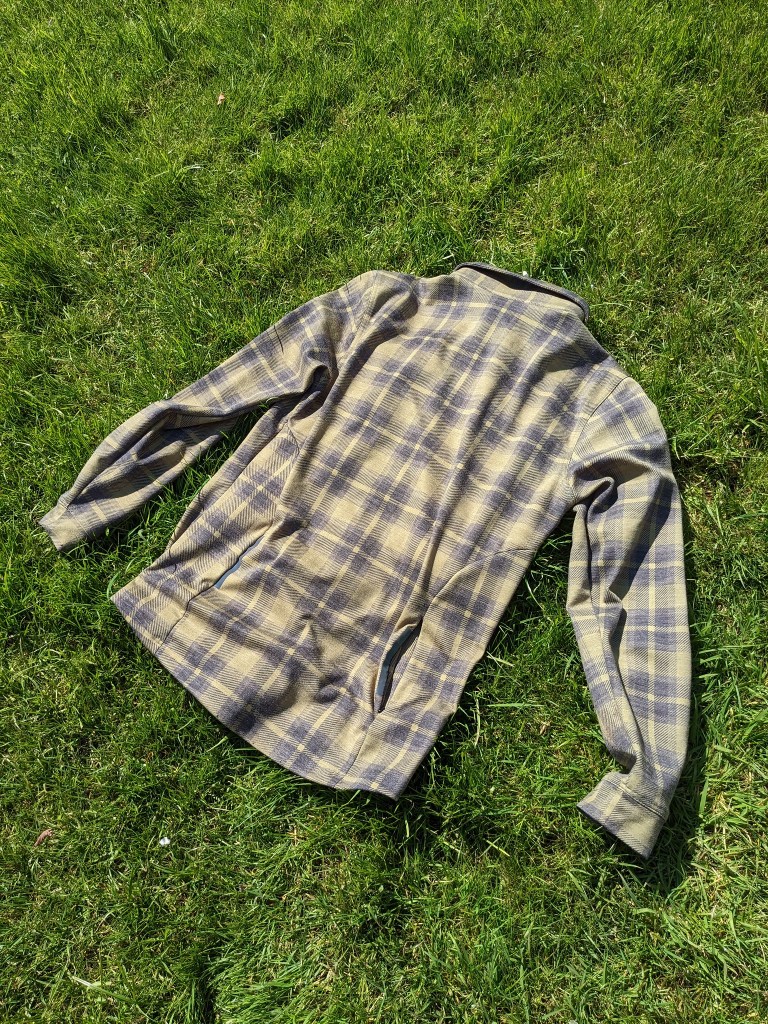
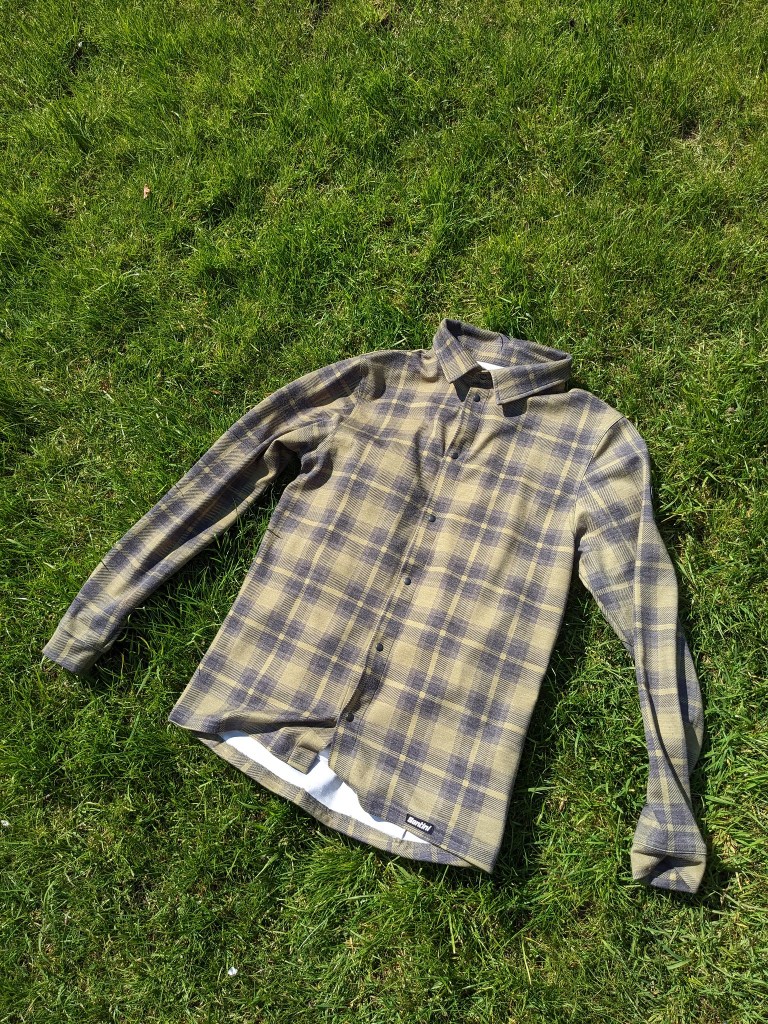
DYLAN – TECHNICAL SHIRT
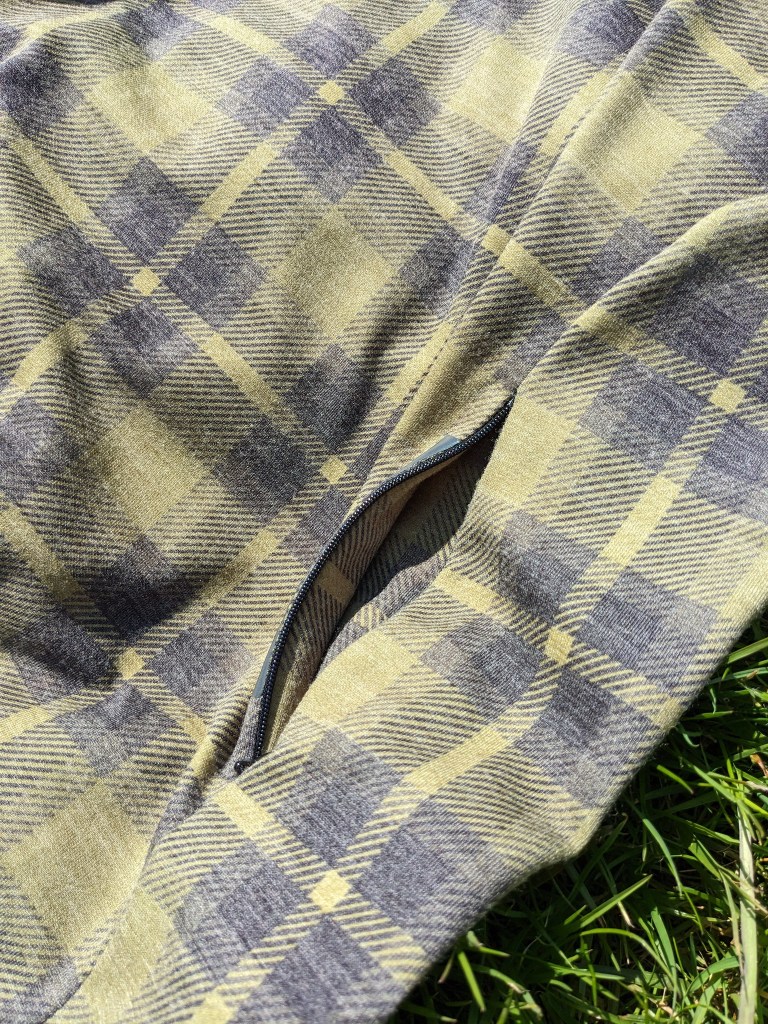
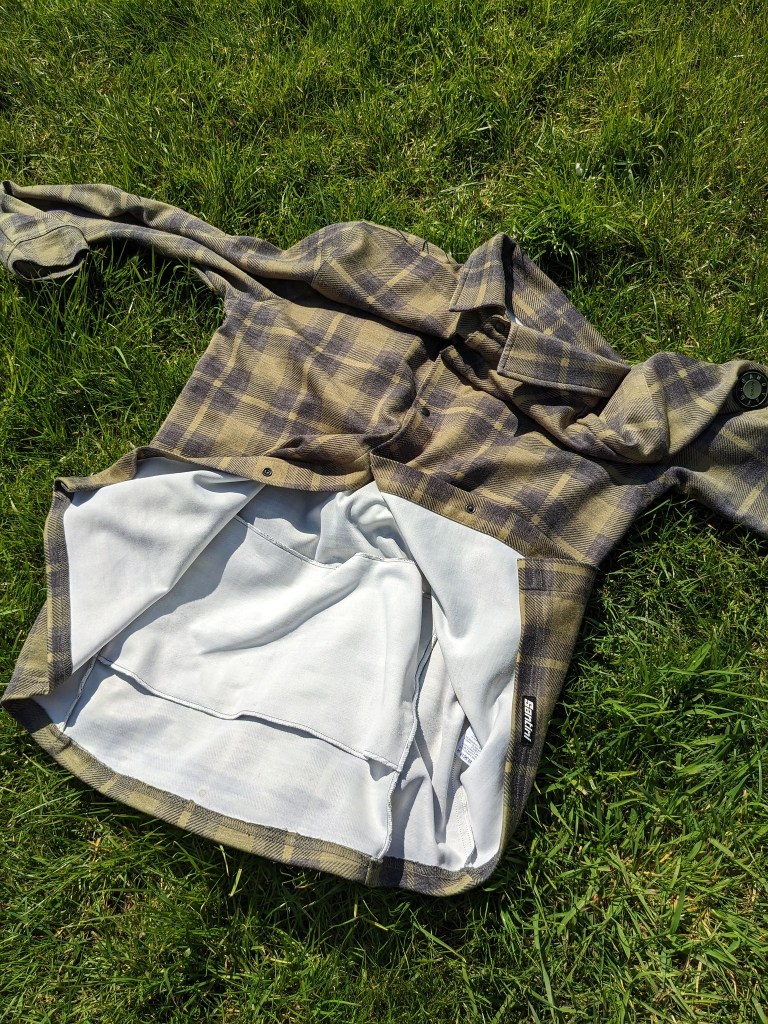
This shirt feels like a luxury item straight out of the package. Its wool blend feels super soft to the touch and the colour is bang on trend for the current gravel style. The fit is slightly fitted but not in any way “racing snake” so it looks good on ordinary people, it also does not scream “cyclist” and I’ve worn it to the pub and at work. The shirt has a lining that feels good against your skin, I have been wearing it with a thin base layer underneath as it doesn’t let any drafts through on cold days. On hotter days the press stud/poppers down the front are exactly what you need to ventilate easily with one hand if need be on a prolonged climb, much better than fiddly buttons. The one thing I’d like to see on this shirt are different cuffs. The cuffs here are just like a long sleeve jersey with no popper/ button so your only choice if you want to roll sleeves up is to just push them up rather that rolling and exposing more arm. There are no chest pockets but there is a zipped pocket at the rear which I found perfect for carrying my phone and a couple of times I’ve stashed a gilet in there in an emergency.
The Dylan shirt is a really great versatile garment that looks just as at home on and off the bike, at time of publishing this shirt retails at £160, not exactly cheap but the great feel, fit and the dual use it’s worth the outlay.
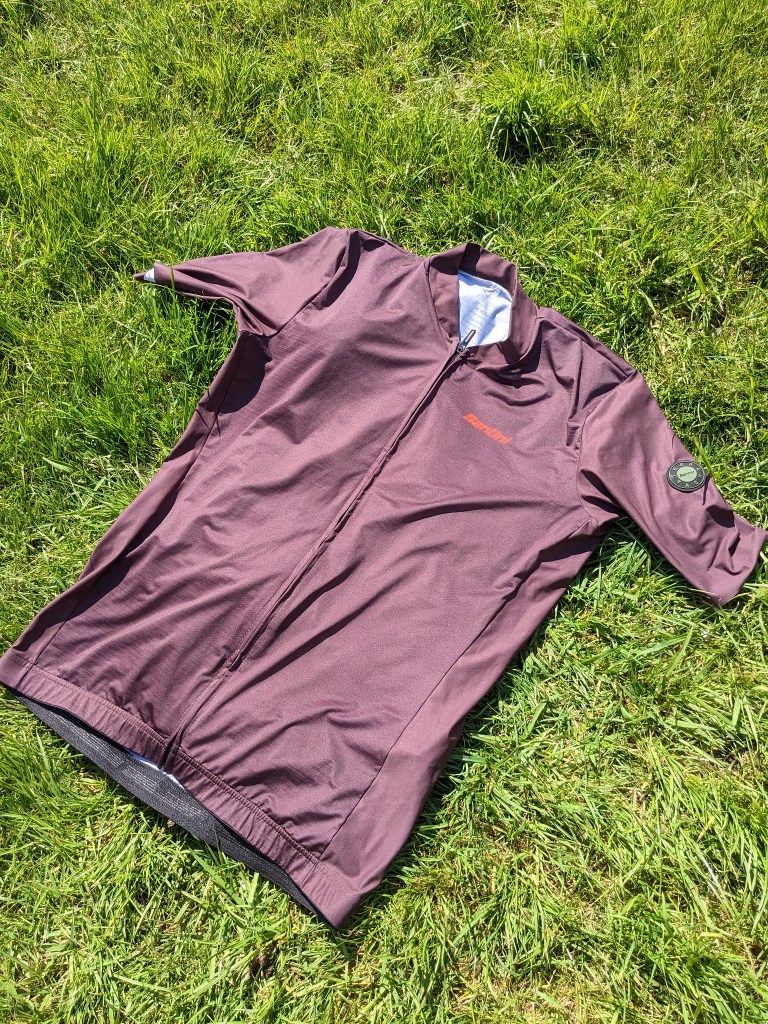
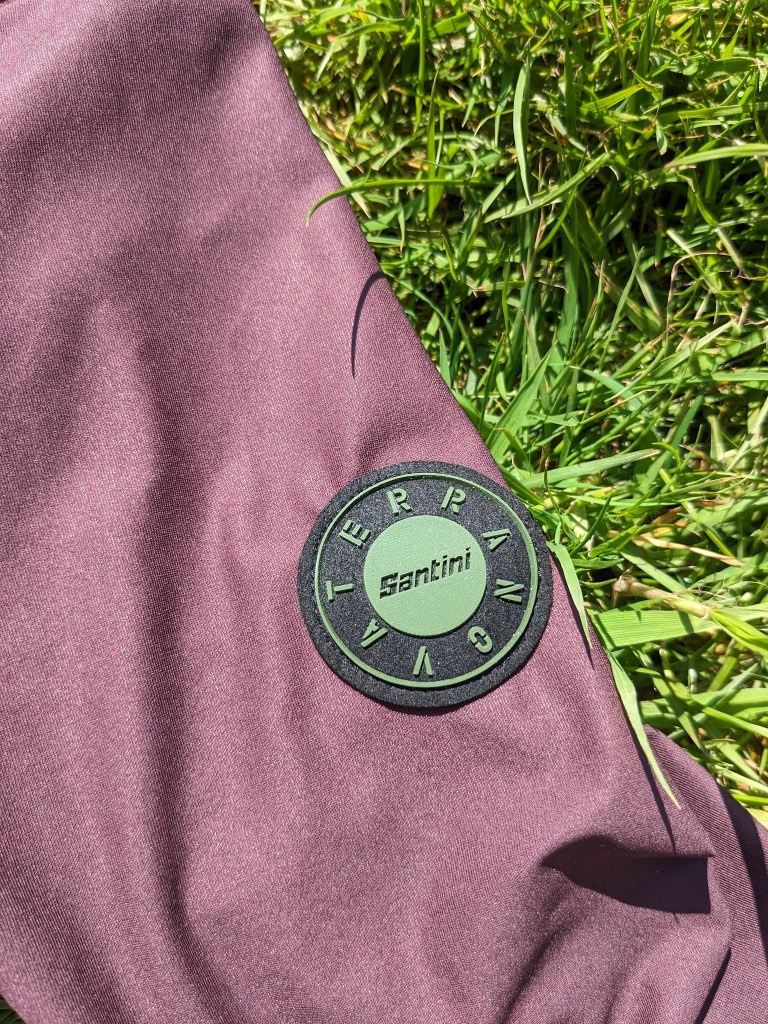
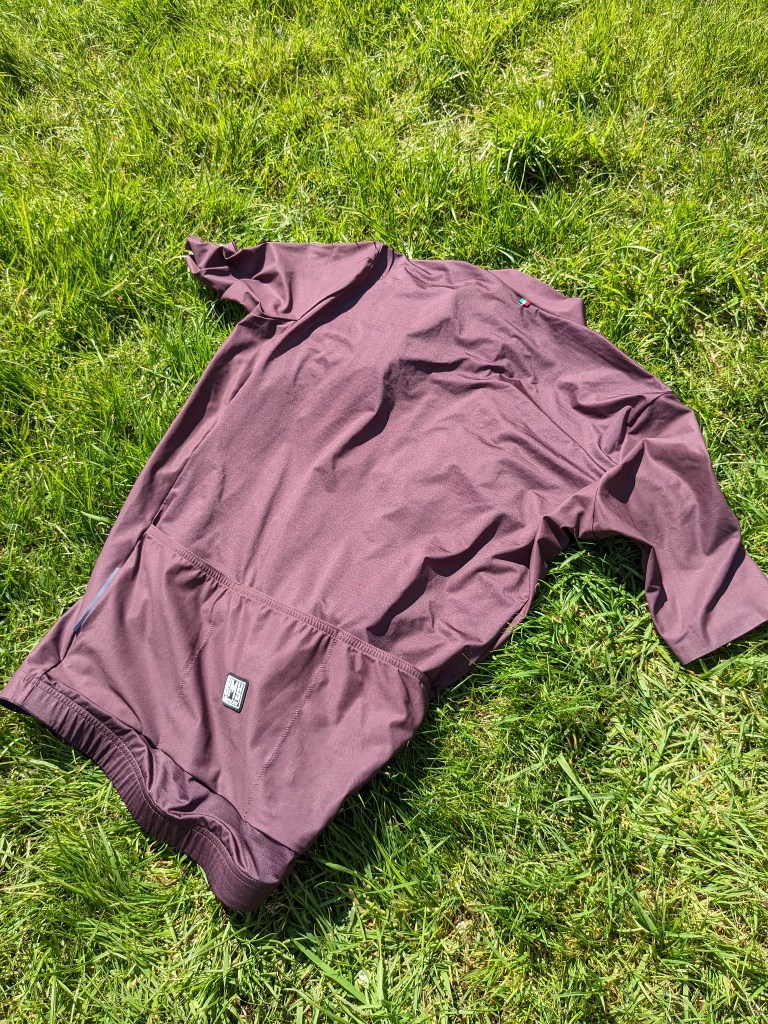
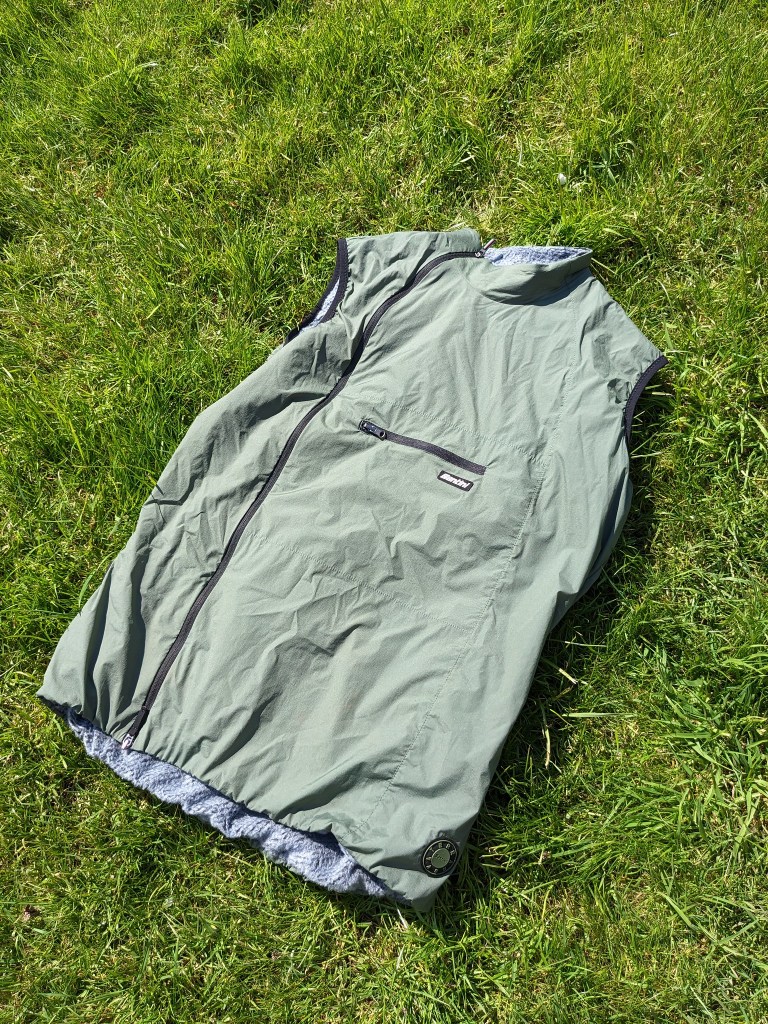
GLORY DAY – JERSEY
This jersey has a slim fit, so I sized up one size as I’m really not into marginal gains and full aero. if you are, then the sizing guide will be spot on. Going one size up gave me a comfortable but not flappy fit. The sleeves are what Santini call body fit and they are tight but not restrictive. The full length zip (which I think is a must on all jerseys) is great for venting on climbs and is much more elegant when getting dressed in company! I love the colour and the fact it has three useful and adequately deep pockets at the rear with reflective strips at each side.
Definitely a jersey for summer with a thin base layer underneath or spring/autumn with a gilet…..talking of which…
ALPHA PACK – VEST
This one is a bit controversial really. As this review is coming out when the temperatures are getting warmer (hopefully) and this vest is really a colder month item so you’d think it wasn’t the best thing for Santini to send as the market for winter stuff is waning, but, this vest is so great styling wise I just really wanted to try it. It is lined with Polartec fabric which is very warm! The centre chest pocket has a zip closure and the whole vest can be folded into this pocket for compact storage. To accommodate this pocket the main zip is offset to the right hand side. There are three deep pockets at the rear and this is a great feature from Santini, too many gilets these days have no pockets so if you need to stash something you have to go under your gilet to get to jersey pockets. No such problems here, the pockets are deep and useful and your phone , even the biggest smartphone will be swallowed up and wont fall out. Now the warmer days are here I’ve been using this vest on evening rides that start off warm but soon chill down, especially if there’s a pub stop! The styling is great, I really love the look of that central chest pocket but this pocket causes the one issue I have with the vest. if you need to vent heat on a climb and unzip, then you’ll have one large flap of vest one side and the remnants on the other and it makes the vest hang weirdly, which is accentuated if there’s weight in the rear pocket.
I can live with the zip position and I can say that this is my favourite of all the kit Santini sent out. There’s also a long sleeve version that would make a cracking winter jacket.
GRAVEL – BIB SHORTS
Santini’s Gravel Bib shorts feature what they call their C3 pad which has a gel structure. The short material is super soft against your skin and features breathable mesh on the back of the shoulder bibs, there are two thigh pockets and two pockets at the back, there are reflective strips on either leg.
Cycling shorts take a while to review, normally the first ride is inconclusive as you compare them to your favourite pair. Your favourite pair have been warn many times, washed many times and the pad has moulded to your sit bone and arse cheek shape whereas the new shorts normally are uncomfortable as they just aren’t worn in. it’s only right then to give them a series of short and long rides and many washes to be fair to them. One of my riding buddies asked how much they cost, and replied “they’d better be bloody good for that” when I said they retail at £160.
I say normally, and I really wanted to find something I didn’t like about these shorts to prove that expensive isn’t always better. In this case though you get what you pay for, first ride in these shorts I completely forgot that they hadn’t been worn before, they were that comfortable. The shoulder bibs are wide so they don’t dig in. The thigh pockets are deep enough to give you confidence nothing is going to fall out and the mild compression the shorts give supports your leg muscles. Each subsequent wash has only confirmed my initial impression, these shorts are worth the money.
Massive thanks to Santini Cycling and Santini UK for giving me the opportunity to try these garments out.
This episode I travelled across the border from England into Wales to chat with Chris Yeomans, main torch wielder at Smithy Frame works.
Smithy Frames Works is a place to get a made to measure hand made bicycle. Chris contacted me to ask if he could build a gravel bike fit for all conditions that the UK could throw at it and asked for my input on the type of features it would need.
Obviously it took me a micro second to say Yes please! and then i thought talking to Chris about what a customer could expect to experience in the bike build process and about the history of Smithy Frame works would be a good subject for the podcast. Chris agreed and the link below will let you listen to what went on on the day I spent in Powys.
As mentioned in the podcast here are the pictures of the things discussed
Chris’s other project, the Flying Gate
listen to the podcast with the link below or jus search for UK Gravel Collective Podcast on your favourite podcast provider
In these days of tubeless tyres for bicycles and how efficient they are at stopping puncures it’s easy to forget that you you might at some point on a ride need to put an inner tube into the tyre. When it happens to me it’s usually because I’ve forgotten to check that there is still enough sealant in the tyre. Tubeless systems are so good that I tend to take them for granted. So you’ll need a minimum of one inner tube, a tyre lever to get the tyre bead off one side of the rim, might as well combine that with a multi-tool to save weight and space and a tubeless repair kit to try and plug the hole in the tyre before hand when you go out on a regular ride.
Most of us will have strapped a bag of some sort to the bike or utilised one of the many mounts that come on gravel and mountain bikes these days. but my bag is usually full of sandwhiches, a waterproof jacket, this is the UK after all, a cafe lock and most rides a GoPro because of the UK Gravel Collective YouTube channel so there’s not much room to stuff in the afore mentioned tube etc.
Along comes 76 projects with a solution. I tested their strapless top tube bag way back and found this to be a very convienient system for stopping floppy bag syndrome and portability but now they’ve transfered this technology to what most dyed in the wool cyclists would refer to as a saddle bag. However, your little pouch with stuff in it that you don’t want covered in spray from the rear wheel now has the versatility to fit to any bottle cage mount spaced bolts anywhere on your bike.
This frees up space in your bag or keeps the contents out of harms way. The kit comes with discs that bolt into your mounts and then the base plate of the bag just twists and clicks into place.
The mount is very secure. I’ve tried to put it in unconventional places to test it’s robustness and to see if it would rattle off but everywhere i’ve mounted it to it has stayed exactly where placed. So that’s on the top tube, under the down tube, on the fork leg and even in the traditional bottle position. I trust it so much now i’ve stopped looking to see if it’s still there at the bottom of every bumpy downhill.
The zip is easy to use with gloved or cold hands. it has a small inner pocket for tyre patches or similar and comes with a stabilising strap for extra security, i’ve never used it but you’d might want to if mounting to a downhill/enduro bike maybe? the zip and bag is made of hard wearing and waterproof material and despite many soakings, mud and jet washes it’s remained dry inside.
If you need somewhere to stash small essential items it is perfect, if you have multiple bikes, get two sets of mounts and just swap the bag between bikes.
The 76 projects Quick release Piggy Zip case is a genuine fit and forget item but when you do need it it’ll still be there for you……..but given the efficiency of tubeless systems I’d check that the spare inner tube hasn’t perished before you go on a long wilderness ride!
for more info on this 76 procts piggy case click here (non affiliated link)
Mudguards are a necessary evil in the UK, if you want to ride for longer in the winter slop and save your bike from premature wear you have to put up with bolting on a guard that does nothing for aesthetics but does a job. No one likes a gritty wet backside and to have to clean every inch of the bike after every ride. Below is the reality of riding off road , year round in the UK
With conditions like the above a full mudguard is just a wheel seized with mud and having to clear the frame of mud with a stick or carry the bike moment. We’ve probably all faced that at some point if you are a committed off road winter rider. Minimal guards tend to get less clogged but they don’t really work as spray from the rear wheel will get through.
With this in mind I was very sceptical that the Win Wing from Ass-Saver would be any more effective than some of the tiny guards on the market today. But Staffan from Ass-Saver was confident enough in his product to send a Win Wing out to me for just the cost of postage from Sweden to try in the UK mud.
Ass-Saver are probably best known for the little guard that sits under the back of the saddle to stop spray from wetting your bum, and they are very effective at this. They don’t stop you getting mud everywhere else than your bum but if your bum is comfy you are generally happy! Enough bottom talk though lets look at the Win wing. It is literally a thin flap of plastic that fits around a plastic hoop with a pin on the top. the flap has mounting holes drilled into it so you can adjust the angle of the Win Wing to suit your bike (not everyone’s seat stays are the same angle). The hoop fits to your bike’s seat stays with a very simple but tenacious zip-tie like clamp. The clamp once synched up doesn’t move at all and there’s lots of adjustment for the thinnest and fattest stays. The clamp can be mounted and removed in seconds enabling quick swaps between bikes making the guard very versatile. I popped min in the middle position and it’s been fine on 3 different bikes. Once set it doesn’t move. I would however protect your frame, I used some insulating tape, as if a tiny bit of grit gets under the clamp it may remove some paint.
So it fits great, isn’t big and ugly (in my opinion) is easy to mount on wet days and remove on dry rides but does it actually work? I thought the best way to prove this one way or the other was to mount my camera on my seat post looking back at the Win Wing and ride through quite a lot of mud. If the camera got really muddy then I’d say it was a fail, if the lens stayed relatively splatter free it would be a “WIN”
So here’s the video I uploaded to the UK Gravel Collective you tube channel (please like and subscribe)
As you can see from the video, my scepticism was misplaced. The area from the bottom of my seat post to a quarter of the way up my back stayed mud free, my back side was happy and my dropper post didn’t need a clean and rebuild after every gritty ride. Admittedly my legs still got splattered as you’d need a full coverage guard for that.
So, is the Win Wing well named? in my book yes, the fact it does keep the spray off your delicate bits (and my bottom), is super easy to fit and swap to other bikes, is very light weight, won’t clog in even the filthiest thickest mud (I’ve had 2.1″ MTB tyres under it with loads of room) and it’s not super expensive compared to full mudguards is enough for me to recommend it to anyone facing the conditions we ride in in the UK
Now Staffan, lets talk about a UK Gravel Collective Logo version!
You can find out more from the ASS-Savers website here (non affiliate link)
Tis the season in the UK where just about everywhere is under water, there will have been snow, snow melt and lots of rain, it’s winter after all. Those semi slick tyres that ruled the roost through the spring, summer and into autumn are just not up to the task now and in certain conditions are actually deadly. So what are the best tyres for this time of the year?
Pirelli has one of those fast summer tyres in it’s range called the RC, it also has the Cinturato M (tested here) which is a great all rounder but the winter trails need something more specialised to cope with the conditions. Pirelli have come up with the Cinturato Gravel “S” with the S standing for soft conditions.
On test are the standard black wall version in 700x40mm. They popped onto the 25mm (internal) rims I use with ease, in fact just with a track pump. Your experience may differ as there are a lot of variables at work when seating tyres but in this instance the tyres have stayed on the rim what ever pressure I’ve pumped them up or let them down to. The tyres come with what Pirelli call “techwall” which gives a little more puncture/tear resistance and to date, despite a lot of blackthorn hedge cutting I’ve not noticed any damage or sealant escaping.
The tyre centre tread has some wide spaced knobs that are siped to help spread the rubber as it bites into the soft ground, the shoulder knobs are about twice the height of the centre ones and also siped (almost split)
Riding on these tyres my first thought was that they would not be a great rolling tyre on tarmac given the spaced knobs, but I have to say I was pleasantly surprised how well they do roll. Not as fast as a semi slick of course but the penalty for off road grip is low and they bowl along quite happily. This may be down to the 40mm width, they are available in 45 and 50mm too which may give more rolling resistance but offer more cushioning. that said, the tyres run at around 32psi front and 35psi rear never felt uncomfortable on bumpy ground.
As you’d expect, where they do come into their own is in the very soft mud. the knobs cut in and find grip like no other gravel tyre I’ve tried, the relative narrowness may help here too as the tyres cut through the sloppy stuff to find firmer ground beneath. Traction is great and if you can pedal you’ll keep moving forward in all but the slimiest mud. Off camber trail riding and cornering are equally as good giving you confidence to lean the bike further and carry speed through the turns. This comes without the twitchiness on tarmac turns you might find with similar tall knob shouldered tyres.
This tyre is pitched as a soft condition specialist and it is, but I think it’s much more of an all rounder than that. if you are not racing and just want a do it all tyre I’d definitely look at the Cinturato S with perhaps a switch to a wider version for the harder ground in the drier months.
I’ve been using this tyre for around 2.5 months through the worst of the UK weather both on and off road and I can detect no discernable wear yet on the tread, so far so good there but of course I can’t comment on anything longer than that.
I know I’m going to have real angst when it comes to swapping these tyres for a different review set as they’ve been so good, unless those replacements are a tan wall set of the same model which may already be in my shopping basket!
the latest podcast episode is now live, I chat with Hannah Dobson, managing Editor of one of the UK (if not the worlds) premier cycling magazines and website www.singletrackworld.com We chat about how she came to be in charge of the content of an award winning bike publication, how she got into cycling, being female in the bike industry, the bike she’d ride if she couldn’t ride any other (this may surprise you), her unusual riding clothing choices and how to attract more people to our favourite pastime.