I’ve always lusted over the Smith (usually known as Smith Optics) helmet range as I really like the styling. Well known in the Ski/Snowboard scene for their helmets and sunglasses would they transfer to bicycle riding or be all style and no substance? Luckily the people at Smith UK sent me a helmet to try out, I guess they are confident in their own product so that’s a good start!
The helmet on the outside looks like the standard hard shell with an expanded foam interior but look more closely and you can see what look like straws on end through the vents. This is a material call Koroyd which gives and extra level of protection while not stopping airflow. Smith has been using this material in their helmets for a while. The helmet also comes equipped with the M.I.P.S. system which claims to reduce rotational forces caused by angled impacts to the head (details on the science of the system can be found here).
The helmet has an internal plastic cradle for fitting with a rotary knob at the back to fine tune the fit. I usually wear a medium helmet and the medium Network fitted well with plenty of adjustment to fit a cap underneath should you choose to. the helmet does come with a removeable fabric peak that velcros in round the brow. The straps have plenty of adjustment and are comfortable when riding.
I received the Nerwork Helmet at the beginning of March and so (it now being almost June) have had plenty of rides wearing it in all conditions, from hot sun, rain and even snow! My one fear about the helmet was the MIPS system, I’ve tried a lot of helmets with it but found most of them fitted with the system all creaked horribly, even some when just moving your jaw to eat and drink. The Network though didn’t in normal use. If you take it off and twist the cradle with force it will creak slightly but that never happens while riding so that made me very happy, I’ve given away other noisy helmets after one ride because of it as it really irritates me…can you tell?
In fact once it’s on your head you forget it’s there, usually there’s an adjustment period while you get used to a new lid but the Network was fine out of the box. As you’d expect the helmet works perfectly with Smith sunglasses (separate review coming) but I found they work equally as well with other brand glasses too. Theres even a suglasses port at the front for those relaxed pro rider moments! The helmet isn’t especially super light but it’s also not exactly heavy either and for the price I think it’s pretty good. There’s also a bewildering range of colours too including some special editions. check out the Smith network range here
the Smith Network helmet is perfect for gravel as it has the extra level of protection for the thrills and spills of off road riding without it looking like a full on MTB helmet. It will also not look out of place on your local road club run either. I’d definitely have another one, I’m just terrible at choosing colours!
I recently visited Chris Yeomans at Smithy Frame Works HQ in Wales to record a podcast (listen here) about the history of Smithy frameworks and what to expect when asking for a frame to be built. In order to experience the process Chris asked if he could measure me and build a bike that I would like to ride. This would also give Chris more experience in building off road drop bar bikes. Chris has years of experience building MTB and flat bar gravel bikes but wanted to perfect the dimensions and angles needed for a drop bar bike. I could hardly refuse this opportunity so we sat down and I played the customer in a sort of role play (funny how i hate role play when it is in a training session at work but not when it’s about a new bike!) over tea and biscuits in Chris’s house.
We discussed what I was looking for in a bike, how I wanted it to feel, did I want a racy position or a more upright comfy all day riding bike. What was I going to do with the bike, did I need lots of mounting points for bags and bottle, rack and mudguard mounts, how big a tyre did I think I’d want to run in the frame etc etc.
Buying a bespoke bike is a lot of fun, you can literally have anything you want, you are not tied down to what a designer has added to the bike like you would have to when buying an off the shelf, mainstream brand. Obviously if you come up with the idea you want two wheels on the back and one on the front with a lorry steering wheel then Chris may point out the problems with that, although I’m sure he’d love to build something like that. So, you don’t have to be a designer yourself, just have an idea of how you want the bike to ride and what you’re going to use it for, Chris will do the rest.
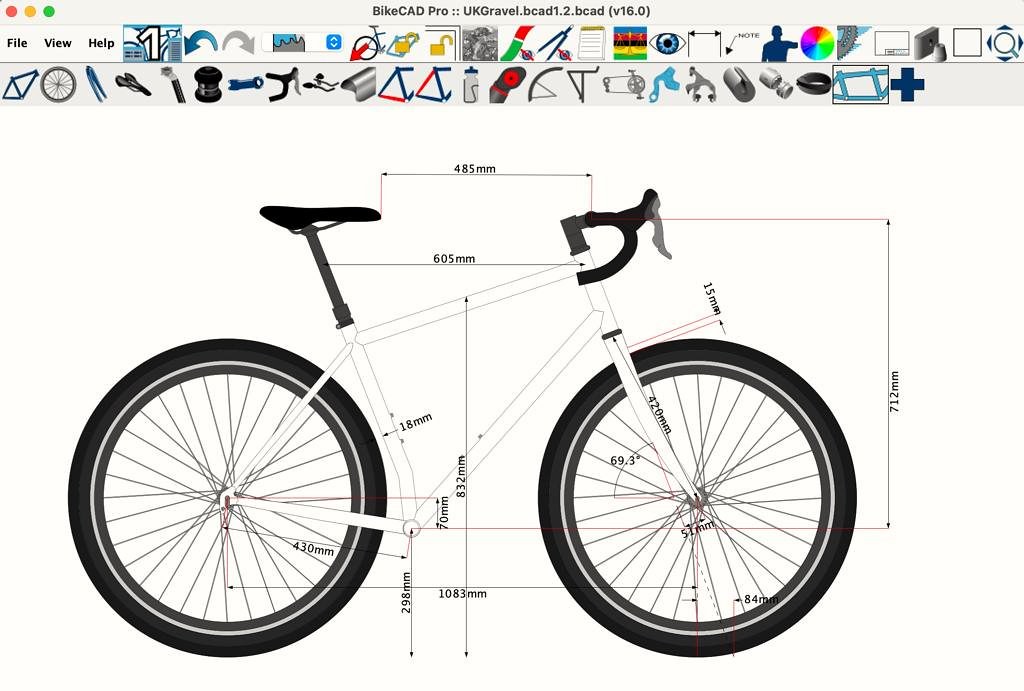
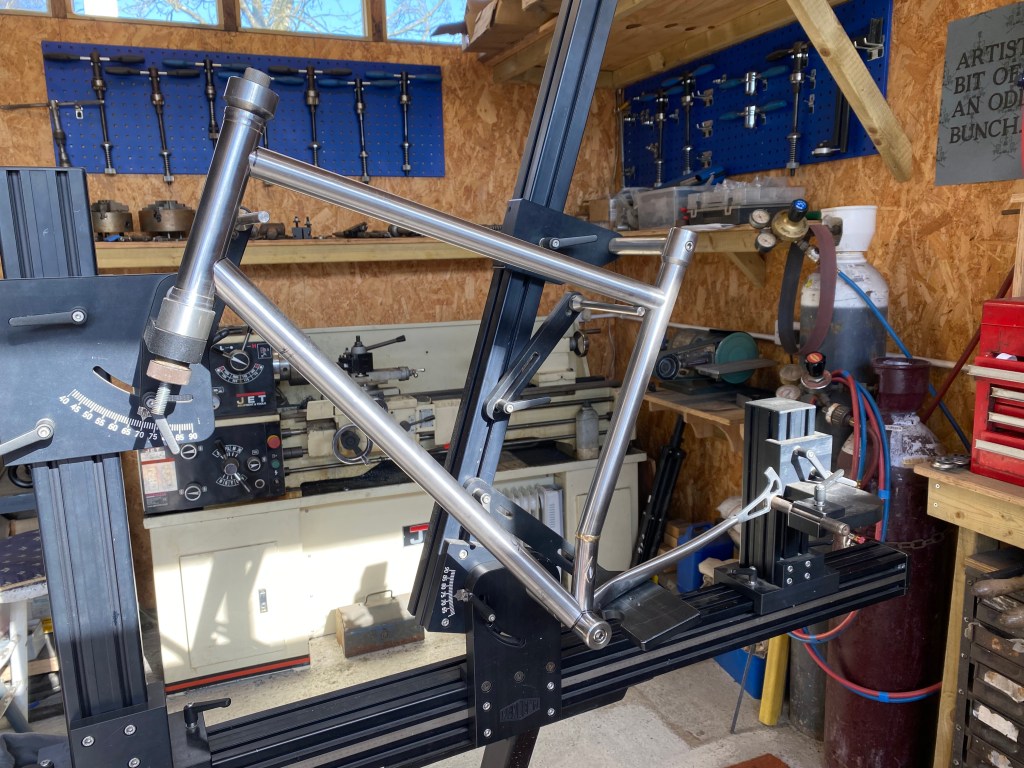
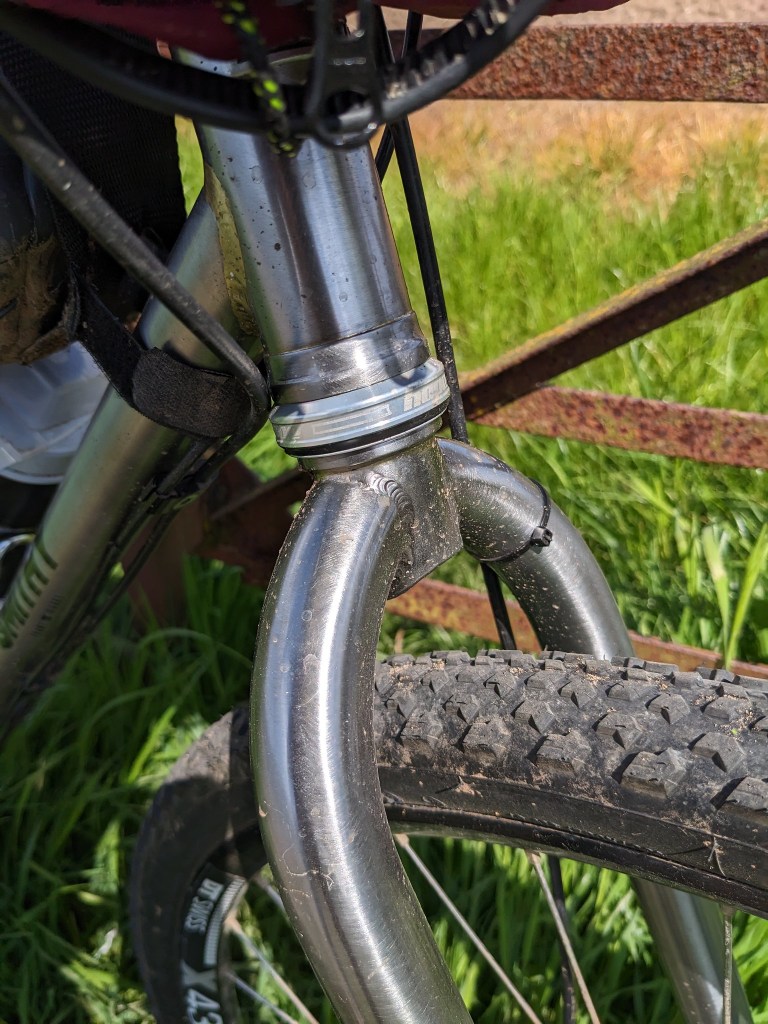
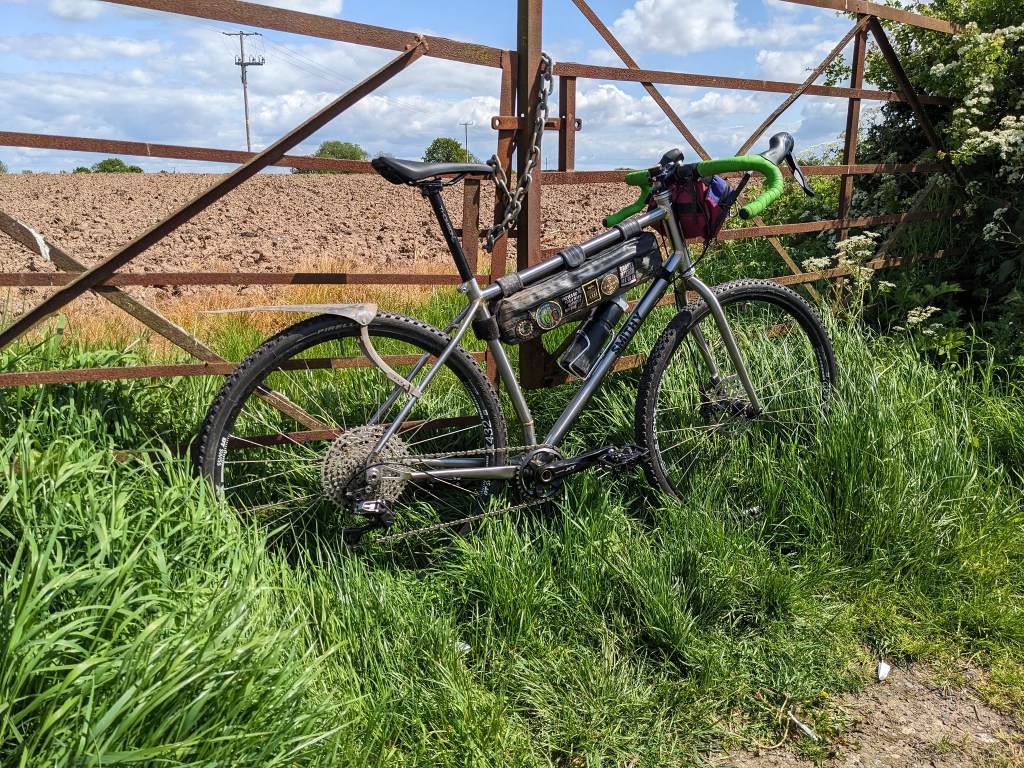
So I chose a gravel/adventure frame with room for 50mm tyres on a 700c rim in a fairly upright but still sprightly geometry. the frame would leave room for a frame bag and bottles but still be able to accommodate a dropper post if i fitted one. I wanted external cabling for ease of maintenance and an external bottom bracket. Chris designed the frame on some software on his computer around my body measurements and after another tea and more biscuits we had come up with a schematic drawing, now the only thing left to do was build it!
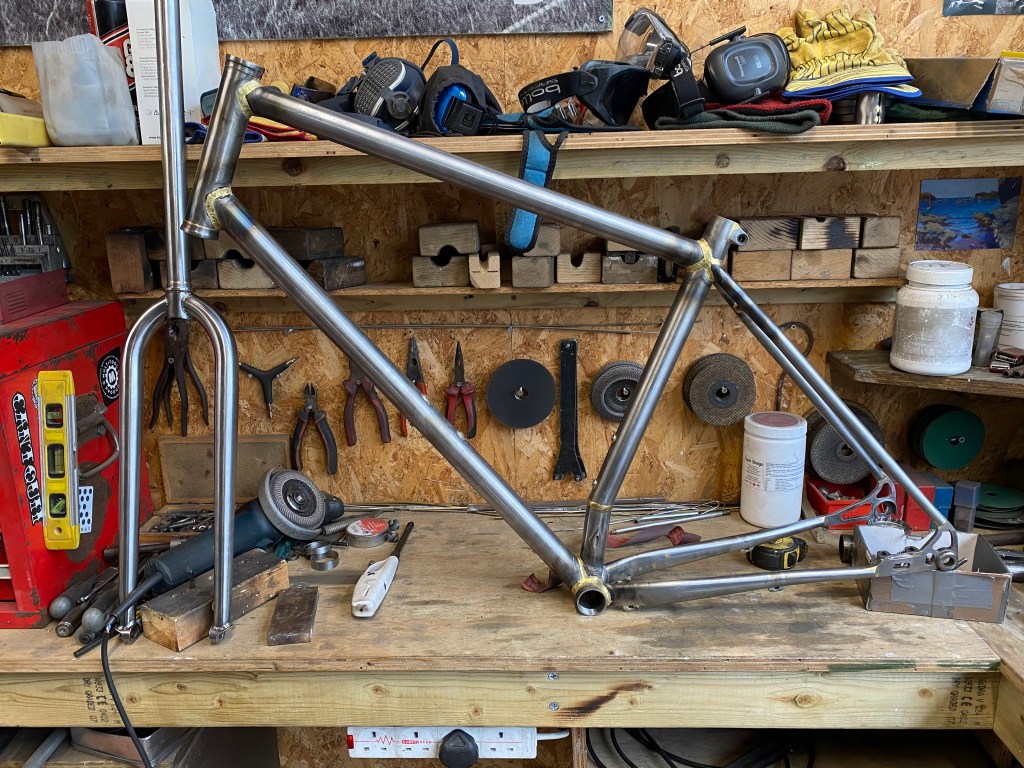
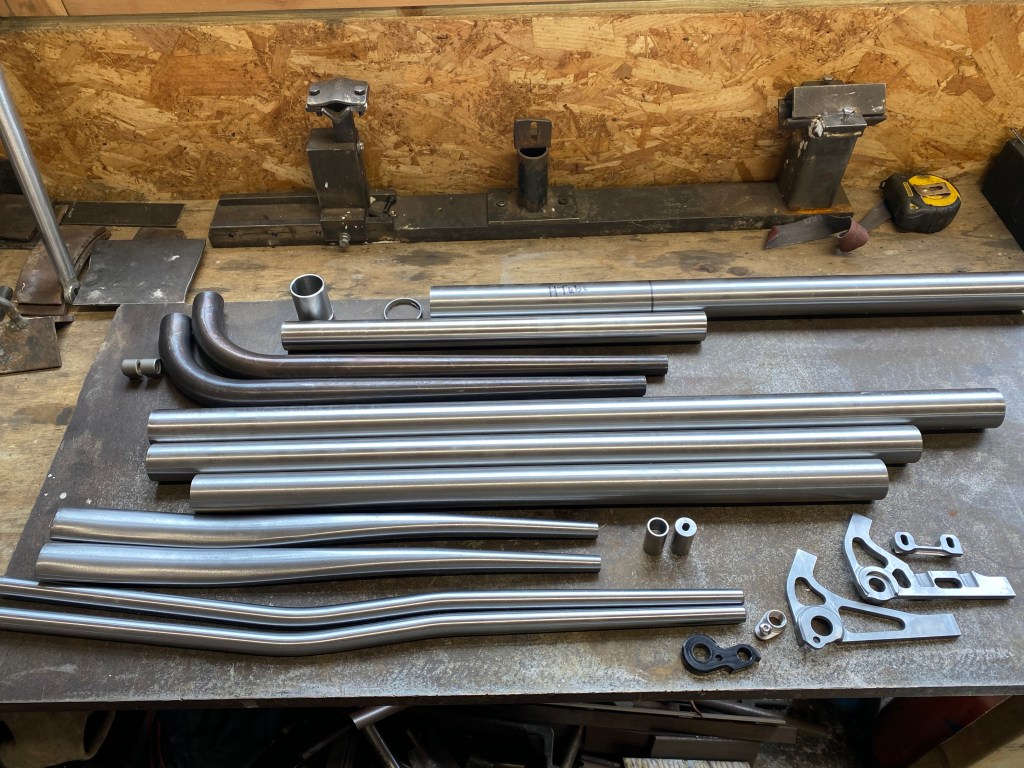
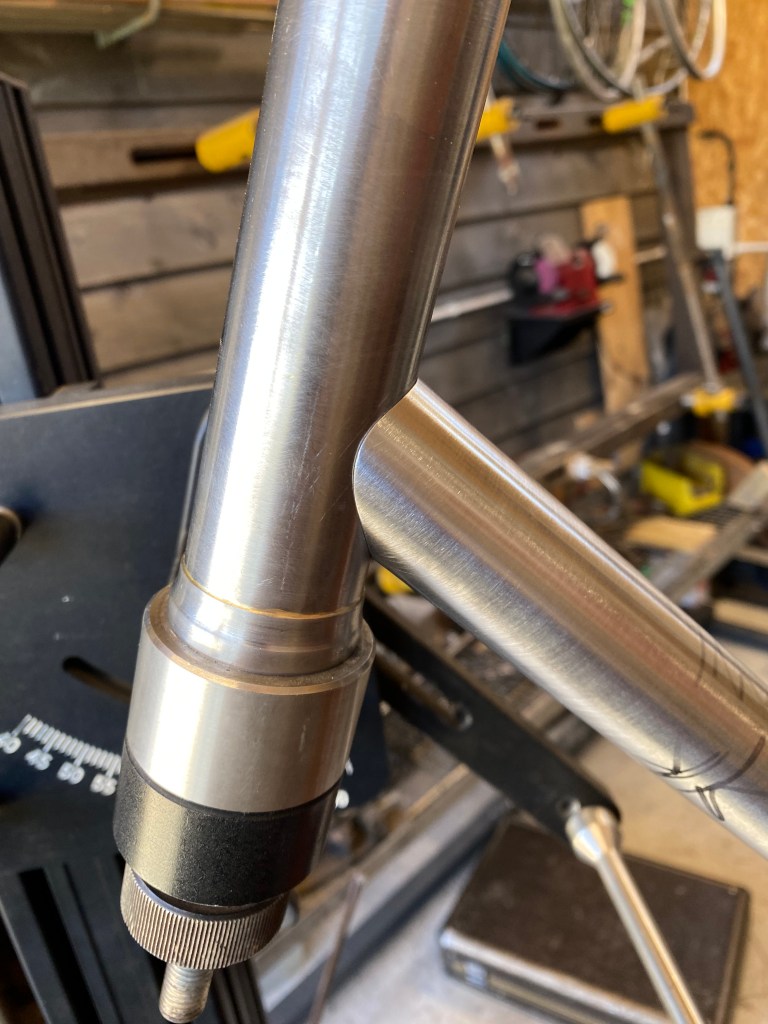
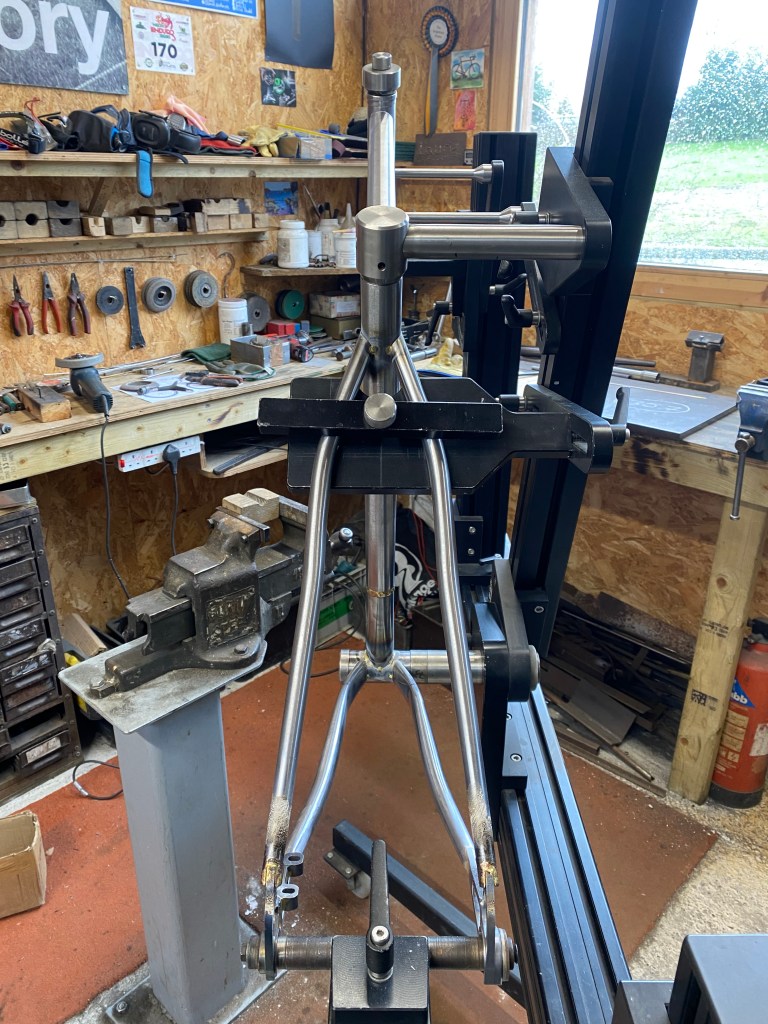
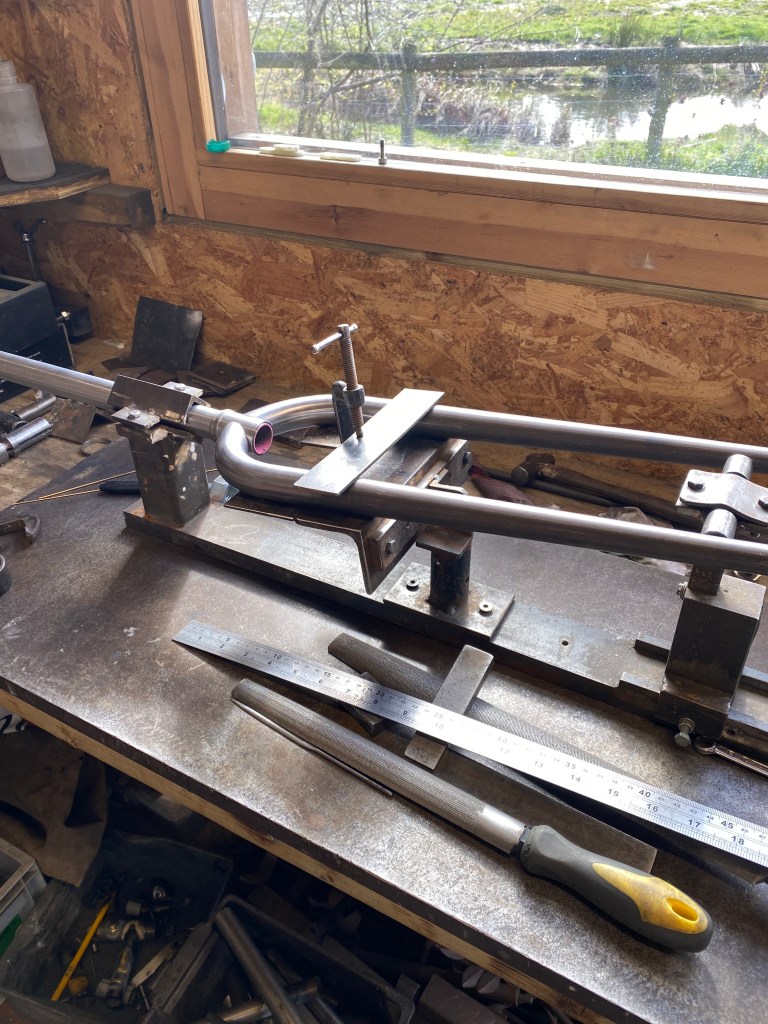
The build started from a set of carefully chosen tubes of steel that Chris than mitred, brazed and filed into a frameset and forks. I can’t believe how simple that sounds but this part of the process is where Chris’s skill comes in. To know how to manipulate those tubes, how to choose how they are butted (thicker internally on the ends where more strength is needed, more on this in the podcast) and then to braze them together has been honed over years of blacksmithing and frame building.
The whole process from start to finish took just over a week. This was because Chris had most of the tubing in stock apart from the flat mount bolt through rear dropouts. It was also quicker as we decided to just add a very light clear coat on the frame. We did this for two reasons. 1 – It shows of the braze-welds to good effect, and i think looks awesome! and 2 – This frame set will be for sale after the review and so the new owner can have the clear coat removed and paint it what ever colour they want. Chris has a great paint shop contact so he can arrange that too.
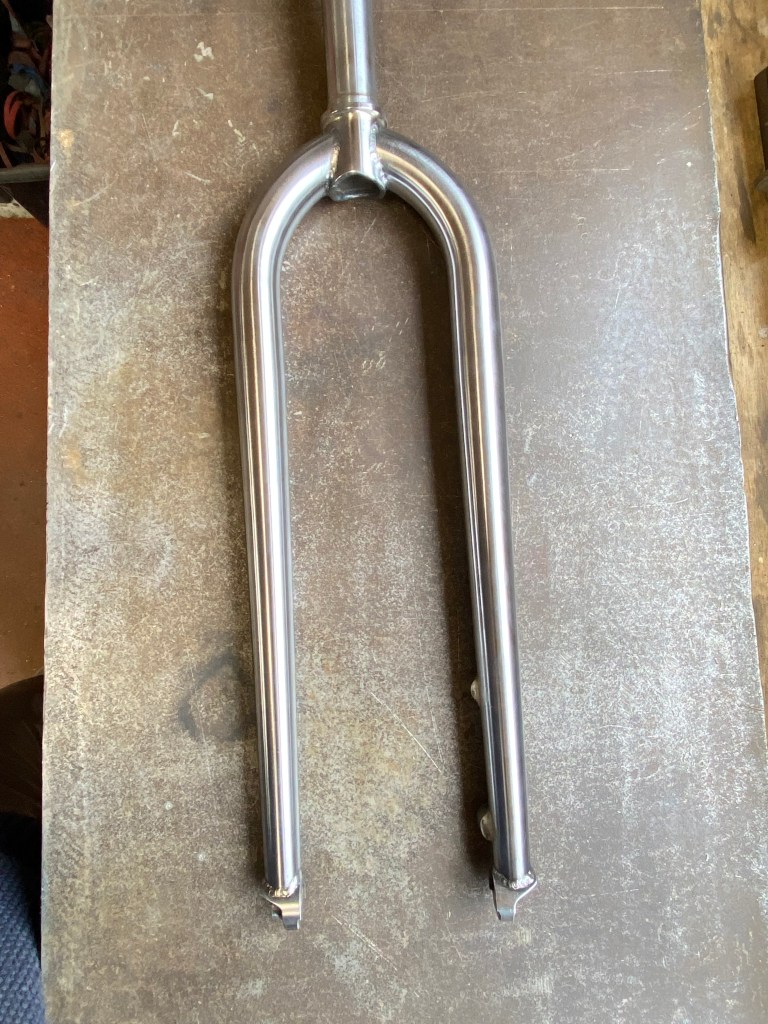
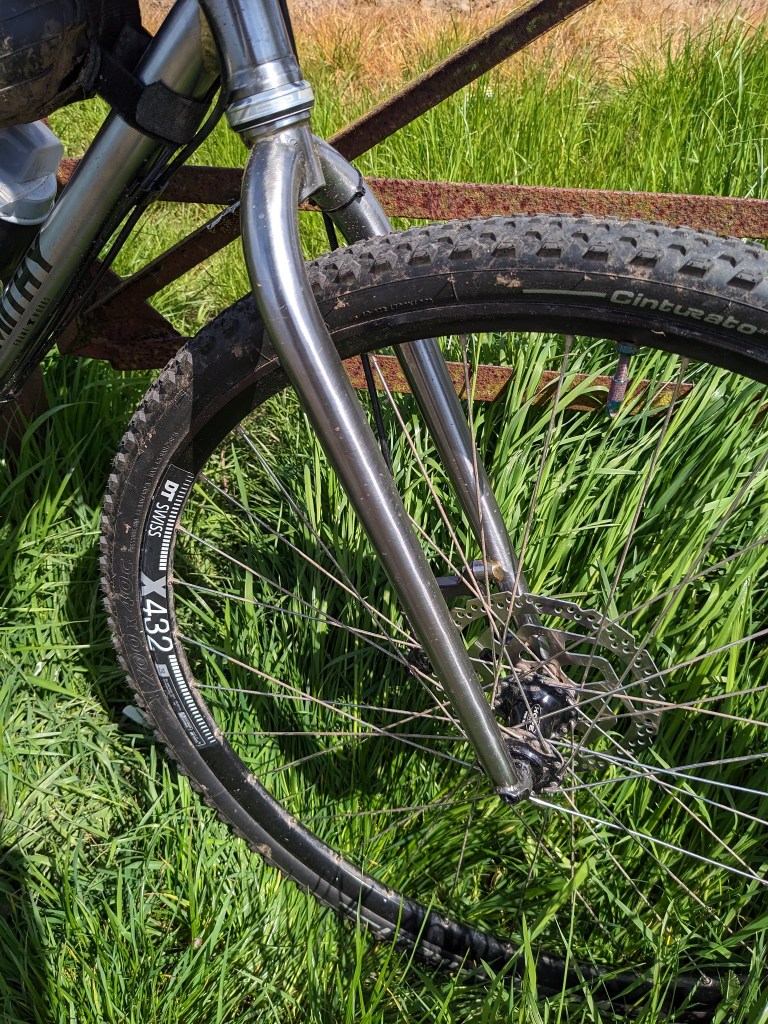
We could have done the easy thing and added a generic carbon fork but Chris wanted to build a fork in steel. Again, he’s done many MTB and road forks but wanted to do a gravel specific fork. We chose a unicrown design with bolt through drop outs
So the frame was built and I collected it and brought it home to build up and ride it to see if what we had created pedaled how we thought and hoped it might. I had to use parts that I already had, I’m not sponsored by anyone so can’t throw high end bits on this frame. i suspect this is the situation that the majority of you reading this are so I hope that it makes this review a more realistic one.
The tyres are quite narrow on this build, they are 40mm Pirelli cinturato S tyres. There’s a couple of reasons for me putting these on. The first is that if i’d put wide higher volume boots on I’d be experiencing the ride feel of the tyre rather than the frame. narrower tyres at a higher PSI for a time allowed me to see how the frame reacted to rough, stoney and rooty surfaces. Was it harsh and stiff or too flexy? The second is that despite the test period being the UK late spring, we have had a lot of rain and everywhere off road is really muddy, so those soft condition narrow tyres are a must if you want to pedal anywhere. The bottom bracket shell is a 73mm threaded one with an external BB. this was added to run a MTB chainset with a 34T ring. You could fit up to a 36T or maybe a 38T. this frame is pretty much single ring specific to allow the chainstays to curve out to fit a bigger tyre. This is the beauty of a bespoke frame though. if you wanted to run a triple chainset Chris will design the frame around that choice for you. I won’t go into the other parts as the review is about the frameset and the process of having a frame built for you. Please do watch the video below to get more info and insight into the reasons for the design.
Hopefully you’ve had chance to check out the above video where you can see the bike in action but if not here are my thoughts on it.
The design was meant to be a gravel/adventure cross over, biased more to off road than on and I think we achieved that. I don’t want to use the old cliché of “steel is real” but the frame does seem compliant in all the right places. It’s not a magic carpet ride by any means but riding the bike back to back with an aluminium framed bike you can definitely feel the difference. There’s no discernable sideway flex at the bottom bracket though so at no time do you feel all your effort is being lost, pedal turns go straight into forward motion. Riding to some trails on tarmac i was a little worried as the bike handled so well on that surface, turn into a curve at speed and the bike holds its line tenaciously even with the knobbly tyres on, I though maybe we’d got the geometry too biased to road riding. The first venture off road soon put those fears to the back of my mind though.
Over my local routes which are a mix of loam, polished pebbles and exposed roots and muddy single track the bike felt right at home. A good test is to find a section of trails and see if it’s possible to ride no-handed. The bike was stable enough to do this without me hand-hovering over the bars. the more distance I covered the more confident I became. Around here we tend to ride the MTB trails too and I was confident in the bikes ability to drop into some smooth descents, the dropper post will help a lot with this too. The dimensions felt spot on, the tall head tube meant I could ride on the drops comfortably for long periods and also gave me extra control on the rough stuff without feeling too upright.
The most surprising part for me was the fork, I’ve ridden a few steel MTB rigid forks and as they are usually longer length they are generally not too harsh (29″ suspension corrected forks). The Smithy FW fork is shorter and yet seemed to soak up all the chatter from the pebbles and roots. Look down when riding and you can see the very slight fore-aft flex that makes them feel so good. Climbing or sprinting though there’s no unwanted side to side movement. I think this explains the tarmac performance and the road holding in turns.
The one drawback usually with any steel frame is the weight, This frame weights a hair over 2.2kg for the frame. its by no means heavy compared to off the peg steel frames but compared to a carbon frame it does lose out. however this bike is not about being super light, this bike was designed to take you over all terrains in comfort, multiple mile rides where you get up the next day and do the same again, and again the next day. Load the bike up with bags and camping gear and it’s a nice smooth stable ride which means you’ll have energy to spare for pedalling rather than wrestling the bike to stay on track. This doesn’t mean boring though, throw off those bags and this bike will rag through your local single track leaving you giggling and wanting more.
if calling bikes ATBs (all terrain bicycle) was fashionable again then this frame would be definately in that genre.
On this frameset you probably won’t win the UCi Gravel worlds but you could ride it around the world!
The whole process from start to finish has been a joy, Chris has listened to what I wanted and added a few suggestions of his own, communication was regular about different aspects of the build. You could visit Chris in Wales and he’ll happily discuss your new frame while you are both out riding the fantastic trails he has right from his doorstep. After all the designing and hard work in his workshop Chris has come up with this great riding frame and fork.
Oh, and the name, as mentioned in the video above, the frame didn’t have a name when I picked it up and there have been quite a few ideas for it but in the end Chris came up with “Graean” which he tells me is Welsh for “gravel”
To be able to say a bike was specially made for you and you get to choose how it rides and how it looks is a truly great experience and I totally recommend you have a chat to Chris if you fancy something special.
I’ll come right out and say it, I really don’t like locking my bike up when it’s out of my eyesight. But, as I ride quite often solo and need to stop to refuel (read-eat cake) it’s sometimes unavoidable. I do choose venues that allow me to see the bike when it is leant up outside though.
My normal life job location means I can’t easily commute by bike so I don’t need a big lock to leave at work or in a bike shed and I certainly don’t want to haul a heavy lock around with me on pleasure rides so I take what I call a cafe lock.
My definition of a cafe lock is something that I can strap around the bike frame to an immovable object while I’m inside buying pastries (but can see the bike through the window). Which will stop the opportunist thief walking past and wheeling my bike away while I’m busy.
No lock is impregnable, given enough time anything can be grinded (ground?) snipped, levered or bolt cut and the two here on test are no different. What they will do, and it sounds harsh, is deter the thief who likes easy pickings to leave your bike alone and take one that isn’t locked up.
So the lock needs to be long enough to go through the frame but not be unwieldy, be light enough that you’ll actually take it with you and have an easy lock-unlock system.
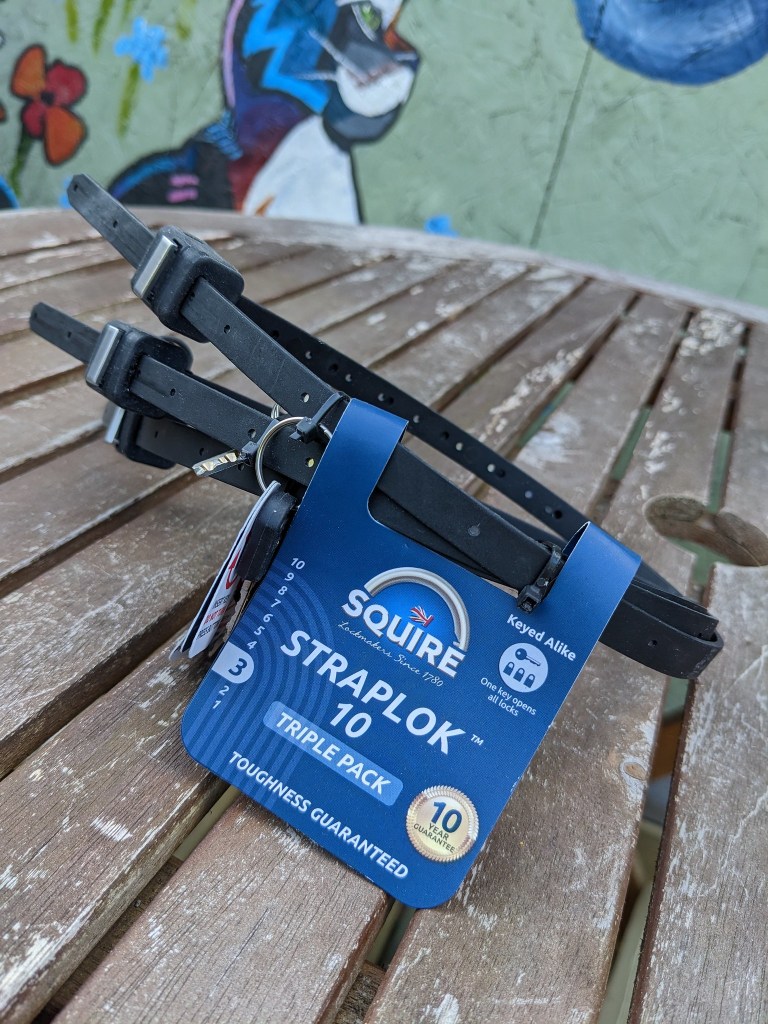
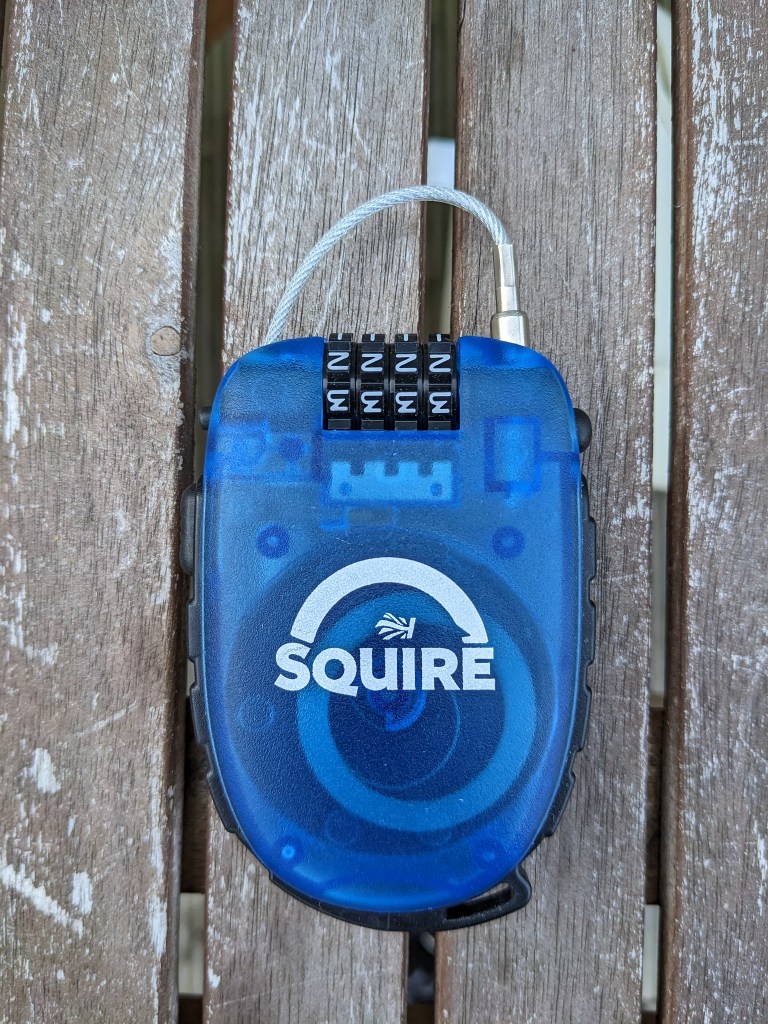
Straplok 10 fits all the wanted criteria and the set given to me comes as a three pack for £44.99 or singles at £16.99 so pretty good value. The length is 450mm so easy to lock a gravel or road bike to say some railings, even a standard mtb. Full suspension or Ebikes with much fatter frames or complicated designs might be more of a creative exercise.
Dimple Key Straplok 10Why wouldn’t you go in?
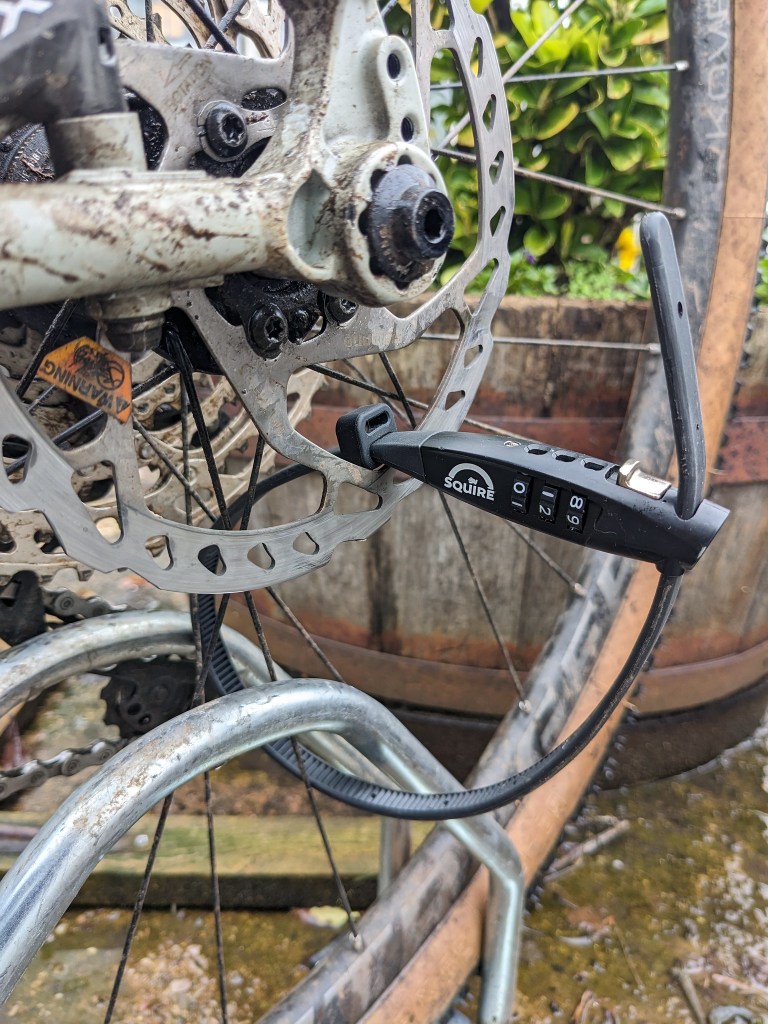
The lock comes with what Squire call a “dimple key” and this just needs to be inserted, not turned and then the sliver bar depressed to release the lock. the lock has a nylon/plastic covering over a 10mm stainless steel core so it shouldn’t do damage to your paint work. The lock is easy to pop in a bar bag or thread through some of the daisy chain webbing you get on bags these days. Pull the lock through tight and it’ll fit in a jersey pocket.
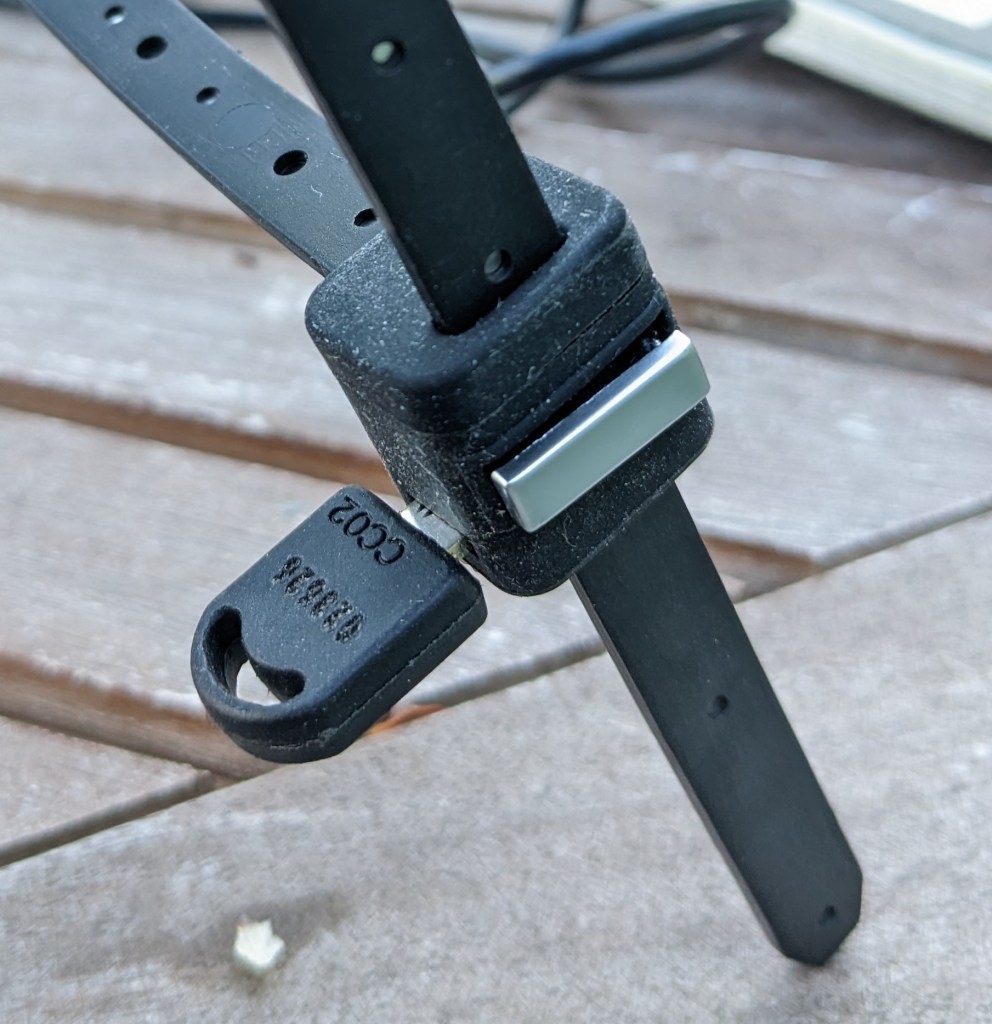
Straplok Combi 10 also fits all the criteria and comes as a single unit at £19.99. Again, length is 450mm with a plastic covered 10mm stainless steel core so all the comments about the key entry Straplok with regards to capacity and ease of carrying apply here too. Where the combi differs though, you probably guessed from the name, is that it has a combination lock. 3 digits on a rotating barrel lock and open it.
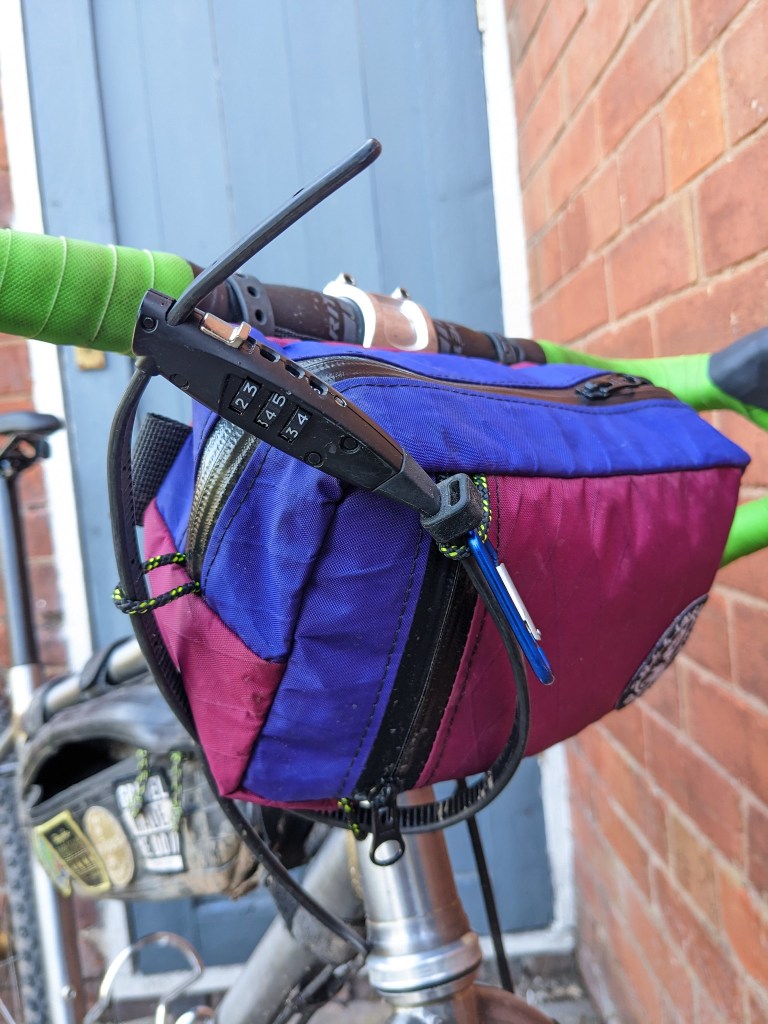
Straplok combi fits to bags easilySquire Straplok Combi 10 in action
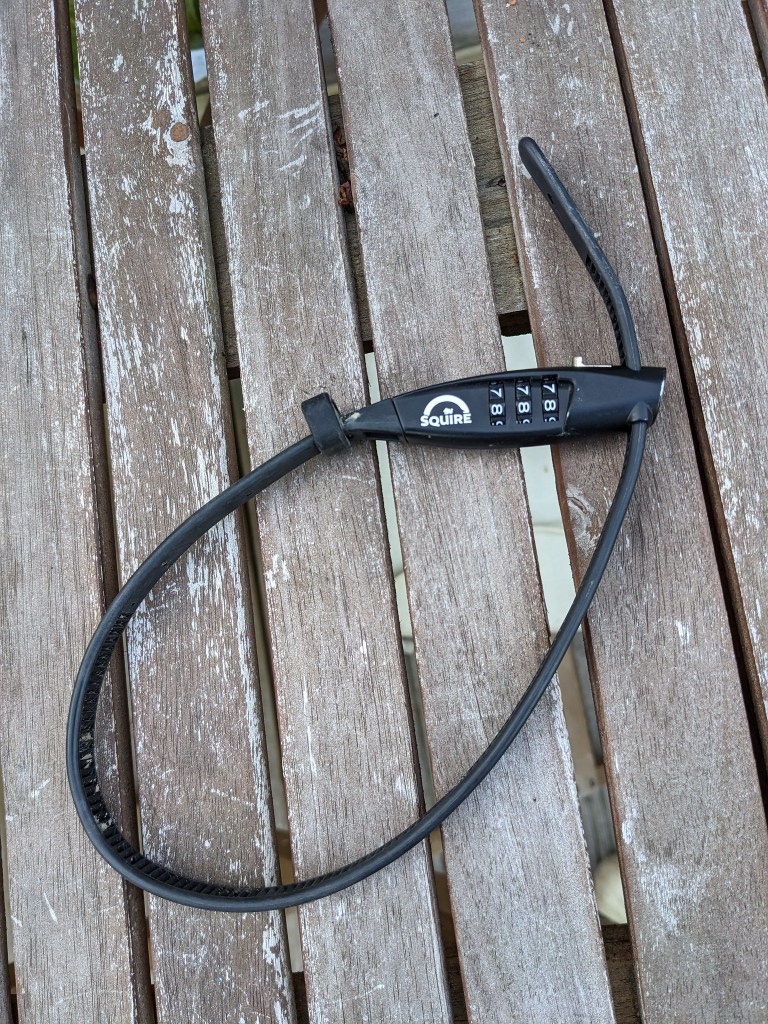
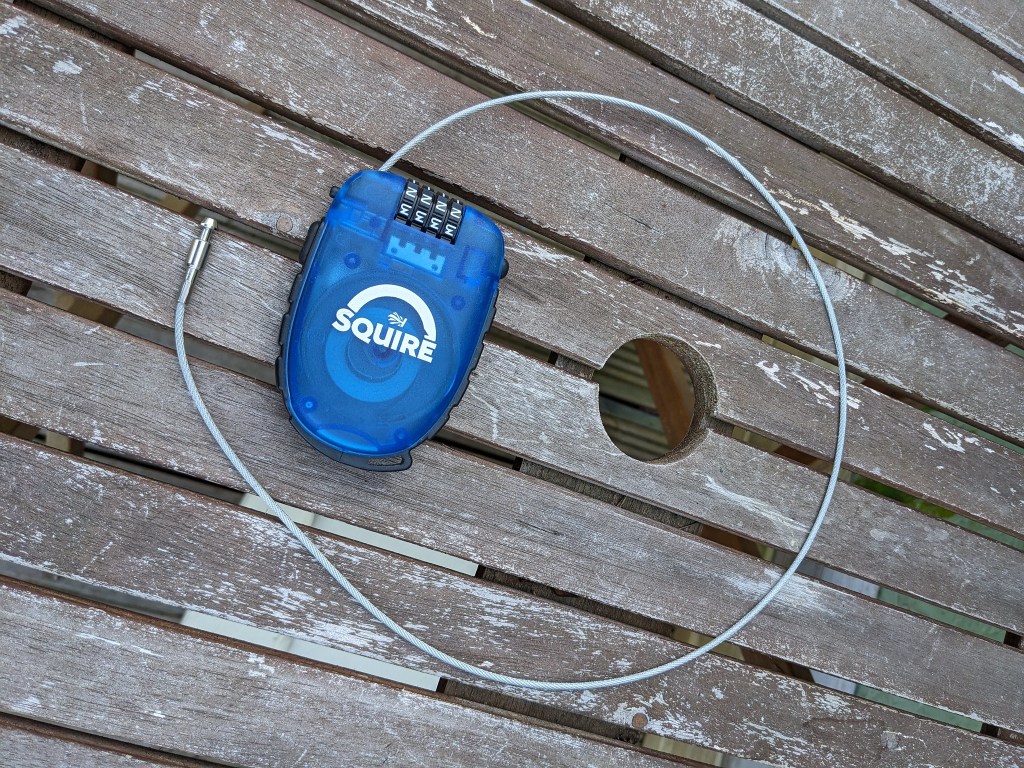
Retrac Max again meets all my needs and also has a combination, this time 4 barrels. It has a plastic case that houses 900mm of PVC coated steel cable. You pull out the cable and press the button on the side to retrac(t) it. The plastic feels brittle but has not cracked during the test period and I’ve dropped it on the floor a few times. It is small enough to easily fit in a pocket or bag and is less intrusive than the other two designs
All these locks will 100% do the job asked of it. it will be a very mild deterrent to the casual thief but no more than that. In my circumstances though, that is all i need.
Out of the two locks I much prefer the combi versions compared to the key operated lock for the simple reason I know I would definitely lose the keys! Both combi versions are much better as a take one thing solution to the problem. I like the simplicity of the strap combi to the blue plastic one though. The Retrac is clever with its one button reel-in feature but those inner workings put me off in the event of a jam or weather ingress (neither of which happened during the test I have to add) and to that end after the first few uses of the key entry lock and the Retrac I’ve used nothing but the Combi 10. It threads nicely through the cords on my bag or sits inside my other bag and is very simple to use which is good on a freezing day when hinger knock has struck and you don’t want to be messing about with keys etc. Think of it as a very big lockable cable tie and it gives me a little piece of mind while I choose the best cake to have, and that’s always the hardest thing on my rides!
I was very fortunate to meet up with the UK representative of Santini Cycling at a bike show earlier this year and we discussed if Santini would consider sending out some of their cycling kit for me to review. I’m very happy to say that Santini’s HQ in Bergamo came back to me with a resounding yes. It’s great to see that a premium brand is so confident in their product that they are willing to send out kit for an unpaid , unbiased review.
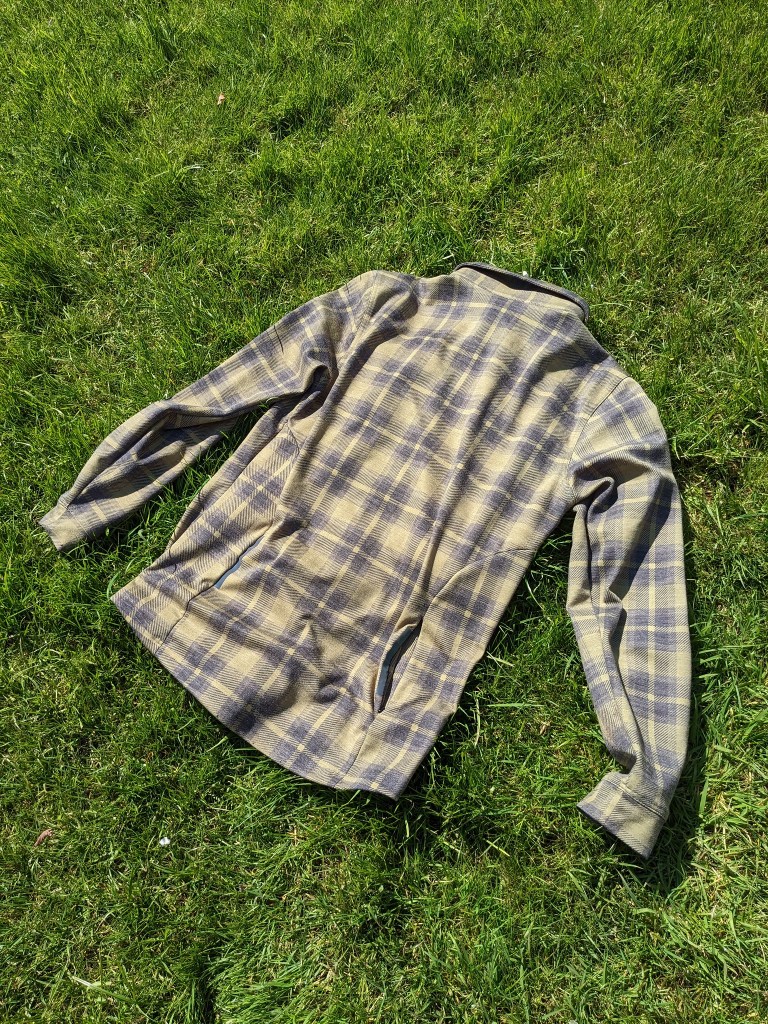
DYLAN – TECHNICAL SHIRT
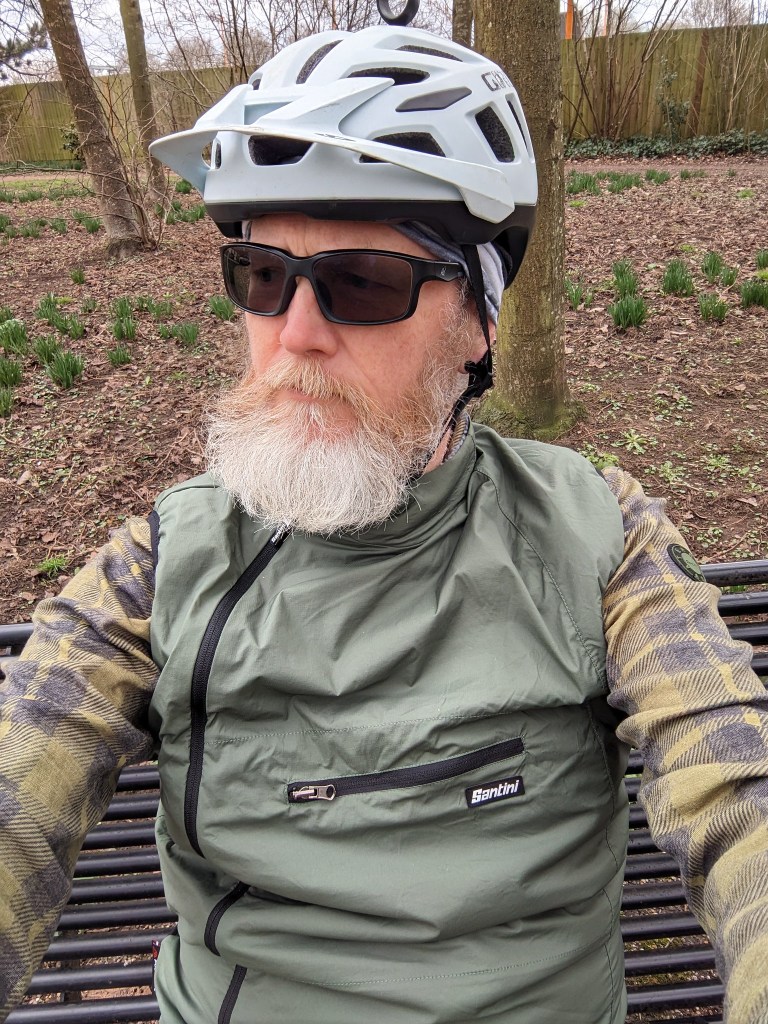
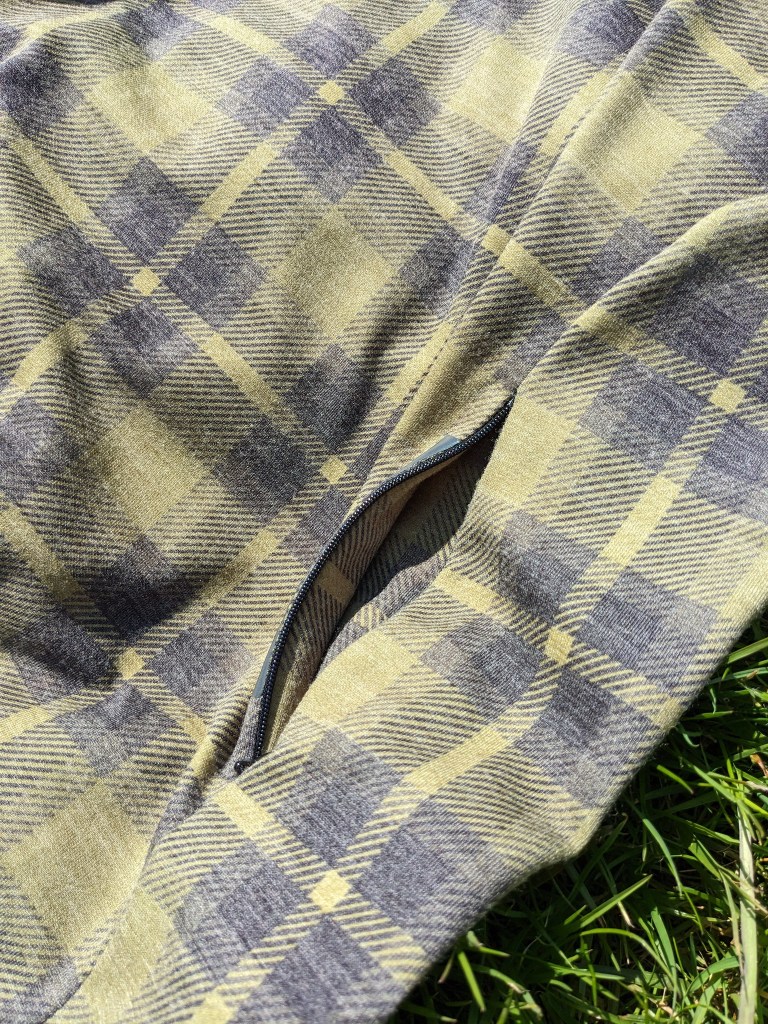
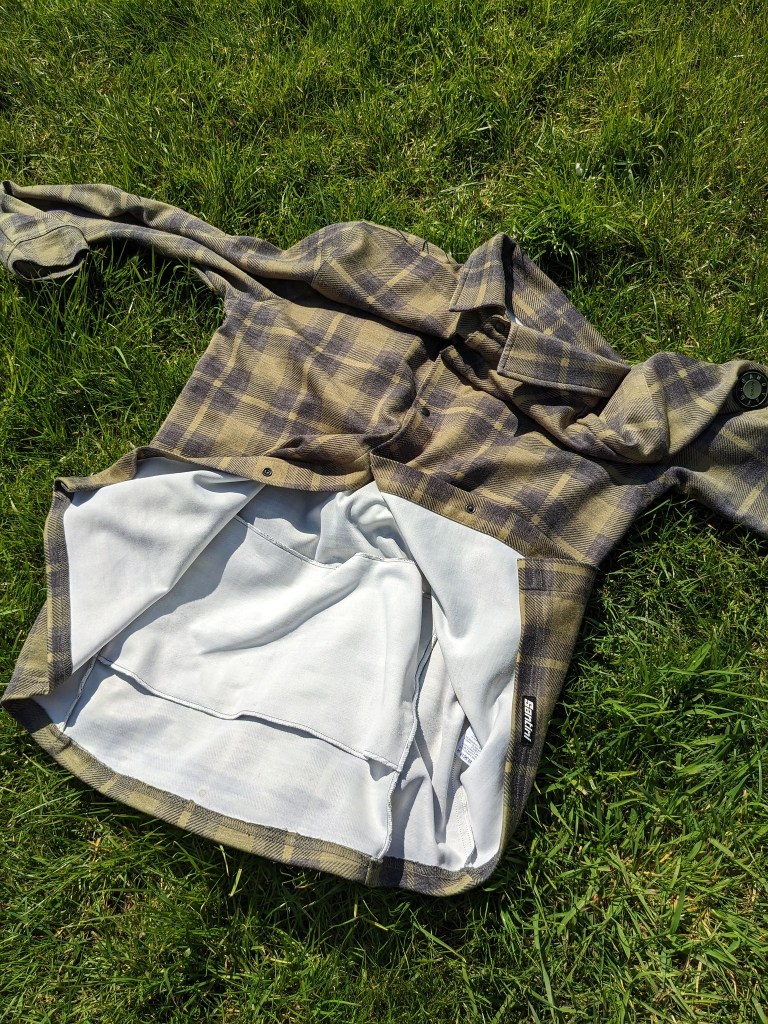
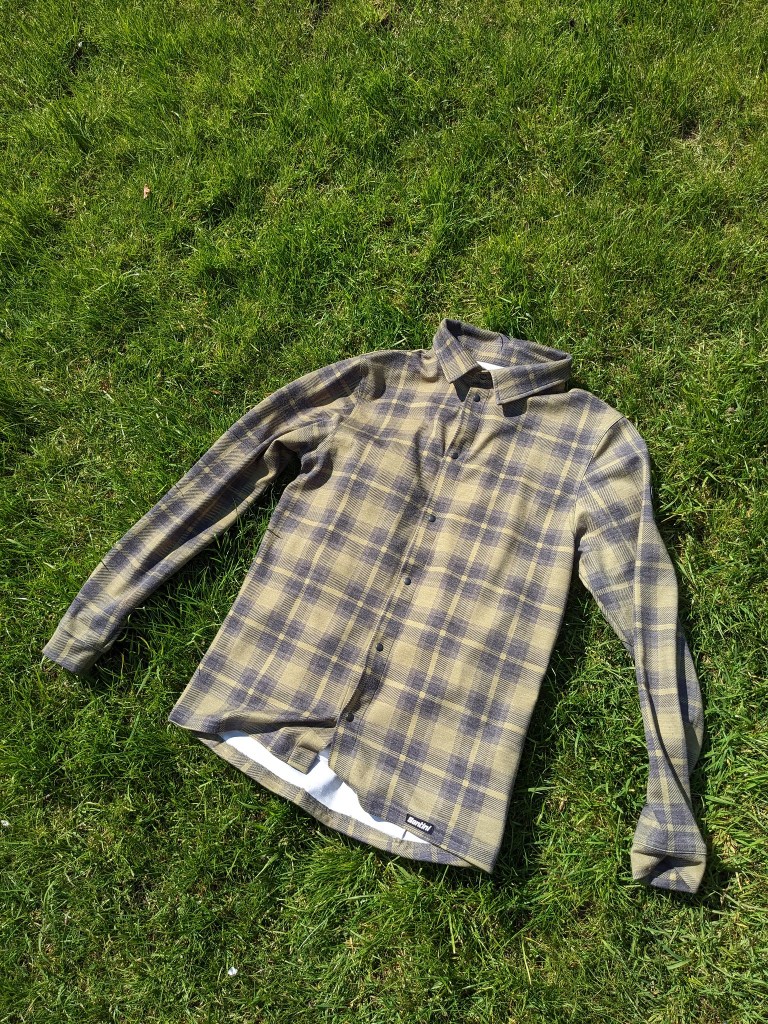
This shirt feels like a luxury item straight out of the package. Its wool blend feels super soft to the touch and the colour is bang on trend for the current gravel style. The fit is slightly fitted but not in any way “racing snake” so it looks good on ordinary people, it also does not scream “cyclist” and I’ve worn it to the pub and at work. The shirt has a lining that feels good against your skin, I have been wearing it with a thin base layer underneath as it doesn’t let any drafts through on cold days. On hotter days the press stud/poppers down the front are exactly what you need to ventilate easily with one hand if need be on a prolonged climb, much better than fiddly buttons. The one thing I’d like to see on this shirt are different cuffs. The cuffs here are just like a long sleeve jersey with no popper/ button so your only choice if you want to roll sleeves up is to just push them up rather that rolling and exposing more arm. There are no chest pockets but there is a zipped pocket at the rear which I found perfect for carrying my phone and a couple of times I’ve stashed a gilet in there in an emergency.
The Dylan shirt is a really great versatile garment that looks just as at home on and off the bike, at time of publishing this shirt retails at £160, not exactly cheap but the great feel, fit and the dual use it’s worth the outlay.
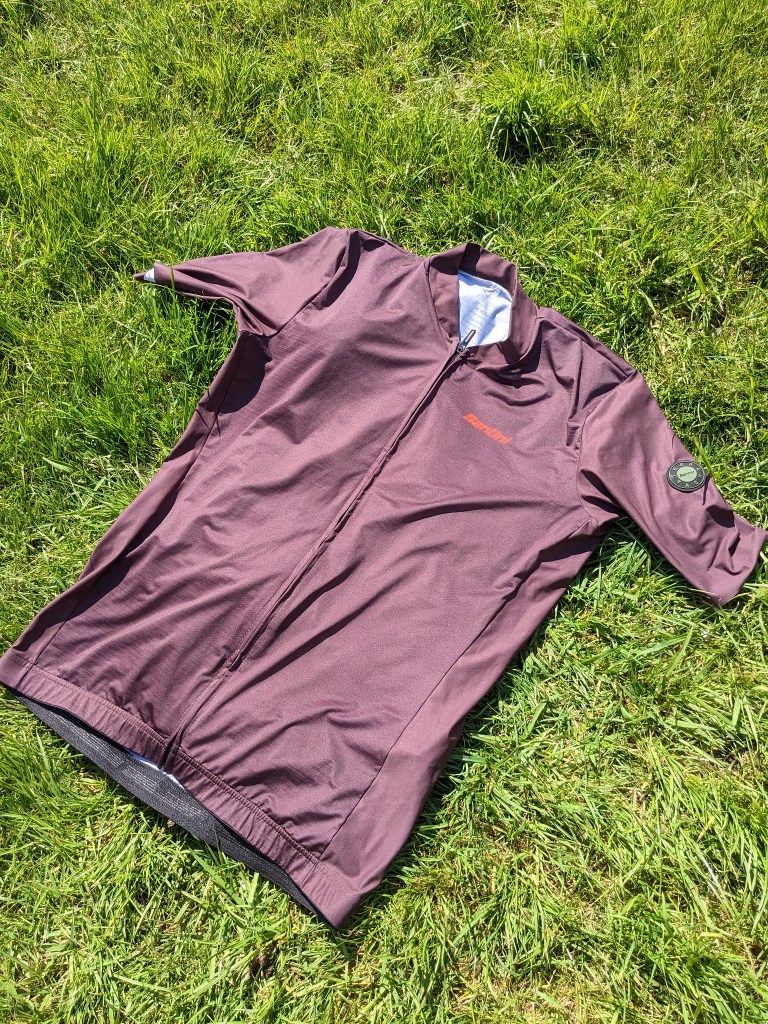
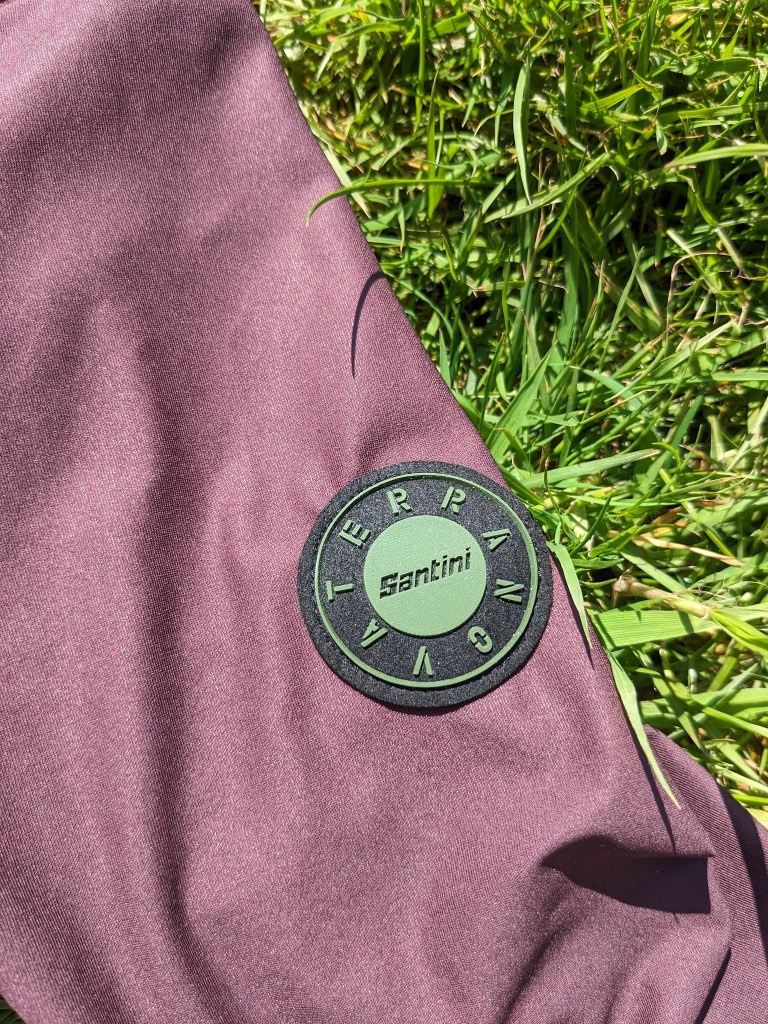
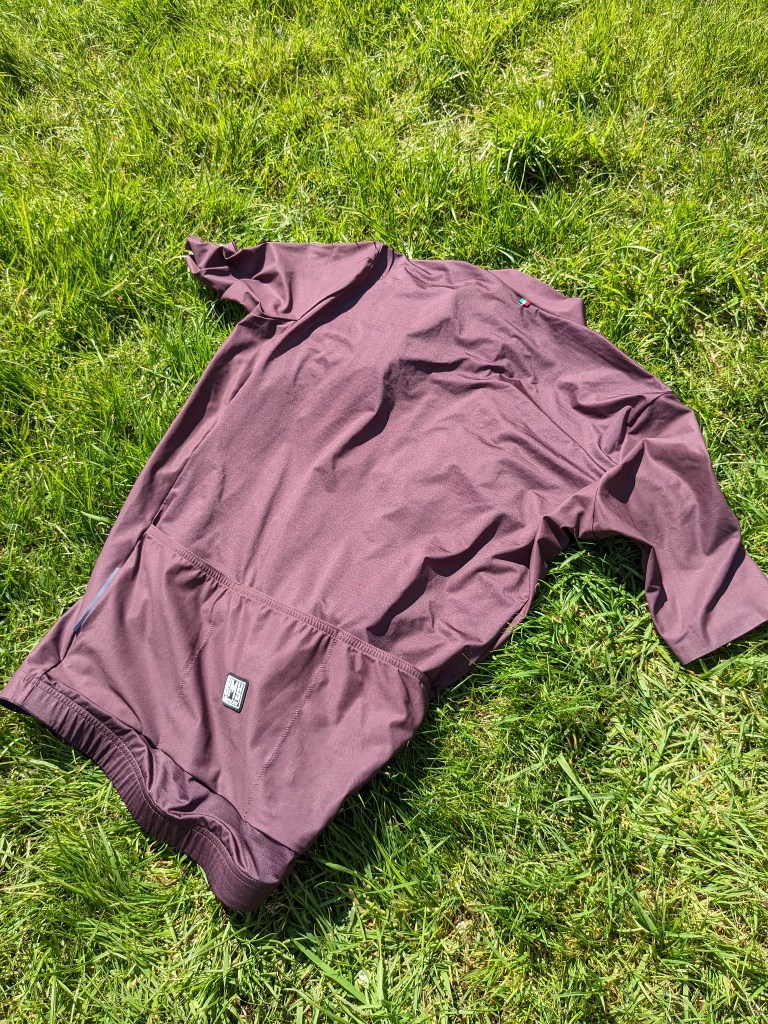
GLORY DAY – JERSEY
This jersey has a slim fit, so I sized up one size as I’m really not into marginal gains and full aero. if you are, then the sizing guide will be spot on. Going one size up gave me a comfortable but not flappy fit. The sleeves are what Santini call body fit and they are tight but not restrictive. The full length zip (which I think is a must on all jerseys) is great for venting on climbs and is much more elegant when getting dressed in company! I love the colour and the fact it has three useful and adequately deep pockets at the rear with reflective strips at each side.
Definitely a jersey for summer with a thin base layer underneath or spring/autumn with a gilet…..talking of which…
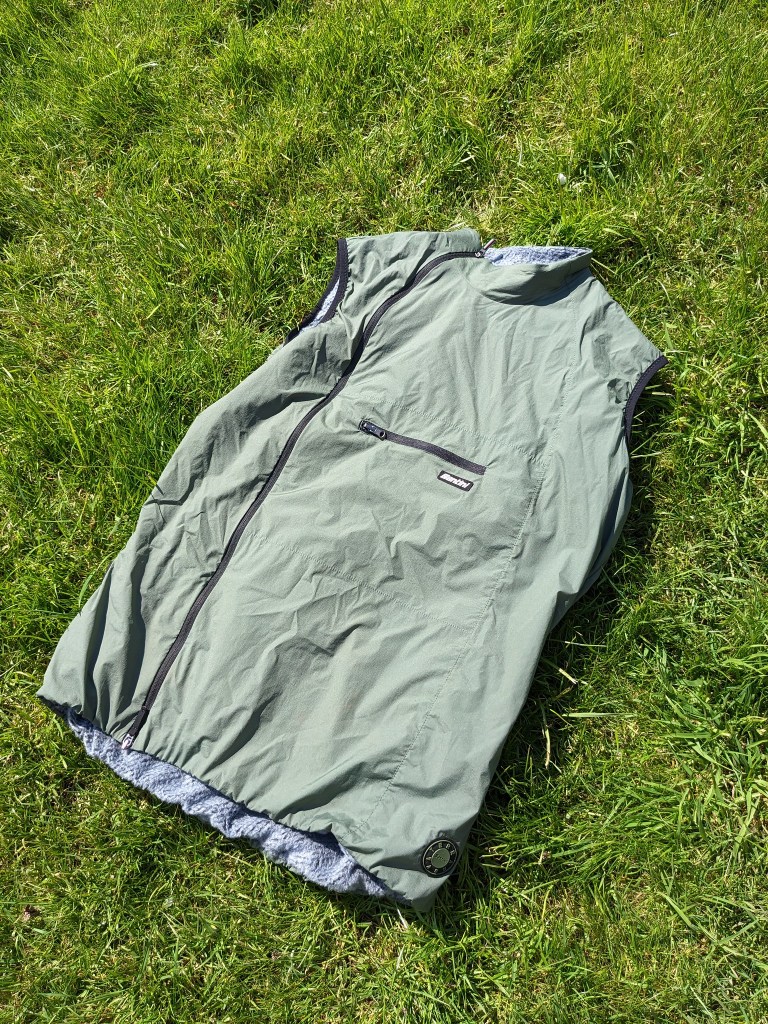
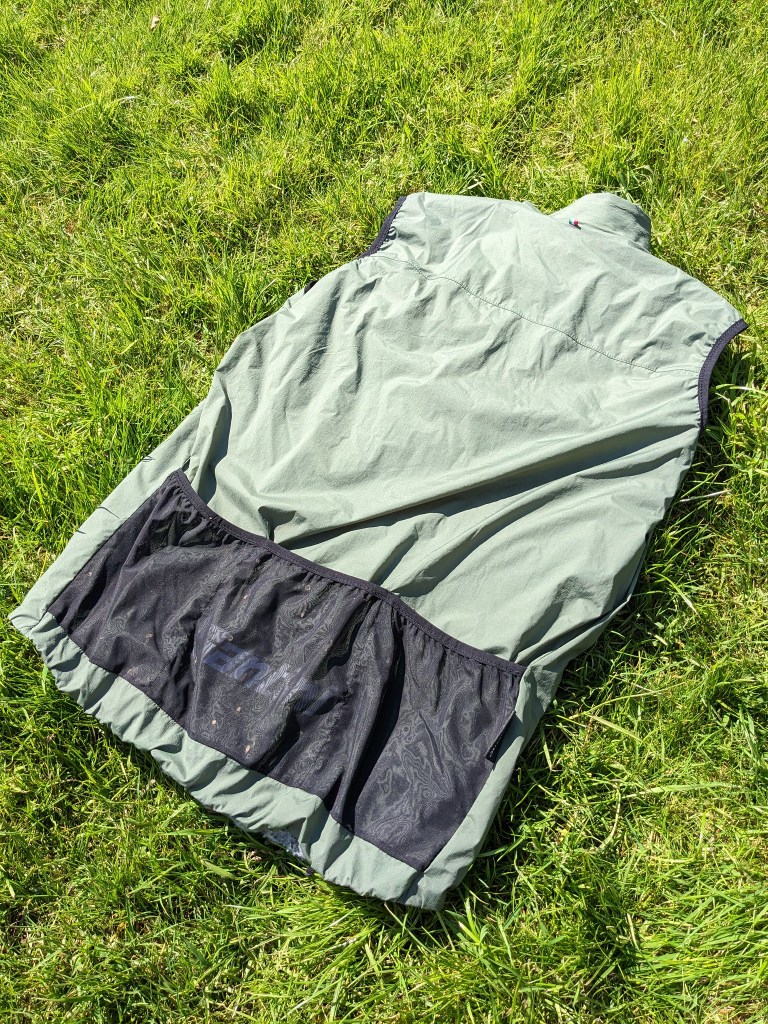
ALPHA PACK – VEST
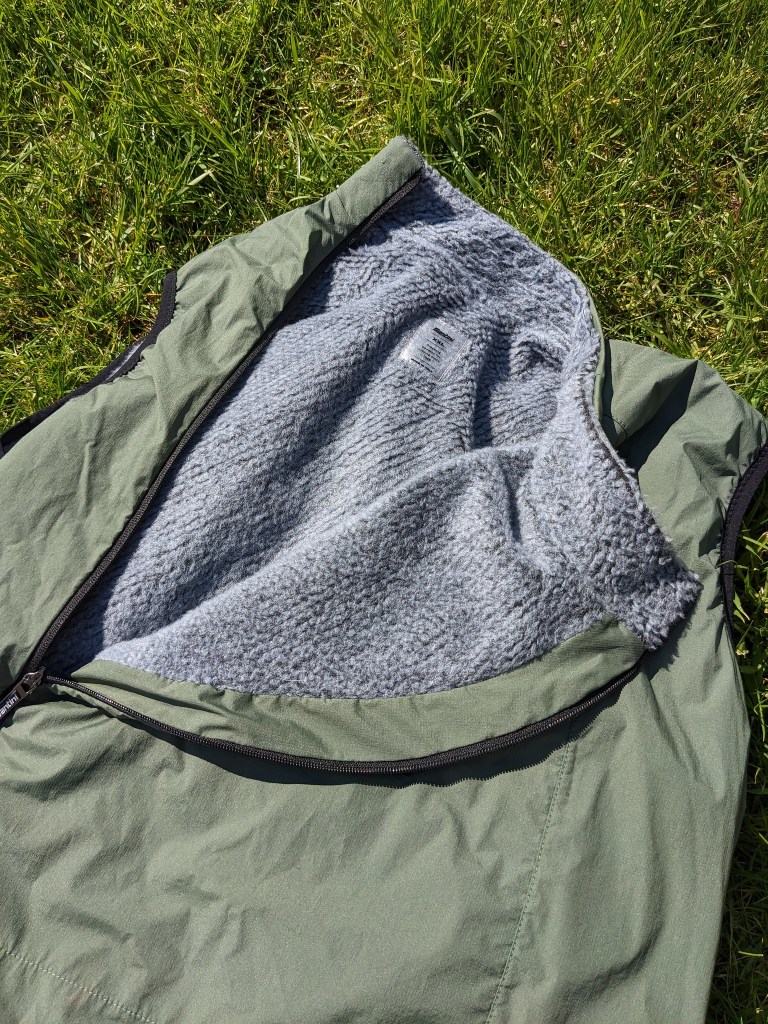
This one is a bit controversial really. As this review is coming out when the temperatures are getting warmer (hopefully) and this vest is really a colder month item so you’d think it wasn’t the best thing for Santini to send as the market for winter stuff is waning, but, this vest is so great styling wise I just really wanted to try it. It is lined with Polartec fabric which is very warm! The centre chest pocket has a zip closure and the whole vest can be folded into this pocket for compact storage. To accommodate this pocket the main zip is offset to the right hand side. There are three deep pockets at the rear and this is a great feature from Santini, too many gilets these days have no pockets so if you need to stash something you have to go under your gilet to get to jersey pockets. No such problems here, the pockets are deep and useful and your phone , even the biggest smartphone will be swallowed up and wont fall out. Now the warmer days are here I’ve been using this vest on evening rides that start off warm but soon chill down, especially if there’s a pub stop! The styling is great, I really love the look of that central chest pocket but this pocket causes the one issue I have with the vest. if you need to vent heat on a climb and unzip, then you’ll have one large flap of vest one side and the remnants on the other and it makes the vest hang weirdly, which is accentuated if there’s weight in the rear pocket.
I can live with the zip position and I can say that this is my favourite of all the kit Santini sent out. There’s also a long sleeve version that would make a cracking winter jacket.
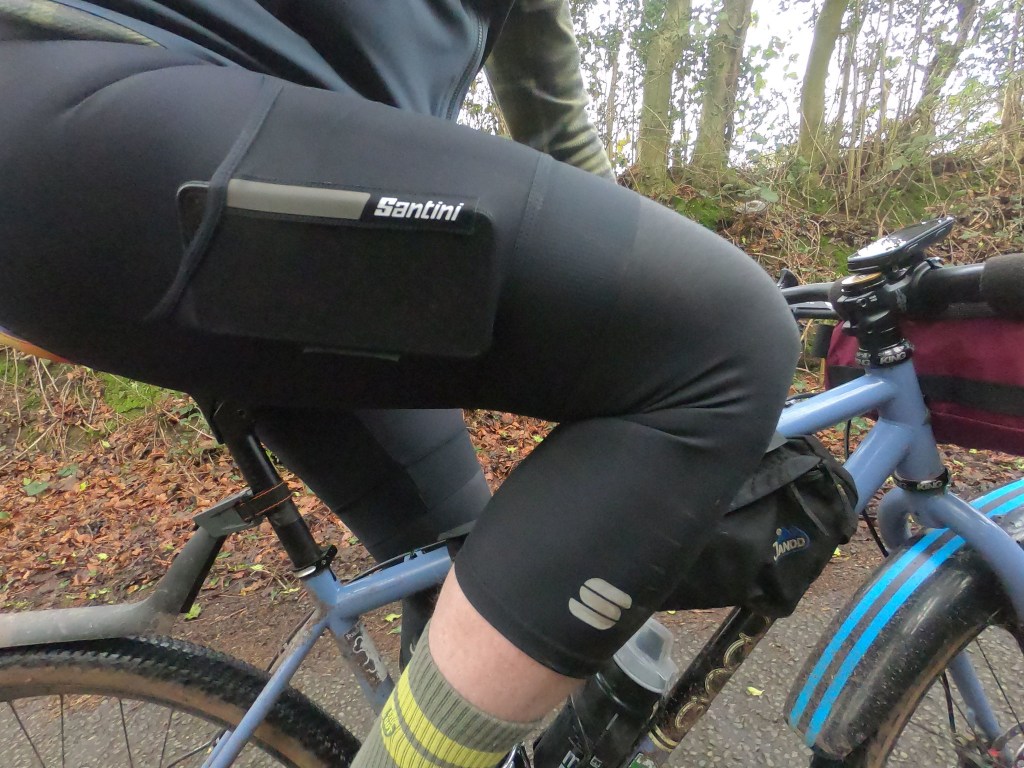
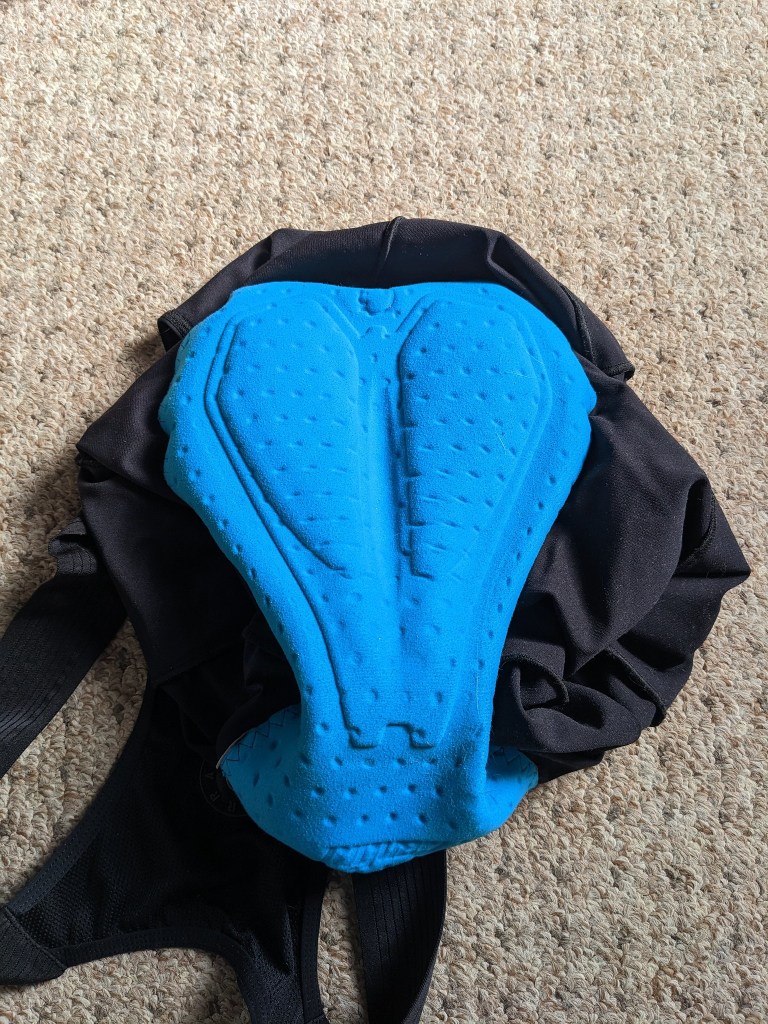
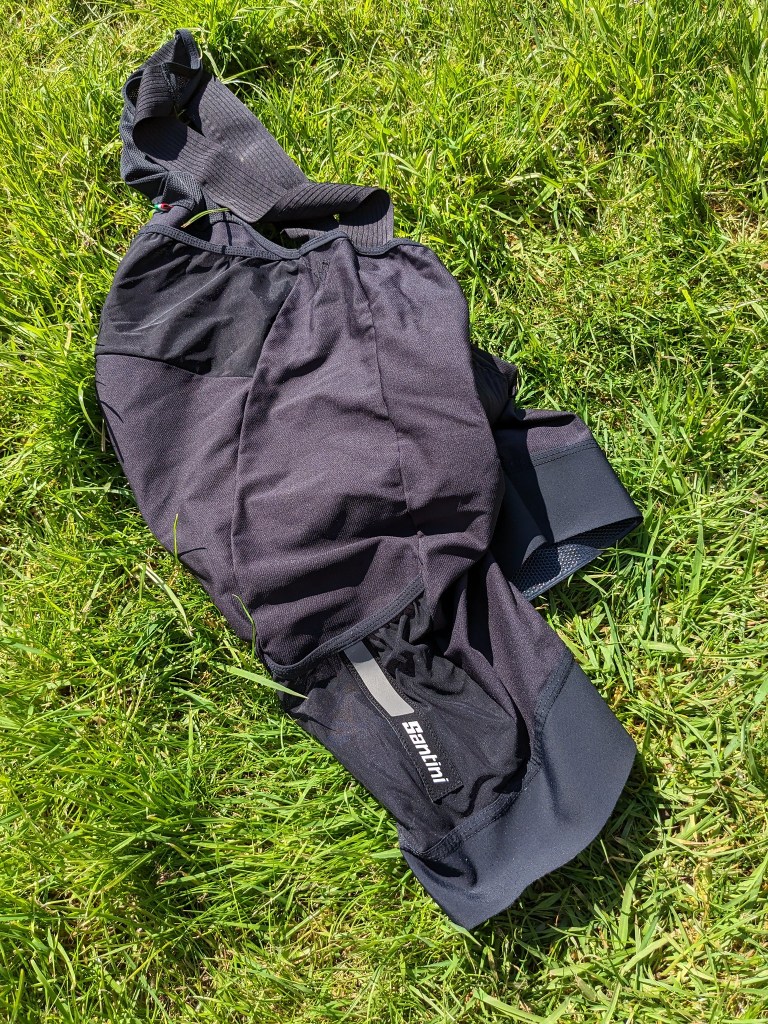
GRAVEL – BIB SHORTS
Santini’s Gravel Bib shorts feature what they call their C3 pad which has a gel structure. The short material is super soft against your skin and features breathable mesh on the back of the shoulder bibs, there are two thigh pockets and two pockets at the back, there are reflective strips on either leg.
Cycling shorts take a while to review, normally the first ride is inconclusive as you compare them to your favourite pair. Your favourite pair have been warn many times, washed many times and the pad has moulded to your sit bone and arse cheek shape whereas the new shorts normally are uncomfortable as they just aren’t worn in. it’s only right then to give them a series of short and long rides and many washes to be fair to them. One of my riding buddies asked how much they cost, and replied “they’d better be bloody good for that” when I said they retail at £160.
I say normally, and I really wanted to find something I didn’t like about these shorts to prove that expensive isn’t always better. In this case though you get what you pay for, first ride in these shorts I completely forgot that they hadn’t been worn before, they were that comfortable. The shoulder bibs are wide so they don’t dig in. The thigh pockets are deep enough to give you confidence nothing is going to fall out and the mild compression the shorts give supports your leg muscles. Each subsequent wash has only confirmed my initial impression, these shorts are worth the money.
Massive thanks to Santini Cycling and Santini UK for giving me the opportunity to try these garments out.